DIY: Demon Eye/Clear Lens Install
 06-07-2016, 04:00 AM
#1
Registered Member
Thread Starter

Demon Eye/Clear Lens Install
Hey guys,
A couples months ago I decided to open up my headlights and do a demon eye install. This mod runs a bluetooth controller from your battery, to a demon eye driver, and then to two small LEDs that are mounted inside of your projector bowls of your headlight. The LED shines into your projector bowl and emits a "demon eye" effect through your lenses.
To complete this mod you will need:
- Demon eye kit
- Clear lenses (Optional, but if you're in there already it's highly recommended to swap to clear lenses now)
- Oven
- Cookie Sheet
- Oven Mits
- Flathead screwdriver
- Long Phillips #2 screwdriver
- Pliers
- Phillips #2 socket bit
- High heat resistant JB weld
- Latex gloves
- Butyl glue (https://www.theretrofitsource.com/ac...l#.V1ZyZ5MrJ-U)
- Clamps (I used wood clamps and C clamps)
- Microfibre cloths
- Patience
The demon eye kit I used is from a company called Ess K Customs - I heard good things about these guys so I decided to give it a shot. One thing I really like about this kit is that it uses external drivers, meaning that if your demon eyes begin to have issues, it is often a driver issue, and the part can be replaced without having to open up your headlights again. I actually had the demon eye drivers crap out on me - the red lights weren't as bright - Ess K replaced the part for me at no charge and hassle free, very good customer service experience from these guys! As an added bonus the pricing is in CAD and theres free shipping, which was great for us fellow Canadians who are getting destroyed by this exchange rate.
Before you begin ripping apart your headlights it is a good idea to verify that your kit works. The Ess K kit comes with detailed instructions on how to wire everything to your car battery, and all the connectors and plug and play which is quite nice. Once you have wired it all up either use the RF remote to test out all the colors, or download the Android or IOS app if you have chosen to go with the bluetooth remote. NOTE: I purchased the bluetooth remote, and my friend bought the RF remote, we found that the bluetooth remote has a better overall setup, there are more color options to choose from (uses a color wheel on your phone), and several sequences that you can make the LEDs perform.
https://esskcustoms.com/collections/...ant=3486326083
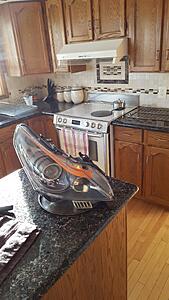
While I had the lights open, I also installed the STI-R Clear lenses, which I purchased and had etched by The Retrofit Source.
I never intended on making a DIY guide for this mod, however a few people have messaged me with questions, and I did take a few pictures while doing the install that I think may help some people out, so here goes:
Firstly you will need to remove your bumper and remove the headlights. I did not take any picture of this process, however this guide by Oneighty will walk you through the removal process step by step:
https://www.myg37.com/forums/d-i-y-i...al-w-pics.html
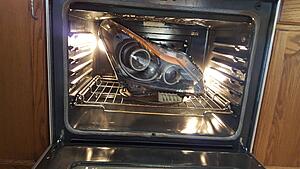
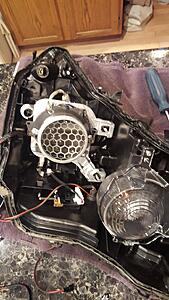
Once you have the headlights removed and ready to go its time to open them up. My headlights were previously modified by Oneighty a few years back, and the butyl they used was quite strong, therefore when you guys bake your OEM lights they may come apart easier than mine did.
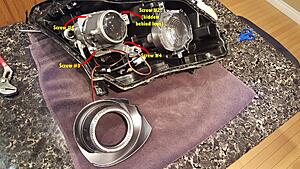
First you will need to remove 4 screws on the back of your headlight (one on each corner), then you will need to bake the lights. I preheated my oven to 225 degrees fahrenheit and let my lights bake for 8 minutes on a cookie sheet. When I pulled them out I found that the butyl was warm, but still not nearly hot enough to pull apart. I let the oven heat back up to 225 degrees, and then let the lights bake for another 6 minutes. At this point I used a flathead screwdriver to carefully pry the lens from the headlight housing, then when it lifted slightly I used my finger to slowly start peeling the lights apart (its really beneficial to use a pair of gloves here, the headlight and butyl will be quite warm.) Take your time with this part as you don't want to break your headlight lens, ensure that the butyl is still warm enough while you lift the lens from the rest of the headlight housing, if the butyl gets cold it will harden and become very hard to peel apart. I finished removing about 75% of my lens before the butyl hardened, at this point I put my headlight back into the oven which was still warm from the last bake cycle, and just let it sit for 5 minutes (the oven was off, I was just using the leftover heat from when it was on previously.) After sitting in the oven for 5 minutes using left over heat, I was able to finally remove the rest of the lens from the headlight housing. NOTE: I did not remove any wiring harnesses or ballasts from the headlights, I just removed the bulbs and left everything else as is.
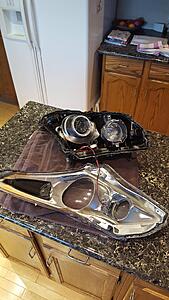
Set aside the lens in a safe spot so it does not get damaged. Now it's time to remove the projector shroud, I didn't take too many pictures of this process so I will do my best to explain, as I found this to be the hardest part of the install process. The shroud is held on by two screws (it will be very easy to see which ones I'm talking about when you have the headlight apart), one can be accessed from the back with a long screw driver (Phillips #2). All you need to do is remove the dust cap that covers your HID bulb, unplug the silver HID plug and set it aside, and then use your long screwdriver to unscrew one side of the shroud.
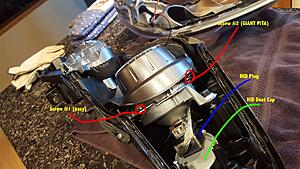
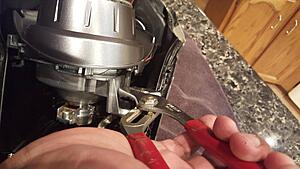
The second screw is a royal PITA. This part was by far the most difficult part of the process for me. The second screw is in a VERY tight position, you will have almost no room to get at it. A few people have had success with 90 degree angled screwdrivers, however this did not work for me at all, and it felt like it was stripping the screw, which would be very bad in this scenario. Instead, I used a big pair of pliers with a Phillips #2 socket bit (the kind you'd typically find included with a socket set) to slowly unscrew this screw.
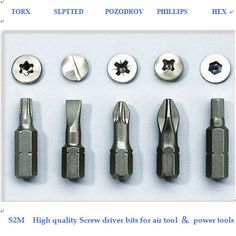
Socket Bits:
Unscrewing using plier and the socket bit:
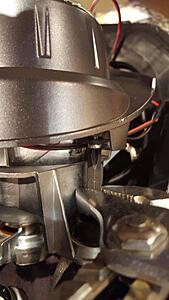
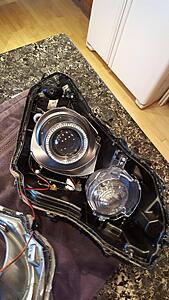
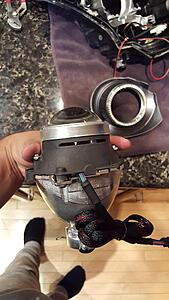
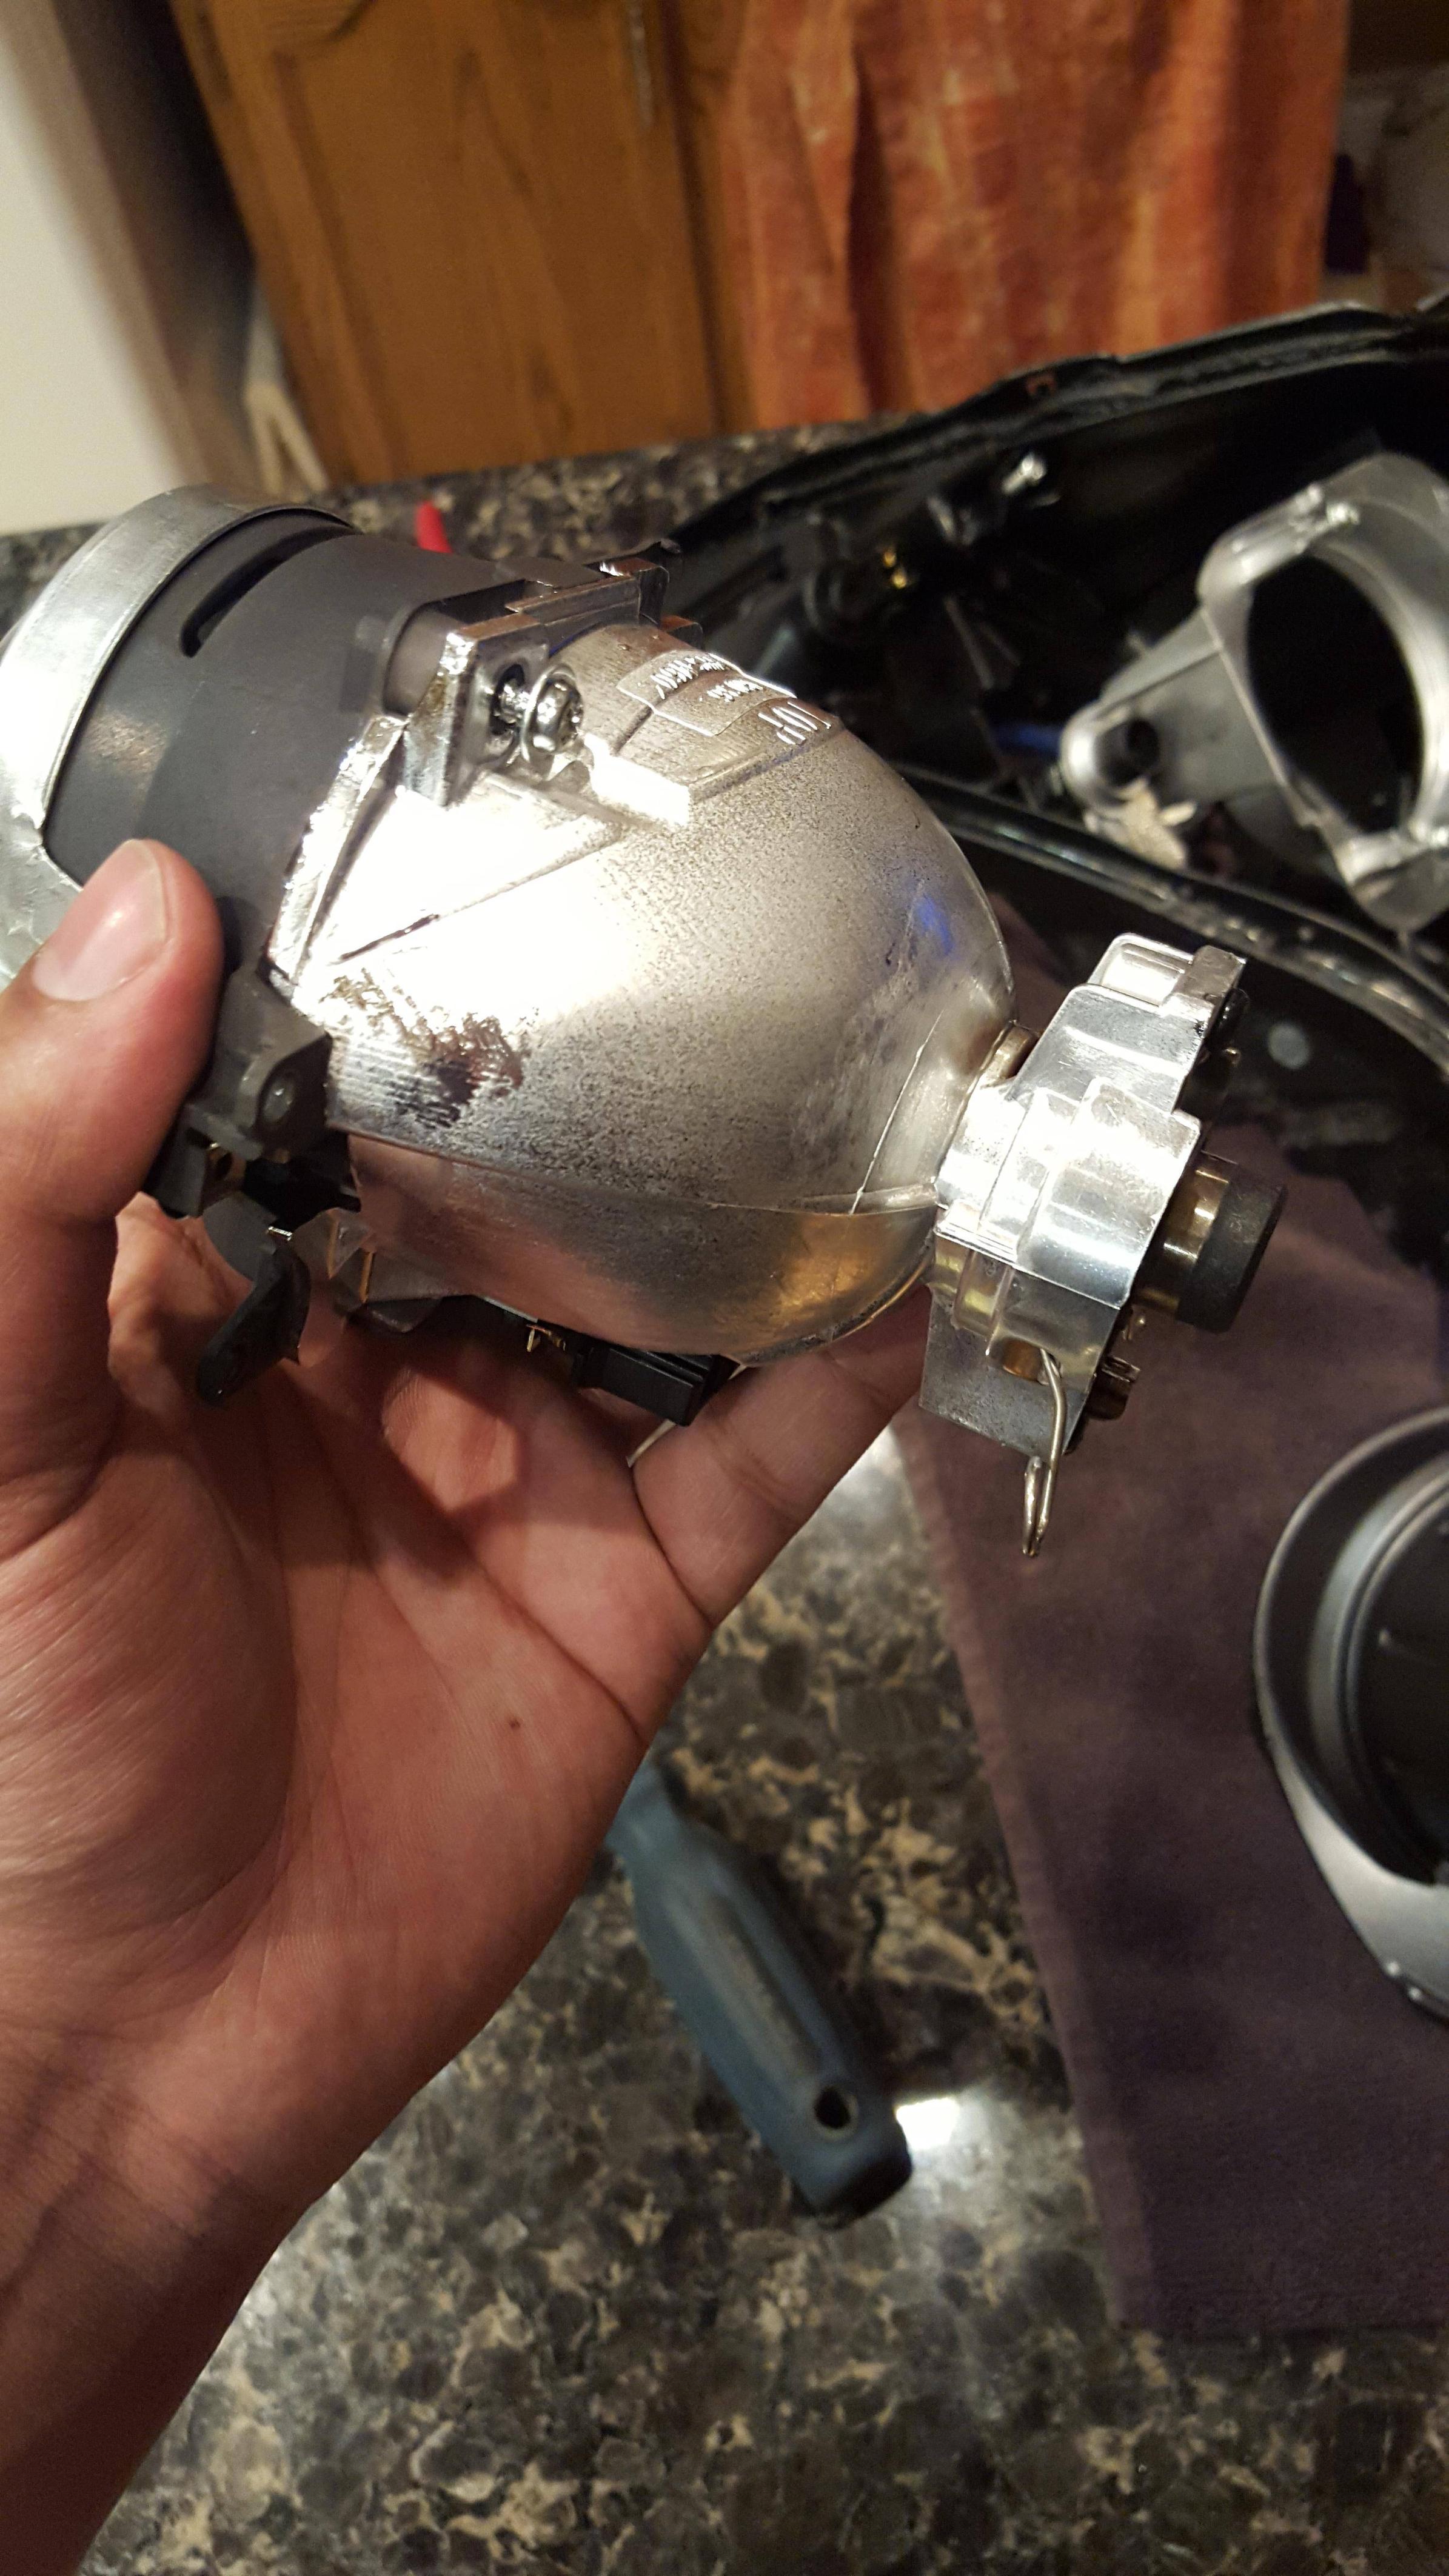
Now it's time to remove the projector from the rest of the headlight, there are 4 screws holding it on (Phillips #2) as well as a harness that you will need to unclip on the bottom. The harness is what powers your high beam cutoff switch.
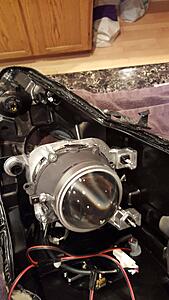
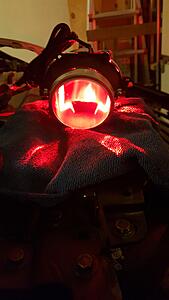
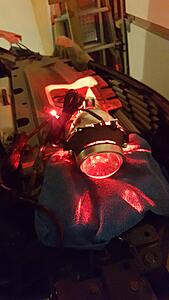
Once you unscrew these 4 screws and remove the high beam harness the projector will come loose. Here I decided to test fit the demon eye LED by slipping it inside the very top of the projector bowl (Bottom being the side with the high beam harness, and top being the direct opposite of that.) I brought the projector to the car and plugged in the demon eyes into the battery and turned them on, I liked the way they projected the light so this was the setup I decided to stick with. I found that with this particular brand of demon eyes, this was the only way I could mount them in the projector bowl, the mounting point I used shines the LED right into the bowl, and dodges the hottest part of the HID bulb. Other brands may be different, and it may be worth experimenting while you have everything apart.
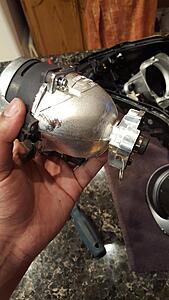
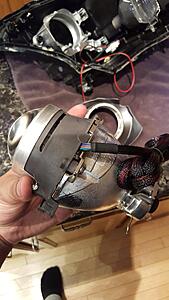
Unfortunately I don't have any pictures of this process, but at this point you need to secure the LEDs in the projector bowl. I used high heat JB weld to secure the LED to the top of the projector bowl. I applied the JB weld to back of the LED and then used toothpicks to reach into the projector bowl and apply pressure. Ensure that the JB weld has fully cured before you move the led around too much, you don't want this thing falling off into the bowl.
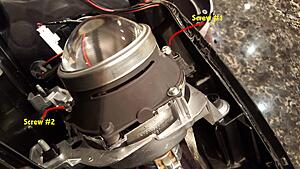
Now it is time to to install the clear lens, this part has given people troubles in the past, many people seem to struggle with the two screws that hold the OEM lens in place. I had no problem removing these screws, I believe the key is using the correct size screwdriver (Phillips #2) while holding the back of the headlight and applying moderate pressure while unscrewing these two screws. I found it was easier to reinstall the projector back in it's place while performing this mod.
For the STI-R clear lens I wish I had experimented more with the cutoff and the spacers provided by The Retrofit Source. I ended up using the OEM spacer, along with two of the three cardboard spacers that TRS sells (the spacer kit used to be one single metal ring, then TRS started including 3 cardboard spacers, and now the 3 cardboard spacers are sold with the lenses for an additional charge - I found this confusing when searching around on the forums for people's past experience with these spacers)
I am running some 5500k Morimoto XB HIDs behind my STI-R lenses with the OEM spacer + 2 cardboard spacers from TRS, this setup has some nice color spectrum flicker, however the cutoff is not quite as sharp as some of the other setups I have seen on the forums. If you have the time and patience, best thing to do is to try out each spacer configuration and see what you like best.
A couples months ago I decided to open up my headlights and do a demon eye install. This mod runs a bluetooth controller from your battery, to a demon eye driver, and then to two small LEDs that are mounted inside of your projector bowls of your headlight. The LED shines into your projector bowl and emits a "demon eye" effect through your lenses.
To complete this mod you will need:
- Demon eye kit
- Clear lenses (Optional, but if you're in there already it's highly recommended to swap to clear lenses now)
- Oven
- Cookie Sheet
- Oven Mits
- Flathead screwdriver
- Long Phillips #2 screwdriver
- Pliers
- Phillips #2 socket bit
- High heat resistant JB weld
- Latex gloves
- Butyl glue (https://www.theretrofitsource.com/ac...l#.V1ZyZ5MrJ-U)
- Clamps (I used wood clamps and C clamps)
- Microfibre cloths
- Patience
The demon eye kit I used is from a company called Ess K Customs - I heard good things about these guys so I decided to give it a shot. One thing I really like about this kit is that it uses external drivers, meaning that if your demon eyes begin to have issues, it is often a driver issue, and the part can be replaced without having to open up your headlights again. I actually had the demon eye drivers crap out on me - the red lights weren't as bright - Ess K replaced the part for me at no charge and hassle free, very good customer service experience from these guys! As an added bonus the pricing is in CAD and theres free shipping, which was great for us fellow Canadians who are getting destroyed by this exchange rate.
Before you begin ripping apart your headlights it is a good idea to verify that your kit works. The Ess K kit comes with detailed instructions on how to wire everything to your car battery, and all the connectors and plug and play which is quite nice. Once you have wired it all up either use the RF remote to test out all the colors, or download the Android or IOS app if you have chosen to go with the bluetooth remote. NOTE: I purchased the bluetooth remote, and my friend bought the RF remote, we found that the bluetooth remote has a better overall setup, there are more color options to choose from (uses a color wheel on your phone), and several sequences that you can make the LEDs perform.
https://esskcustoms.com/collections/...ant=3486326083
While I had the lights open, I also installed the STI-R Clear lenses, which I purchased and had etched by The Retrofit Source.
I never intended on making a DIY guide for this mod, however a few people have messaged me with questions, and I did take a few pictures while doing the install that I think may help some people out, so here goes:
Firstly you will need to remove your bumper and remove the headlights. I did not take any picture of this process, however this guide by Oneighty will walk you through the removal process step by step:
https://www.myg37.com/forums/d-i-y-i...al-w-pics.html
Once you have the headlights removed and ready to go its time to open them up. My headlights were previously modified by Oneighty a few years back, and the butyl they used was quite strong, therefore when you guys bake your OEM lights they may come apart easier than mine did.
First you will need to remove 4 screws on the back of your headlight (one on each corner), then you will need to bake the lights. I preheated my oven to 225 degrees fahrenheit and let my lights bake for 8 minutes on a cookie sheet. When I pulled them out I found that the butyl was warm, but still not nearly hot enough to pull apart. I let the oven heat back up to 225 degrees, and then let the lights bake for another 6 minutes. At this point I used a flathead screwdriver to carefully pry the lens from the headlight housing, then when it lifted slightly I used my finger to slowly start peeling the lights apart (its really beneficial to use a pair of gloves here, the headlight and butyl will be quite warm.) Take your time with this part as you don't want to break your headlight lens, ensure that the butyl is still warm enough while you lift the lens from the rest of the headlight housing, if the butyl gets cold it will harden and become very hard to peel apart. I finished removing about 75% of my lens before the butyl hardened, at this point I put my headlight back into the oven which was still warm from the last bake cycle, and just let it sit for 5 minutes (the oven was off, I was just using the leftover heat from when it was on previously.) After sitting in the oven for 5 minutes using left over heat, I was able to finally remove the rest of the lens from the headlight housing. NOTE: I did not remove any wiring harnesses or ballasts from the headlights, I just removed the bulbs and left everything else as is.


Set aside the lens in a safe spot so it does not get damaged. Now it's time to remove the projector shroud, I didn't take too many pictures of this process so I will do my best to explain, as I found this to be the hardest part of the install process. The shroud is held on by two screws (it will be very easy to see which ones I'm talking about when you have the headlight apart), one can be accessed from the back with a long screw driver (Phillips #2). All you need to do is remove the dust cap that covers your HID bulb, unplug the silver HID plug and set it aside, and then use your long screwdriver to unscrew one side of the shroud.

The second screw is a royal PITA. This part was by far the most difficult part of the process for me. The second screw is in a VERY tight position, you will have almost no room to get at it. A few people have had success with 90 degree angled screwdrivers, however this did not work for me at all, and it felt like it was stripping the screw, which would be very bad in this scenario. Instead, I used a big pair of pliers with a Phillips #2 socket bit (the kind you'd typically find included with a socket set) to slowly unscrew this screw.
Socket Bits:
Unscrewing using plier and the socket bit:


Now it's time to remove the projector from the rest of the headlight, there are 4 screws holding it on (Phillips #2) as well as a harness that you will need to unclip on the bottom. The harness is what powers your high beam cutoff switch.


Once you unscrew these 4 screws and remove the high beam harness the projector will come loose. Here I decided to test fit the demon eye LED by slipping it inside the very top of the projector bowl (Bottom being the side with the high beam harness, and top being the direct opposite of that.) I brought the projector to the car and plugged in the demon eyes into the battery and turned them on, I liked the way they projected the light so this was the setup I decided to stick with. I found that with this particular brand of demon eyes, this was the only way I could mount them in the projector bowl, the mounting point I used shines the LED right into the bowl, and dodges the hottest part of the HID bulb. Other brands may be different, and it may be worth experimenting while you have everything apart.


Unfortunately I don't have any pictures of this process, but at this point you need to secure the LEDs in the projector bowl. I used high heat JB weld to secure the LED to the top of the projector bowl. I applied the JB weld to back of the LED and then used toothpicks to reach into the projector bowl and apply pressure. Ensure that the JB weld has fully cured before you move the led around too much, you don't want this thing falling off into the bowl.
Now it is time to to install the clear lens, this part has given people troubles in the past, many people seem to struggle with the two screws that hold the OEM lens in place. I had no problem removing these screws, I believe the key is using the correct size screwdriver (Phillips #2) while holding the back of the headlight and applying moderate pressure while unscrewing these two screws. I found it was easier to reinstall the projector back in it's place while performing this mod.


For the STI-R clear lens I wish I had experimented more with the cutoff and the spacers provided by The Retrofit Source. I ended up using the OEM spacer, along with two of the three cardboard spacers that TRS sells (the spacer kit used to be one single metal ring, then TRS started including 3 cardboard spacers, and now the 3 cardboard spacers are sold with the lenses for an additional charge - I found this confusing when searching around on the forums for people's past experience with these spacers)
I am running some 5500k Morimoto XB HIDs behind my STI-R lenses with the OEM spacer + 2 cardboard spacers from TRS, this setup has some nice color spectrum flicker, however the cutoff is not quite as sharp as some of the other setups I have seen on the forums. If you have the time and patience, best thing to do is to try out each spacer configuration and see what you like best.
Last edited by Drive Clean; 06-07-2016 at 04:07 AM.
 06-07-2016, 04:00 AM
#2
Registered Member
Thread Starter
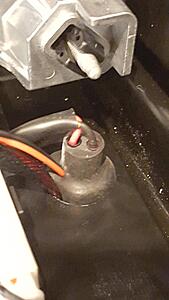
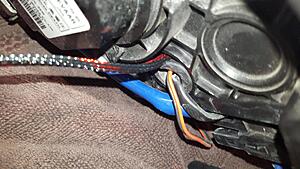
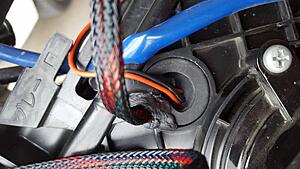
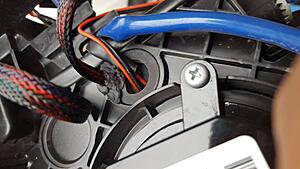
The last thing I needed to do was to run the wiring for the demon eyes through the rubber grommet on the headlight. The demon eye wiring is fairly thick, so I was unsure what the best way to route it was. I ended up with a slightly haggard setup, I slipped the wiring through through the hole the rubber grommet plugs, and then used a BBQ lighter and some butyl glue and sealed off the grommet to ensure no moisture would get into the lights. I have been running this setup like this for around 2 months through several car washes and heavy rain, so far I have no had any issues with moisture.
The install portion is now complete! Sadly I do not have any pictures from here on, however I will do my very best to explain the next steps. You will want to ensure that your new lenses are fastened tightly, and that the projector is secured and that the harness for your high beams are plugged in - if you forget this part you will have to re open your headlights to get your high beams to work. After the lens and projector are tightened down, it is time to re install the projector shroud, you will be able to tighten one side down using a long phillips head, and then use the same plier and socket bit method to reinstall the second screw. Ensure that everything is tidy and that there is no dust inside your headlight. At this point I took the rubber butyl glue and stretched it along the channels where the existing butyl was separated, I ran a thin strip along the entire edge of the headlight, and the placed the headlight lens back on top. I loosely fitted the light back together while pre heating the oven back to 225 degrees. I let the light bake on a cookie sheet for about 7 minutes, and then once I pulled the light out, I pushed down on the lens and the headlight squished itself into place. Quickly put the 4 screws you took out at the start back onto each corner of the headlight, then take a few microfibre clothes and attach wood clamps to the headlight in a manner that squishes it together, use the microfibres to protect the headlight lens from any damage. I used two wood clamps on either end of the headlight, along with two C clamps wherever else I could fit them on the light. Let the light cool down and remove the clamps when the light is back at room temperature.
There you have it! You have successfully installed your demon eye kit and your clear lenses in one shot. Here are some pictures of the final product:


I hope this DIY somewhat helped you guys out! I wish I had taken some better pictures at the time of install, then I would have been able to add a bit more to this tutorial, however I had never thought of making a DIY guide at the time.
The biggest tip I can give you guys would be to use the correct size screwdrivers for everything to ensure you don't strip anything, and to take your time. I did this project over an extra long 4 day weekend, it only took me about a day and a half to complete, but having more time on your hands will always be an asset.
Here are a few threads I used when I was researching these mods, I'd suggest you guys read them and all the comments as there some very helpful points that I may have missed in this guide.
https://www.myg37.com/forums/g37-sed...n-led-diy.html
https://www.myg37.com/forums/d-i-y-i...lens-swap.html
Please feel free to ask any questions and I will do my best to get back to you with an answer


The install portion is now complete! Sadly I do not have any pictures from here on, however I will do my very best to explain the next steps. You will want to ensure that your new lenses are fastened tightly, and that the projector is secured and that the harness for your high beams are plugged in - if you forget this part you will have to re open your headlights to get your high beams to work. After the lens and projector are tightened down, it is time to re install the projector shroud, you will be able to tighten one side down using a long phillips head, and then use the same plier and socket bit method to reinstall the second screw. Ensure that everything is tidy and that there is no dust inside your headlight. At this point I took the rubber butyl glue and stretched it along the channels where the existing butyl was separated, I ran a thin strip along the entire edge of the headlight, and the placed the headlight lens back on top. I loosely fitted the light back together while pre heating the oven back to 225 degrees. I let the light bake on a cookie sheet for about 7 minutes, and then once I pulled the light out, I pushed down on the lens and the headlight squished itself into place. Quickly put the 4 screws you took out at the start back onto each corner of the headlight, then take a few microfibre clothes and attach wood clamps to the headlight in a manner that squishes it together, use the microfibres to protect the headlight lens from any damage. I used two wood clamps on either end of the headlight, along with two C clamps wherever else I could fit them on the light. Let the light cool down and remove the clamps when the light is back at room temperature.
There you have it! You have successfully installed your demon eye kit and your clear lenses in one shot. Here are some pictures of the final product:
I hope this DIY somewhat helped you guys out! I wish I had taken some better pictures at the time of install, then I would have been able to add a bit more to this tutorial, however I had never thought of making a DIY guide at the time.
The biggest tip I can give you guys would be to use the correct size screwdrivers for everything to ensure you don't strip anything, and to take your time. I did this project over an extra long 4 day weekend, it only took me about a day and a half to complete, but having more time on your hands will always be an asset.
Here are a few threads I used when I was researching these mods, I'd suggest you guys read them and all the comments as there some very helpful points that I may have missed in this guide.
https://www.myg37.com/forums/g37-sed...n-led-diy.html
https://www.myg37.com/forums/d-i-y-i...lens-swap.html
Please feel free to ask any questions and I will do my best to get back to you with an answer
The following 12 users liked this post by Drive Clean:
2009g37xcoupe (07-12-2016),
bikezilla (06-08-2016),
blnewt (06-07-2016),
Daddy Fat Sacs (06-07-2016),
dwb993 (06-07-2016),
and 7 others liked this post.
 06-07-2016, 11:22 AM
#4


Do you see the etching in the lenses when the headlights are working? Could that be what is messing up your cutoff?
06-07-2016, 12:13 PM
#5
Registered Member
Thread Starter
From what I've read it seems like you need to find a happy medium with the spacers to find the perfect balance between color flicker and a sharp cutoff. My cutoff is not horrible, but not the best either, I will try and remember to take some pictures when I'm out at night to show what it looks like. I have not re aimed my headlights since I did this mod so that may cause some imperfections in the cutoff as well!


The following users liked this post:
Drive Clean (06-07-2016)
06-07-2016, 01:18 PM
#7
Excellent that you took the time to detail everything, the job you did looks top notch!
Agree about the cutoff, it's something that you need to play with a few times to get it just right, wish I would've done a bit more trial & error w/ mine, but still awesome vs. OEM.
This one is an instant "sticky"
Agree about the cutoff, it's something that you need to play with a few times to get it just right, wish I would've done a bit more trial & error w/ mine, but still awesome vs. OEM.
This one is an instant "sticky"
The following users liked this post:
Drive Clean (06-07-2016)
Trending Topics
06-07-2016, 09:47 PM
#8
Registered Member
Thread Starter
Thanks Kenny!
Woohoo sticky status! Thanks Brad, appreciate the kind words!
Excellent that you took the time to detail everything, the job you did looks top notch!
Agree about the cutoff, it's something that you need to play with a few times to get it just right, wish I would've done a bit more trial & error w/ mine, but still awesome vs. OEM.
This one is an instant "sticky"
Agree about the cutoff, it's something that you need to play with a few times to get it just right, wish I would've done a bit more trial & error w/ mine, but still awesome vs. OEM.
This one is an instant "sticky"
Thanks Brad, appreciate the kind words!
06-08-2016, 12:55 PM
#9

Sticky for sure! Thanks for all the detail.
Now to find a 4-day weekend and a bucket full of courage.
A question to those in the know:
I plan on painting my projector shroud and interior at the time of the DE mod, Probably using VHT engine paint to match my calipers...
Does anyone know if it is necessary to let the paint cure for additional DAYS to avoid the paint out-gassing and possibly fogging the clear plastic housing?
(similar to how the plastic in a new dash slowly fogs the windshield)
I was thinking the curing of the volatile paint might cause a haze if you sealed it up too early.
Last edited by bikezilla; 06-08-2016 at 01:01 PM.
06-10-2016, 01:33 PM
#10

Nice work! I remember, had that setup on my sedan back in the day.
Little fact... we were the first to do the honeycomb etched lenses, and then TRS started offering them and it blew up! I'll be honest, we got the idea from the Subaru concept car and it came out awesome
Little fact... we were the first to do the honeycomb etched lenses, and then TRS started offering them and it blew up! I'll be honest, we got the idea from the Subaru concept car and it came out awesome
The following 2 users liked this post by ONEighty:
blnewt (06-10-2016),
Drive Clean (06-24-2016)
06-24-2016, 02:44 PM
#11
Registered Member
Thread Starter
Damn that's awesome to hear the history of where the etched lens idea came from, really makes the headlights pop and catches a lot of attention at car shows.
 07-15-2016, 01:00 PM
#13
Registered Member
Thread Starter
Once you remove the screws from the lens you simply slide off the metal band around the lens and the lens will fall right out. I used latex gloves when handling the lenses.

