DIY: GT-R Start Button Installation
 11-13-2010, 03:47 AM
#1

GT-R Start Button Installation
Disclaimer: I am not reponsible for any mistakes made by following my DIY article.
Video:
<object width="425" height="344"><param name="movie" value="http://www.youtube.com/v/VHHGMkFrPio?hl=en&fs=1"></param><param name="allowFullScreen" value="true"></param><param name="allowscriptaccess" value="always"></param><embed src="http://www.youtube.com/v/VHHGMkFrPio?hl=en&fs=1" type="application/x-shockwave-flash" allowscriptaccess="always" allowfullscreen="true" width="425" height="344"></embed></object>
If you're like me, you've found yourself drawn to the idea of taking the ruby start/stop button found in Nissan's supercar, the GT-R, and installing it in place of the G37's dull, white button. Well, good news is, the GT-R button is easy to obtain (I ordered mine from West Covina Nissan, AKA TheNismoShop, can be found at Z1 motorsports and other reputable online stores), and the button is relatively easy to install as well, provided you have about 15 minutes or so to commit to giving your interior some unique flare.
So, assuming you have your button on hand, go ahead and have yourself a beer, then savor the sweet, metallic finish of the GT-R button in your other hand. Then envision that button in your G37. If you can't see it, keep drinking beers until you do.
Now, take off any watches/jewelry. The last thing you want to do is mark up your interior trying to get this button in. Not that it will be a wrestling match or anything, but some members with larger hands (me included) may find their fingers getting stuck trying to pry paneling or reconnect the harness. I promise, it won't hurt you.
Gather your tools. You will need:
-A long flathead or philips head screwdriver
-A flashlight (really helps you see what you're doing)
-A dime* (only if you plan on swapping your original button's "guts" into your new button to retain the color scheme)
Once you've gathered your tools, get in your car and tilt the steering column all the UP and telescope it all the way OUT. You want to maximize the amount of room you have to work with. Then, through some creative method (I laid down sideways into the driver's foot well with my legs hanging out of the car) you will need to get under your steering column so you can see what you're doing. Taking your flashlight, shine it up into the gap between the dash and gauge housing, and locate your start button. It's pretty easy to find: just a fat, black cylinder with brown wire harness coming out the back of it.
Once you've located your button, get your screwdriver into this gap and find a little ribbed clip on the wire harness. Give this a push to disconnect it. It may take some fiddling, but be patient. If you feel getting your fingers in the mix may help, do so. Once the wire harness is disconnect, simply push the button unit out towards the steering wheel. It should pop right out, though it may take a bit of a push the first time, especially on the older G's. As long as the wire harness is detached, just push on that sucker. Once the button is out, squeeze the two clips on the sides to slid the chrome trim ring off the assembly.
If you want amber, skip forward to the Reinstallation section. Your button is ready for installation. If you want to swap the "guts" of your Infiniti button so the GT-R button matches your interior lighting color scheme, keep reading.
Video:
<object width="425" height="344"><param name="movie" value="http://www.youtube.com/v/VHHGMkFrPio?hl=en&fs=1"></param><param name="allowFullScreen" value="true"></param><param name="allowscriptaccess" value="always"></param><embed src="http://www.youtube.com/v/VHHGMkFrPio?hl=en&fs=1" type="application/x-shockwave-flash" allowscriptaccess="always" allowfullscreen="true" width="425" height="344"></embed></object>
If you're like me, you've found yourself drawn to the idea of taking the ruby start/stop button found in Nissan's supercar, the GT-R, and installing it in place of the G37's dull, white button. Well, good news is, the GT-R button is easy to obtain (I ordered mine from West Covina Nissan, AKA TheNismoShop, can be found at Z1 motorsports and other reputable online stores), and the button is relatively easy to install as well, provided you have about 15 minutes or so to commit to giving your interior some unique flare.
So, assuming you have your button on hand, go ahead and have yourself a beer, then savor the sweet, metallic finish of the GT-R button in your other hand. Then envision that button in your G37. If you can't see it, keep drinking beers until you do.
Now, take off any watches/jewelry. The last thing you want to do is mark up your interior trying to get this button in. Not that it will be a wrestling match or anything, but some members with larger hands (me included) may find their fingers getting stuck trying to pry paneling or reconnect the harness. I promise, it won't hurt you.
Gather your tools. You will need:
-A long flathead or philips head screwdriver
-A flashlight (really helps you see what you're doing)
-A dime* (only if you plan on swapping your original button's "guts" into your new button to retain the color scheme)
REMOVAL OF THE BUTTON
Once you've gathered your tools, get in your car and tilt the steering column all the UP and telescope it all the way OUT. You want to maximize the amount of room you have to work with. Then, through some creative method (I laid down sideways into the driver's foot well with my legs hanging out of the car) you will need to get under your steering column so you can see what you're doing. Taking your flashlight, shine it up into the gap between the dash and gauge housing, and locate your start button. It's pretty easy to find: just a fat, black cylinder with brown wire harness coming out the back of it.
Once you've located your button, get your screwdriver into this gap and find a little ribbed clip on the wire harness. Give this a push to disconnect it. It may take some fiddling, but be patient. If you feel getting your fingers in the mix may help, do so. Once the wire harness is disconnect, simply push the button unit out towards the steering wheel. It should pop right out, though it may take a bit of a push the first time, especially on the older G's. As long as the wire harness is detached, just push on that sucker. Once the button is out, squeeze the two clips on the sides to slid the chrome trim ring off the assembly.
NOW STOP RIGHT HERE.
Make your decision: do you want the GT-R button to shine amber on the Start/Stop lettering, or white?
Make your decision: do you want the GT-R button to shine amber on the Start/Stop lettering, or white?
If you want amber, skip forward to the Reinstallation section. Your button is ready for installation. If you want to swap the "guts" of your Infiniti button so the GT-R button matches your interior lighting color scheme, keep reading.
SWAPPING THE "GUTS"
Now personally, I like the white color of the original start button, so I wanted to swap out the internals of my Infiniti button and put them in the GT-R button. Courtesy of Nissan's cost-cutting, these buttons are physically identical in terms of dimensions, meaning we can simply swap one LED panel into another.
The LED panel on the GT-R button will be brown, and will be held to the black cylinder by two fragile clips. This is where the dime comes in. Carefully wedge the dime in and lift each side of the brown panel up until you can eventually work it out. Be patient here. Better for it to take a long time than for you to break your brand new button. Once it's out, leave the white silicone membrane inside the button. Then, remove the blue plastic LED panel from the Infiniti button the same way as you did with the GT-R button. From here, simply insert the blue panel into the GT-R cylinder, making sure the LEDs line up with the ports for Lock/Acc/On. Your button now ready for installation.
REINSTALLATION
So, now that you've got your button ready to be installed, take the chrome trim and slip it on the black cylinder. It's a bit picky about which side it's on, so if you slip it on and it doesn't clip into place, rotate it 180 degrees and try that.
From here, installing the button is straightforward. Reconnect the harness to the back of the button, then slide it into the dashboard until it clips into place. Make sure it's seated, then turn your car on. If it lights up and works, congrats! You now have a sexy, sporty GT-R button in your G37. 
Finally, admire your work, then go have another beer. 
Last edited by Mazaki; 11-06-2013 at 03:38 PM.
 01-31-2011, 09:24 PM
#2
Registered Member

Join Date: Dec 2007
Location: Miami
Posts: 324
Likes: 0
Received 0 Likes
on
0 Posts
Thanks for the write-up!
another easy way to access the button for me was directly through the gaps of the steering wheel shroud. This is because I medium size hands.
The lower plastic panel above the foot well just uncliped easily on the right side if I tugged on it downwards (this is from the accent lighting procedure). It did not have to come off entirely, just unclipping the right side gave a little more room.
then there's a center plastic piece under the steering wheel shroud that bridges the left and right, this piece just uncliped and come off when I pulled on it.
The rest is easy enough to figure out because I could see see everything for there on.
I still needed a long narrow flat head screw driver to poke on the brown harness clip with my right hand while using my left hand from around the inside of the shroud to pull on the cable.
then with my left hand, wiggled and pushed the housing out.


Trending Topics


 very great write up and helped me very easily.
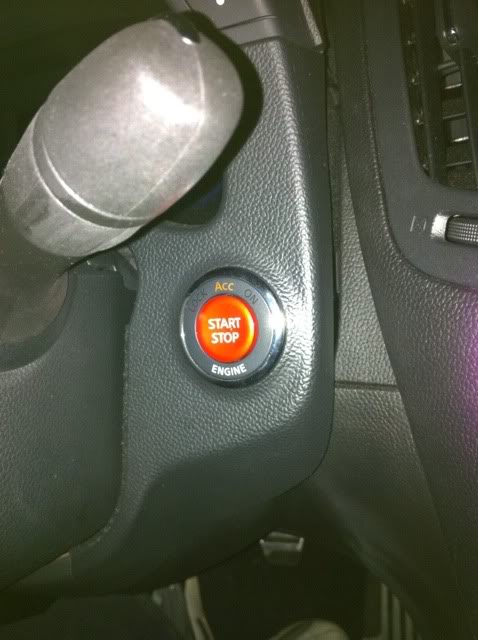 03-23-2011, 05:41 PM
#13
Registered User
Thanks for the write-up, I kept the redish LED in the original GTR button, gives it a bloody look at night, i kinda like it.
One thing worth mentioning is that the brown clip mentioned in the video need to be depressed again to put the button back.
One thing worth mentioning is that the brown clip mentioned in the video need to be depressed again to put the button back.
