Tesla Style Screen Thread
 01-12-2019, 03:12 AM
#106
Registered Member
Thread Starter

I know i started the thread and i wasn�t the first to get the screen. But i might be the first to get rid of it.
I have many reasons but the biggest factor to me was losing the premium sound quality, or whatever you guys would call it. The output of the screen is no where near oem and i personally couldn�t do it. Combined with the rest of the flaws I chose to remove it. Asvegen wanted too much prove of lags to return it so i�m currently in between a sale. If I don�t sell it to this local i�ll be posting it here..
I have many reasons but the biggest factor to me was losing the premium sound quality, or whatever you guys would call it. The output of the screen is no where near oem and i personally couldn�t do it. Combined with the rest of the flaws I chose to remove it. Asvegen wanted too much prove of lags to return it so i�m currently in between a sale. If I don�t sell it to this local i�ll be posting it here..
 01-12-2019, 04:25 AM
#107
Registered Member
iTrader: (1)

That's disappointing to hear...
Are there ways the audio could be improved? I thought one member posted that his sound was better after the install, could be wrong though.
What other flaws?
Are there ways the audio could be improved? I thought one member posted that his sound was better after the install, could be wrong though.
What other flaws?

 01-12-2019, 11:37 AM
#109

Ok, so yes, the manual controls for HVAC are replaced with new manual controls, and yes, they do still work manually or you can touch screen the HVAC. And they do light up when the dash lights are on.
Although Phoenix Android Radio is a vendor of these, they have been sketchy with shipping times and notorious for sending the wrong harness with the radio. I ordered mine through Asvegen via a group buy on FB, but they do have an Aliexpress listing. Took about 2 weeks, and sent me the correct harness.
I purchased the 2x32, the 2x64 wasn't an option when I ordered mine. As for the 2x64, they are an option, but haven't been produced yet. Talking to Asvegen, they are waiting for 5 preorders before production begins. I would assume Phoenix would also be doing the same thing as they all have the same manufacturer. As for the extra storage, USB jump drive for the win. To me, paying an extra $40 for 32gigs and Android 4.4 doesn't make sense when you can get 7.1 and a 1TB jump drive for cheaper...
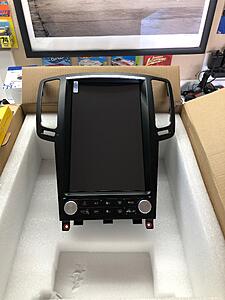
Screen quality is excellent, this thing is heavy and feels well made, even the new trim feels like good material. FYI, you have to reuse the vents from the OEM trim, they just snap out and snap into the new one.
Navigation - you can use any navigation app you want; if it's in the Google Play Store, you can use it. I use Google Maps when my hotspot is on, and Offline Maps & Navigation when I have it turned off. Data, Hotspot, Wireless, and all that is NOT required to run navigation if you have an offline capable app.
Ok, I think I answered most the questions I see. Let me know if anyone has anymore questions.
Although Phoenix Android Radio is a vendor of these, they have been sketchy with shipping times and notorious for sending the wrong harness with the radio. I ordered mine through Asvegen via a group buy on FB, but they do have an Aliexpress listing. Took about 2 weeks, and sent me the correct harness.
I purchased the 2x32, the 2x64 wasn't an option when I ordered mine. As for the 2x64, they are an option, but haven't been produced yet. Talking to Asvegen, they are waiting for 5 preorders before production begins. I would assume Phoenix would also be doing the same thing as they all have the same manufacturer. As for the extra storage, USB jump drive for the win. To me, paying an extra $40 for 32gigs and Android 4.4 doesn't make sense when you can get 7.1 and a 1TB jump drive for cheaper...
Screen quality is excellent, this thing is heavy and feels well made, even the new trim feels like good material. FYI, you have to reuse the vents from the OEM trim, they just snap out and snap into the new one.
Navigation - you can use any navigation app you want; if it's in the Google Play Store, you can use it. I use Google Maps when my hotspot is on, and Offline Maps & Navigation when I have it turned off. Data, Hotspot, Wireless, and all that is NOT required to run navigation if you have an offline capable app.
Ok, I think I answered most the questions I see. Let me know if anyone has anymore questions.
01-13-2019, 03:26 AM
#110
Registered Member

Yup, center console still works and they provide a harness with 2 extra USB ports, however 1 is used for the backup camera.
01-13-2019, 07:37 AM
#111

I know i started the thread and i wasn�t the first to get the screen. But i might be the first to get rid of it.
I have many reasons but the biggest factor to me was losing the premium sound quality, or whatever you guys would call it. The output of the screen is no where near oem and i personally couldn�t do it. Combined with the rest of the flaws I chose to remove it. Asvegen wanted too much prove of lags to return it so i�m currently in between a sale. If I don�t sell it to this local i�ll be posting it here..
I have many reasons but the biggest factor to me was losing the premium sound quality, or whatever you guys would call it. The output of the screen is no where near oem and i personally couldn�t do it. Combined with the rest of the flaws I chose to remove it. Asvegen wanted too much prove of lags to return it so i�m currently in between a sale. If I don�t sell it to this local i�ll be posting it here..
01-13-2019, 08:22 AM
#112

For me, any issues are really insignificant when compared to what I had previously.
Before, no Bluetooth music, no navigation, phone on a windshield mount. Now, I have Apple CarPlay, Waze, Bluetooth calling and a 1tb flash drive for everything else.
I purchased mine through Phoenix and, apart from some choppy video, no problems at all. The biggest thing for me is that I�m not an Android guy so it�s taken me a while to figure out settings. I made changes to the equalizer and the volume offset and the sound is great for me.
Different experience, I guess.
Bryan
Dat240zg
01-13-2019, 08:27 AM
#113
What year is your G? Mines a �13 and I didn�t have to use either USB for cameras. I used one to connect to the factory port in center console and the other I fed to the lower edge of the center console (by my knee) so that I can plug/unplug my flash drive if I make any changes. It�s out of sight unless you know what to look for.
01-13-2019, 08:54 AM
#114
What year is your G? Mines a �13 and I didn�t have to use either USB for cameras. I used one to connect to the factory port in center console and the other I fed to the lower edge of the center console (by my knee) so that I can plug/unplug my flash drive if I make any changes. It�s out of sight unless you know what to look for.
The following users liked this post:
user 3587587 (01-13-2019)
01-13-2019, 10:42 AM
#116
pics of install would be amazing as I have a 2013 sedan. Do you have navi n bose? Was it plug n play n did you need any modifications to get the back up camera working. Once again thanks.
01-13-2019, 02:02 PM
#117
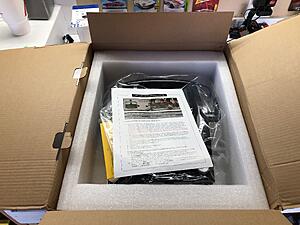
As promised, here's the install how to on the Tesla-style screen for the G. Just for reference, my G is a 2013, no-nav, with Bose sedan.
I purchased the Phoenix version with Android 7.1 and 32g ram and the Apple CarPlay dongle.

Tools needed: A variety of plastic interior tools, a pair of needle nose pliers, phillips and flat head screw drivers and a sharpie.
BTW, feel free to do things differently - this worked for me.
First, I turned the car on but didn't start it. Put the emergency brake on. Shift it to drive. Close your door so the beeping doesn't drive you nuts.
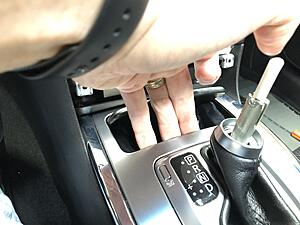
Take the top of the shift boot and pull down. No need to jerk it, just pull down and it will drop.
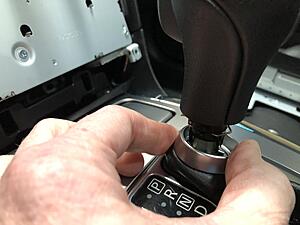
To remove the shift ****, use the needle nose pliers and pull out the c clip located at the bottom of the shift ****.
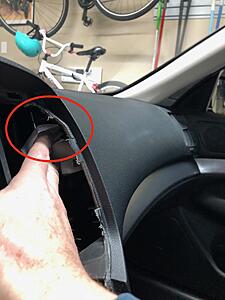
Take an interior tool of choice and pry the curved lower trim piece off. It will take a bit of effort and may even seem like its going to break, but it won't.
Open the coin holder and pull up on the front. It'll take a bit of a tug, but the front of the console will lift up. Unplug the connections on the underside of the console and set it aside.
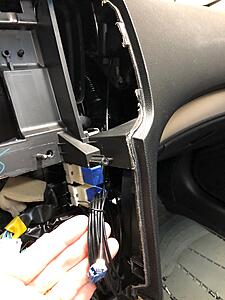
Unscrew the two philips screws at each lower corner and lift the bottom of the face plate out and up to remove.
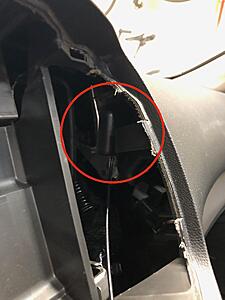
There a several connectors on the back of the face plate that you'll need to remove. I chose to take my sharpie and make dots on them so that I'll be able to put it back together.
Heads up - when you disconnect the passenger airbag indicator on the lower left side (a black cable), your airbag light on your dash will flash when everything is put back together. Don't sweat it. Here's a link to how to reset your light. I did it and it worked fine:
.
I purchased the Phoenix version with Android 7.1 and 32g ram and the Apple CarPlay dongle.


Tools needed: A variety of plastic interior tools, a pair of needle nose pliers, phillips and flat head screw drivers and a sharpie.
BTW, feel free to do things differently - this worked for me.
First, I turned the car on but didn't start it. Put the emergency brake on. Shift it to drive. Close your door so the beeping doesn't drive you nuts.
Take the top of the shift boot and pull down. No need to jerk it, just pull down and it will drop.

To remove the shift ****, use the needle nose pliers and pull out the c clip located at the bottom of the shift ****.

Take an interior tool of choice and pry the curved lower trim piece off. It will take a bit of effort and may even seem like its going to break, but it won't.


Open the coin holder and pull up on the front. It'll take a bit of a tug, but the front of the console will lift up. Unplug the connections on the underside of the console and set it aside.

Unscrew the two philips screws at each lower corner and lift the bottom of the face plate out and up to remove.
There a several connectors on the back of the face plate that you'll need to remove. I chose to take my sharpie and make dots on them so that I'll be able to put it back together.

Heads up - when you disconnect the passenger airbag indicator on the lower left side (a black cable), your airbag light on your dash will flash when everything is put back together. Don't sweat it. Here's a link to how to reset your light. I did it and it worked fine:
Last edited by Dat240zg; 01-13-2019 at 06:09 PM.
The following 6 users liked this post by Dat240zg:
Baadnewsburr (01-14-2019),
DrippDroppz (08-22-2019),
InvincibleMoose (12-22-2019),
Jrizzy (05-02-2019),
Scarab Armor (01-15-2019),
and 1 others liked this post.
01-13-2019, 02:06 PM
#118
Part two:
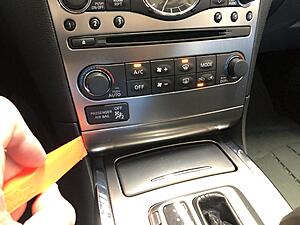
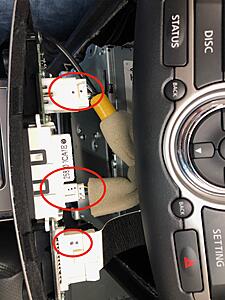
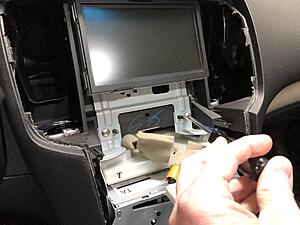
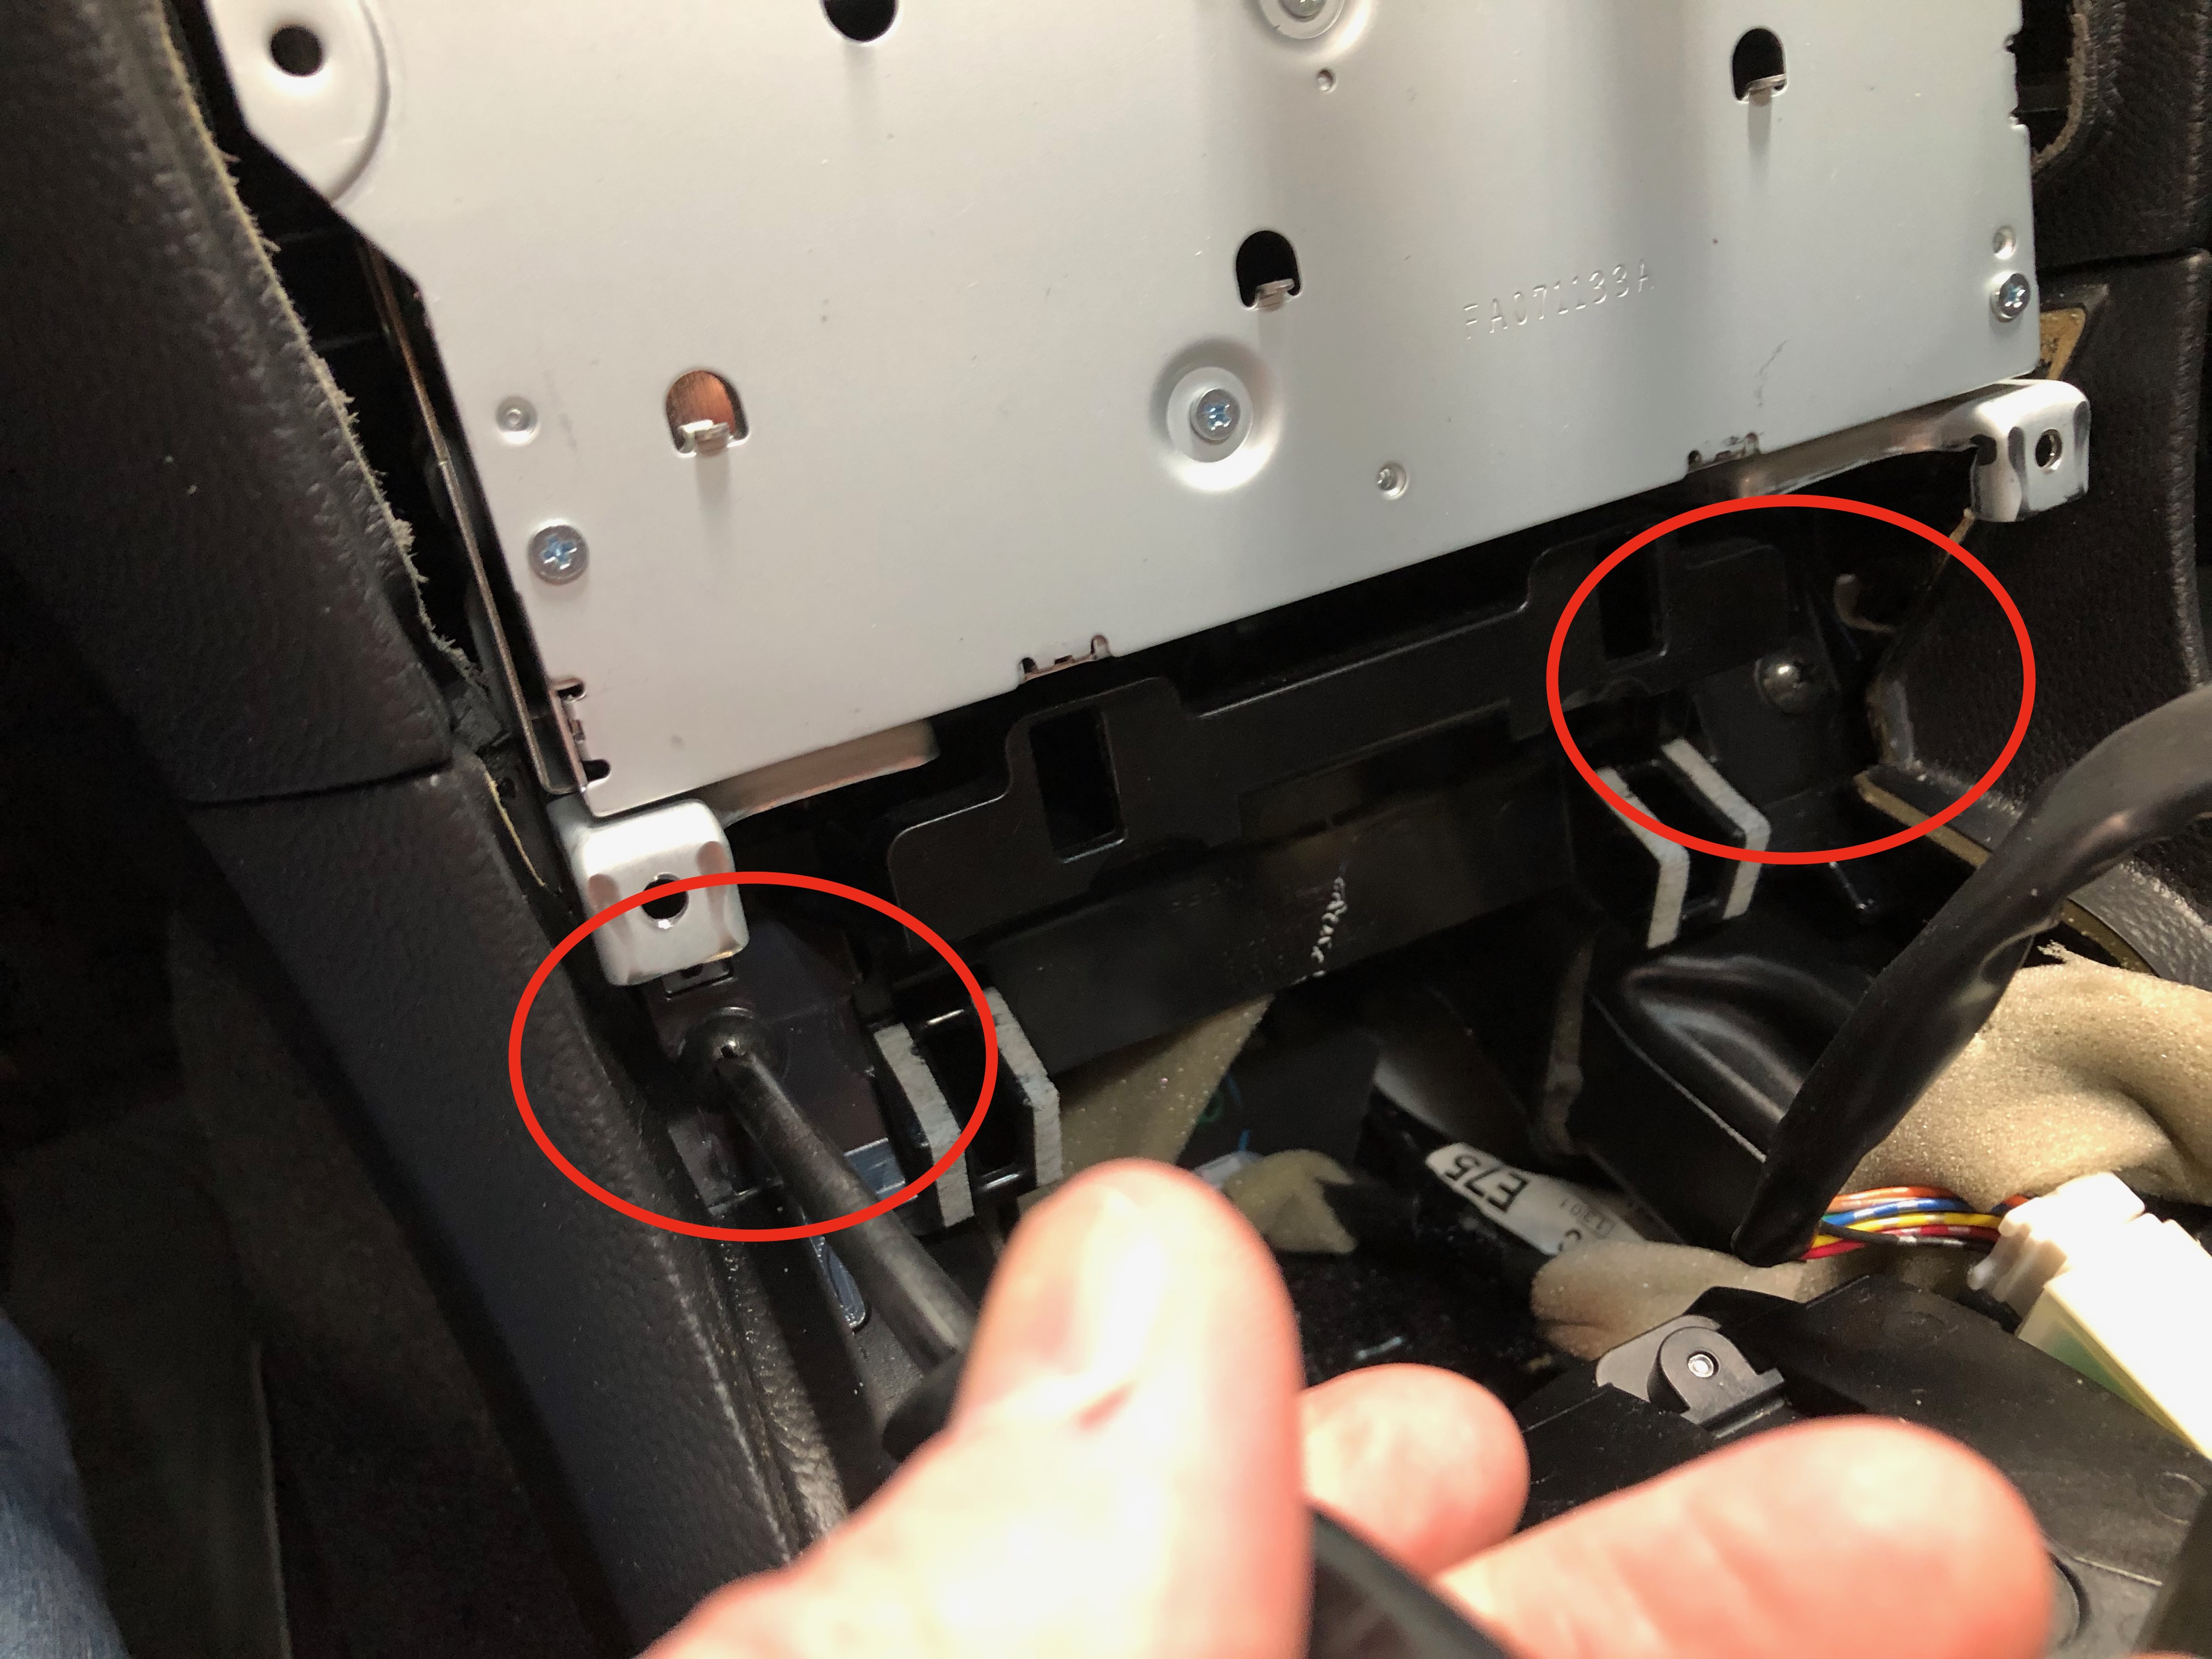
Go to the lower front of the center stack. Take your philips screw driver and remove the two screws in the circles and set them aside.
Take your philips screw driver and unscrew the two screws set deep under the CD player - take a look at the picture. There's one on each side. If you're like me, be ready to drop them down in the depths of the center console and spend a good bit of time fishing them back out. Set them aside.
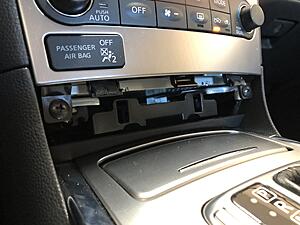
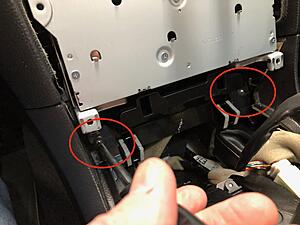
Take a hold of the underside of the top of the display surround and pull up and out. It will take a bit of effort if you've never had it apart before. There are connections attached to the back side, so be careful. Don't rip it out, just pull firmly.
Once you've disconnected it, set it aside carefully. Take your philips screw driver and unscrew the two screws holding the screen in place.
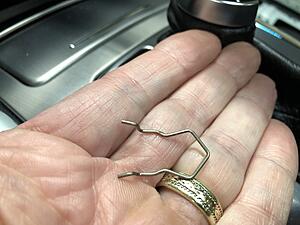
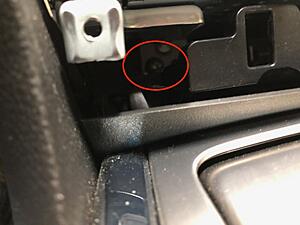
Take your center stack trim piece with vents and with a thin flat head screw driver, carefully - repeat carefully - pry out the tabs. Emphasis carefully. You pry them too far and they break. There are six (if I remember correctly, three on both sides of each vent).
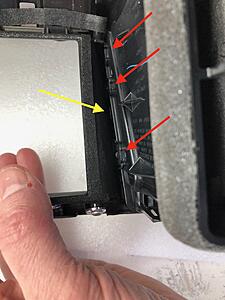
When you've pried them correctly, they should look like this:
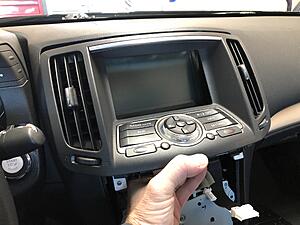
At this point, you can carefully separate them from the center stack.
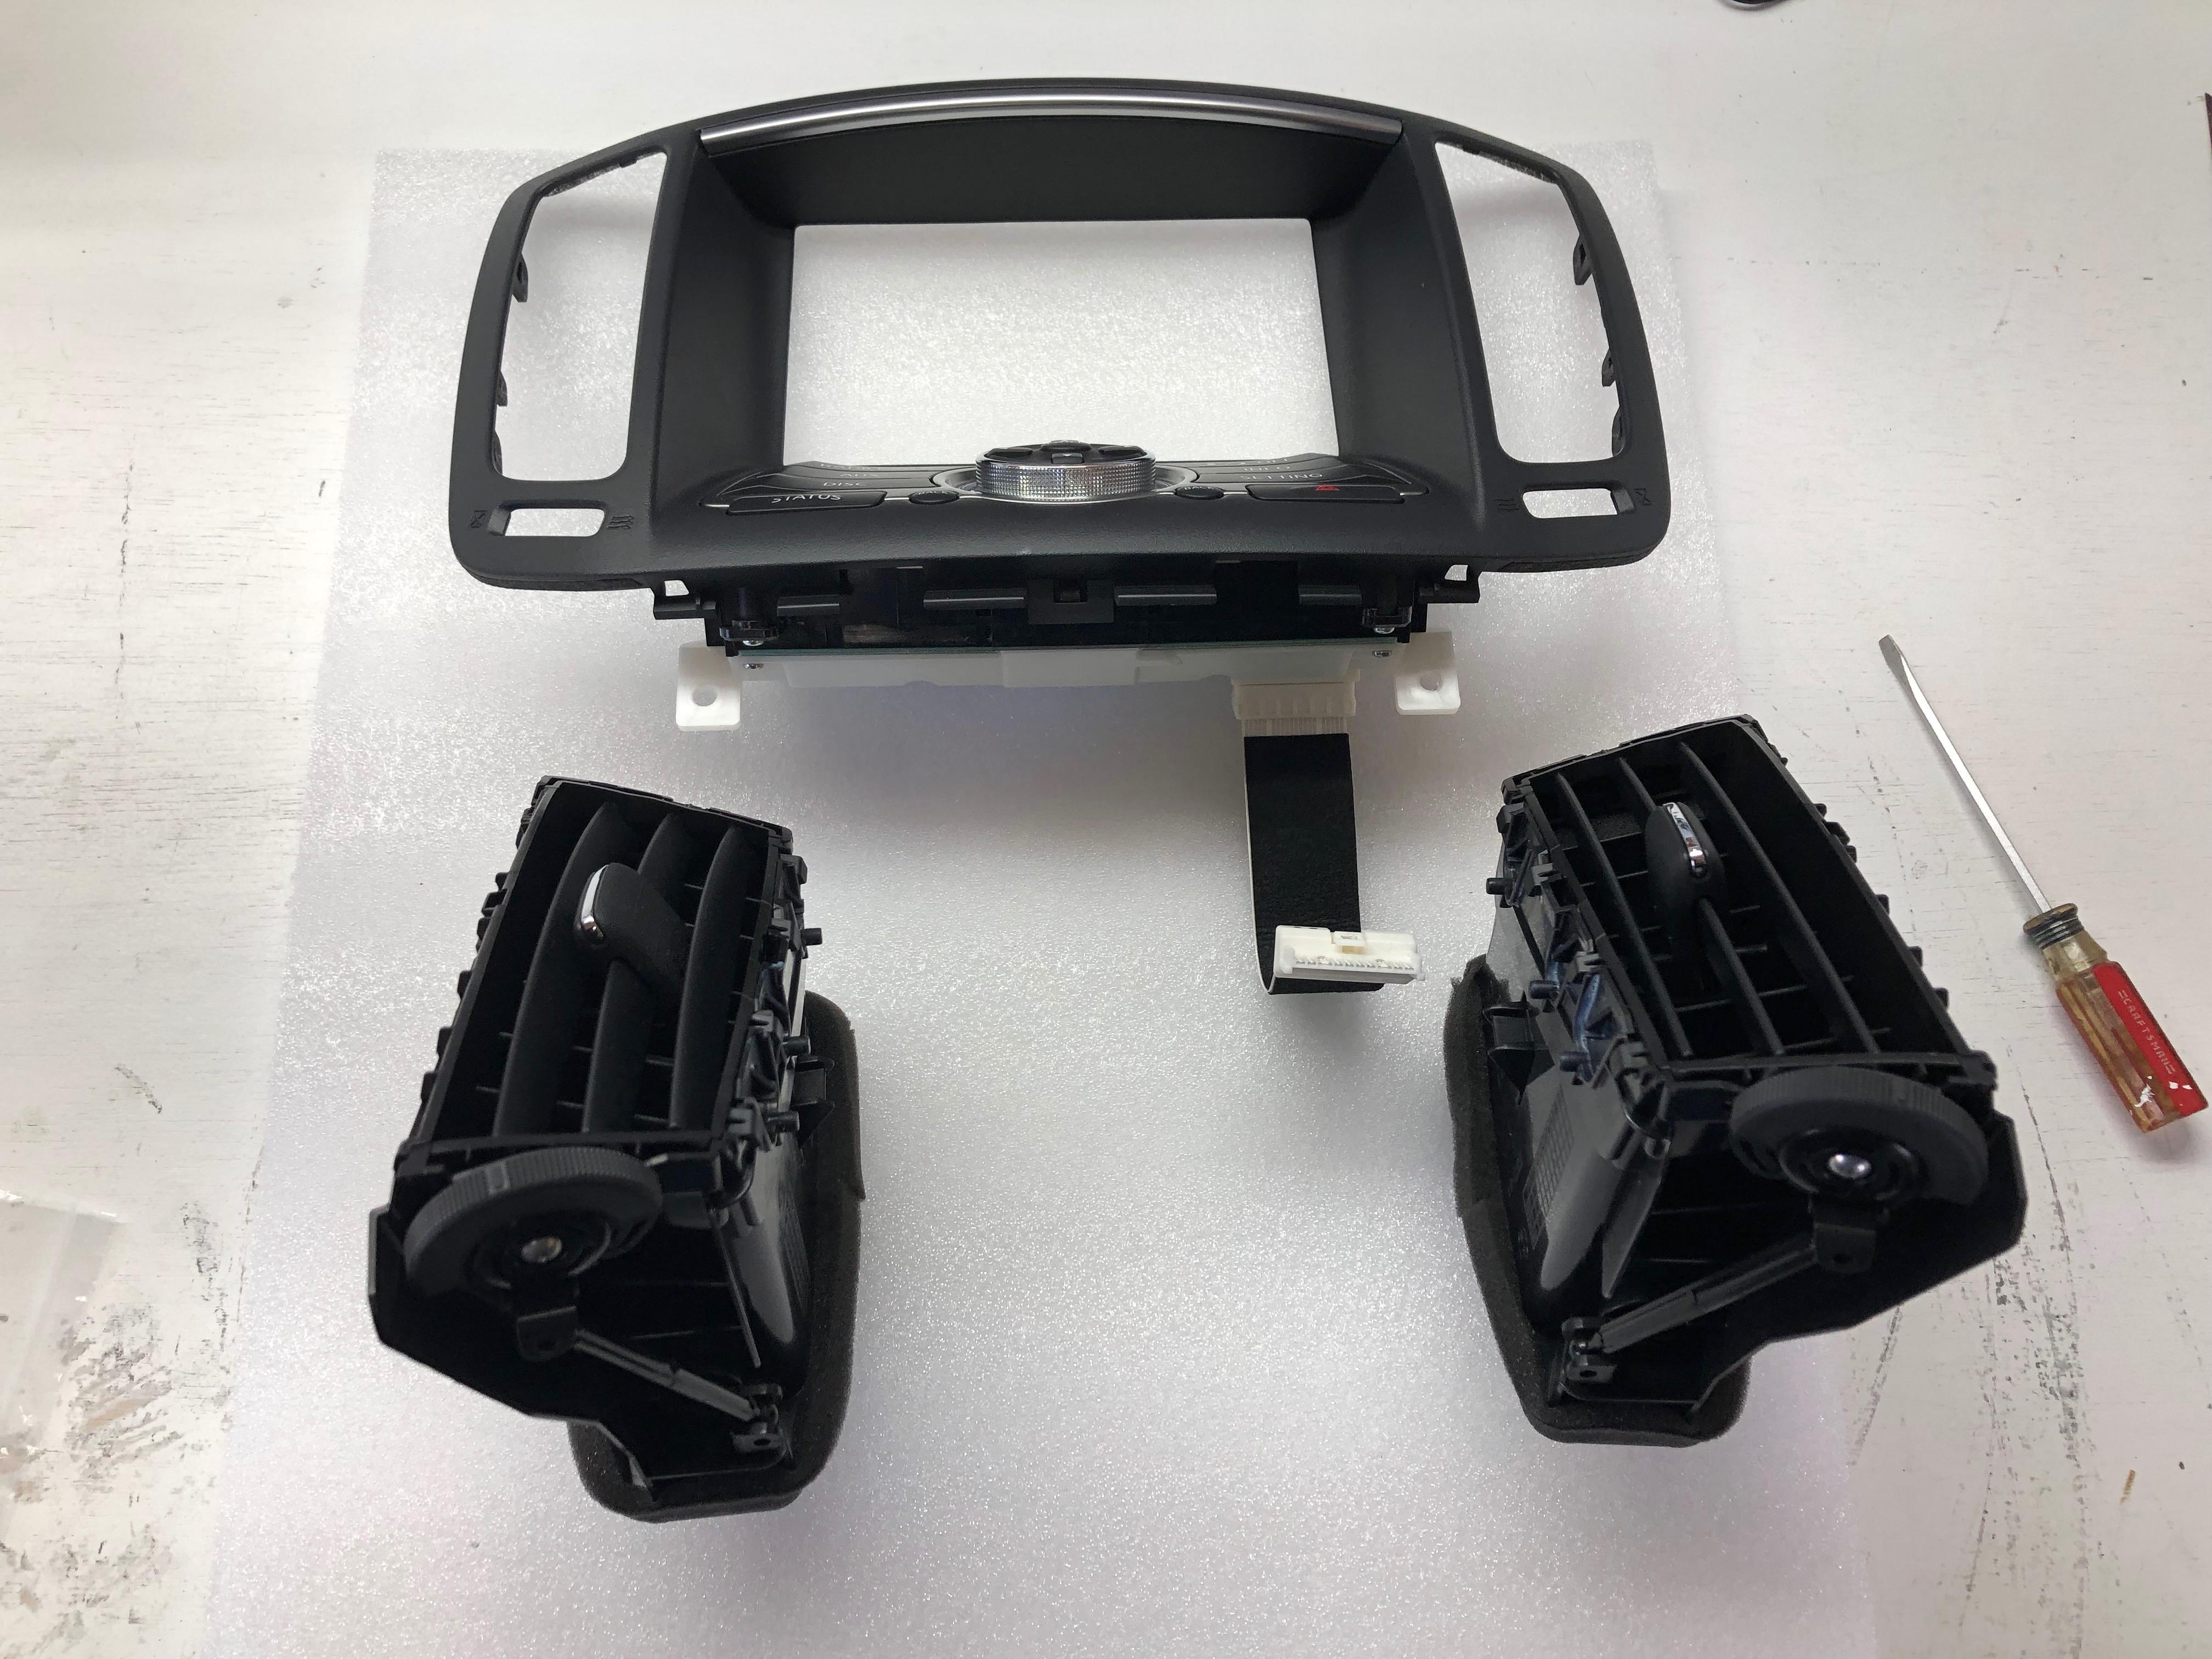
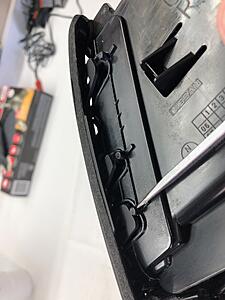
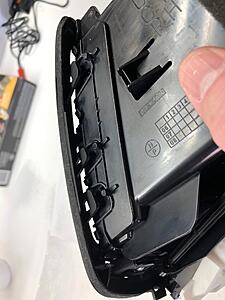
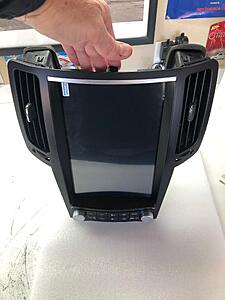
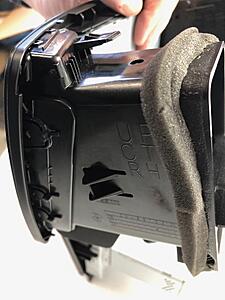
Take your radio and turn it face down on the foam layer that was in the top of the box. Reinstall the vents into the new radio face plate in reverse order. One thing that you need to be aware of; there is a tab on the inside edge that fits in to a slot on the new frame. If you don't seat this in your vents will not fit correctly and there will be a weird gap. Don't ask me how I know this. The yellow arrow above points to it.
Once you have them re-mounted, you'll end up with this:

In part three, I'll go over wiring, etc.
Go to the lower front of the center stack. Take your philips screw driver and remove the two screws in the circles and set them aside.
Take your philips screw driver and unscrew the two screws set deep under the CD player - take a look at the picture. There's one on each side. If you're like me, be ready to drop them down in the depths of the center console and spend a good bit of time fishing them back out. Set them aside.

Take a hold of the underside of the top of the display surround and pull up and out. It will take a bit of effort if you've never had it apart before. There are connections attached to the back side, so be careful. Don't rip it out, just pull firmly.

Once you've disconnected it, set it aside carefully. Take your philips screw driver and unscrew the two screws holding the screen in place.

Take your center stack trim piece with vents and with a thin flat head screw driver, carefully - repeat carefully - pry out the tabs. Emphasis carefully. You pry them too far and they break. There are six (if I remember correctly, three on both sides of each vent).

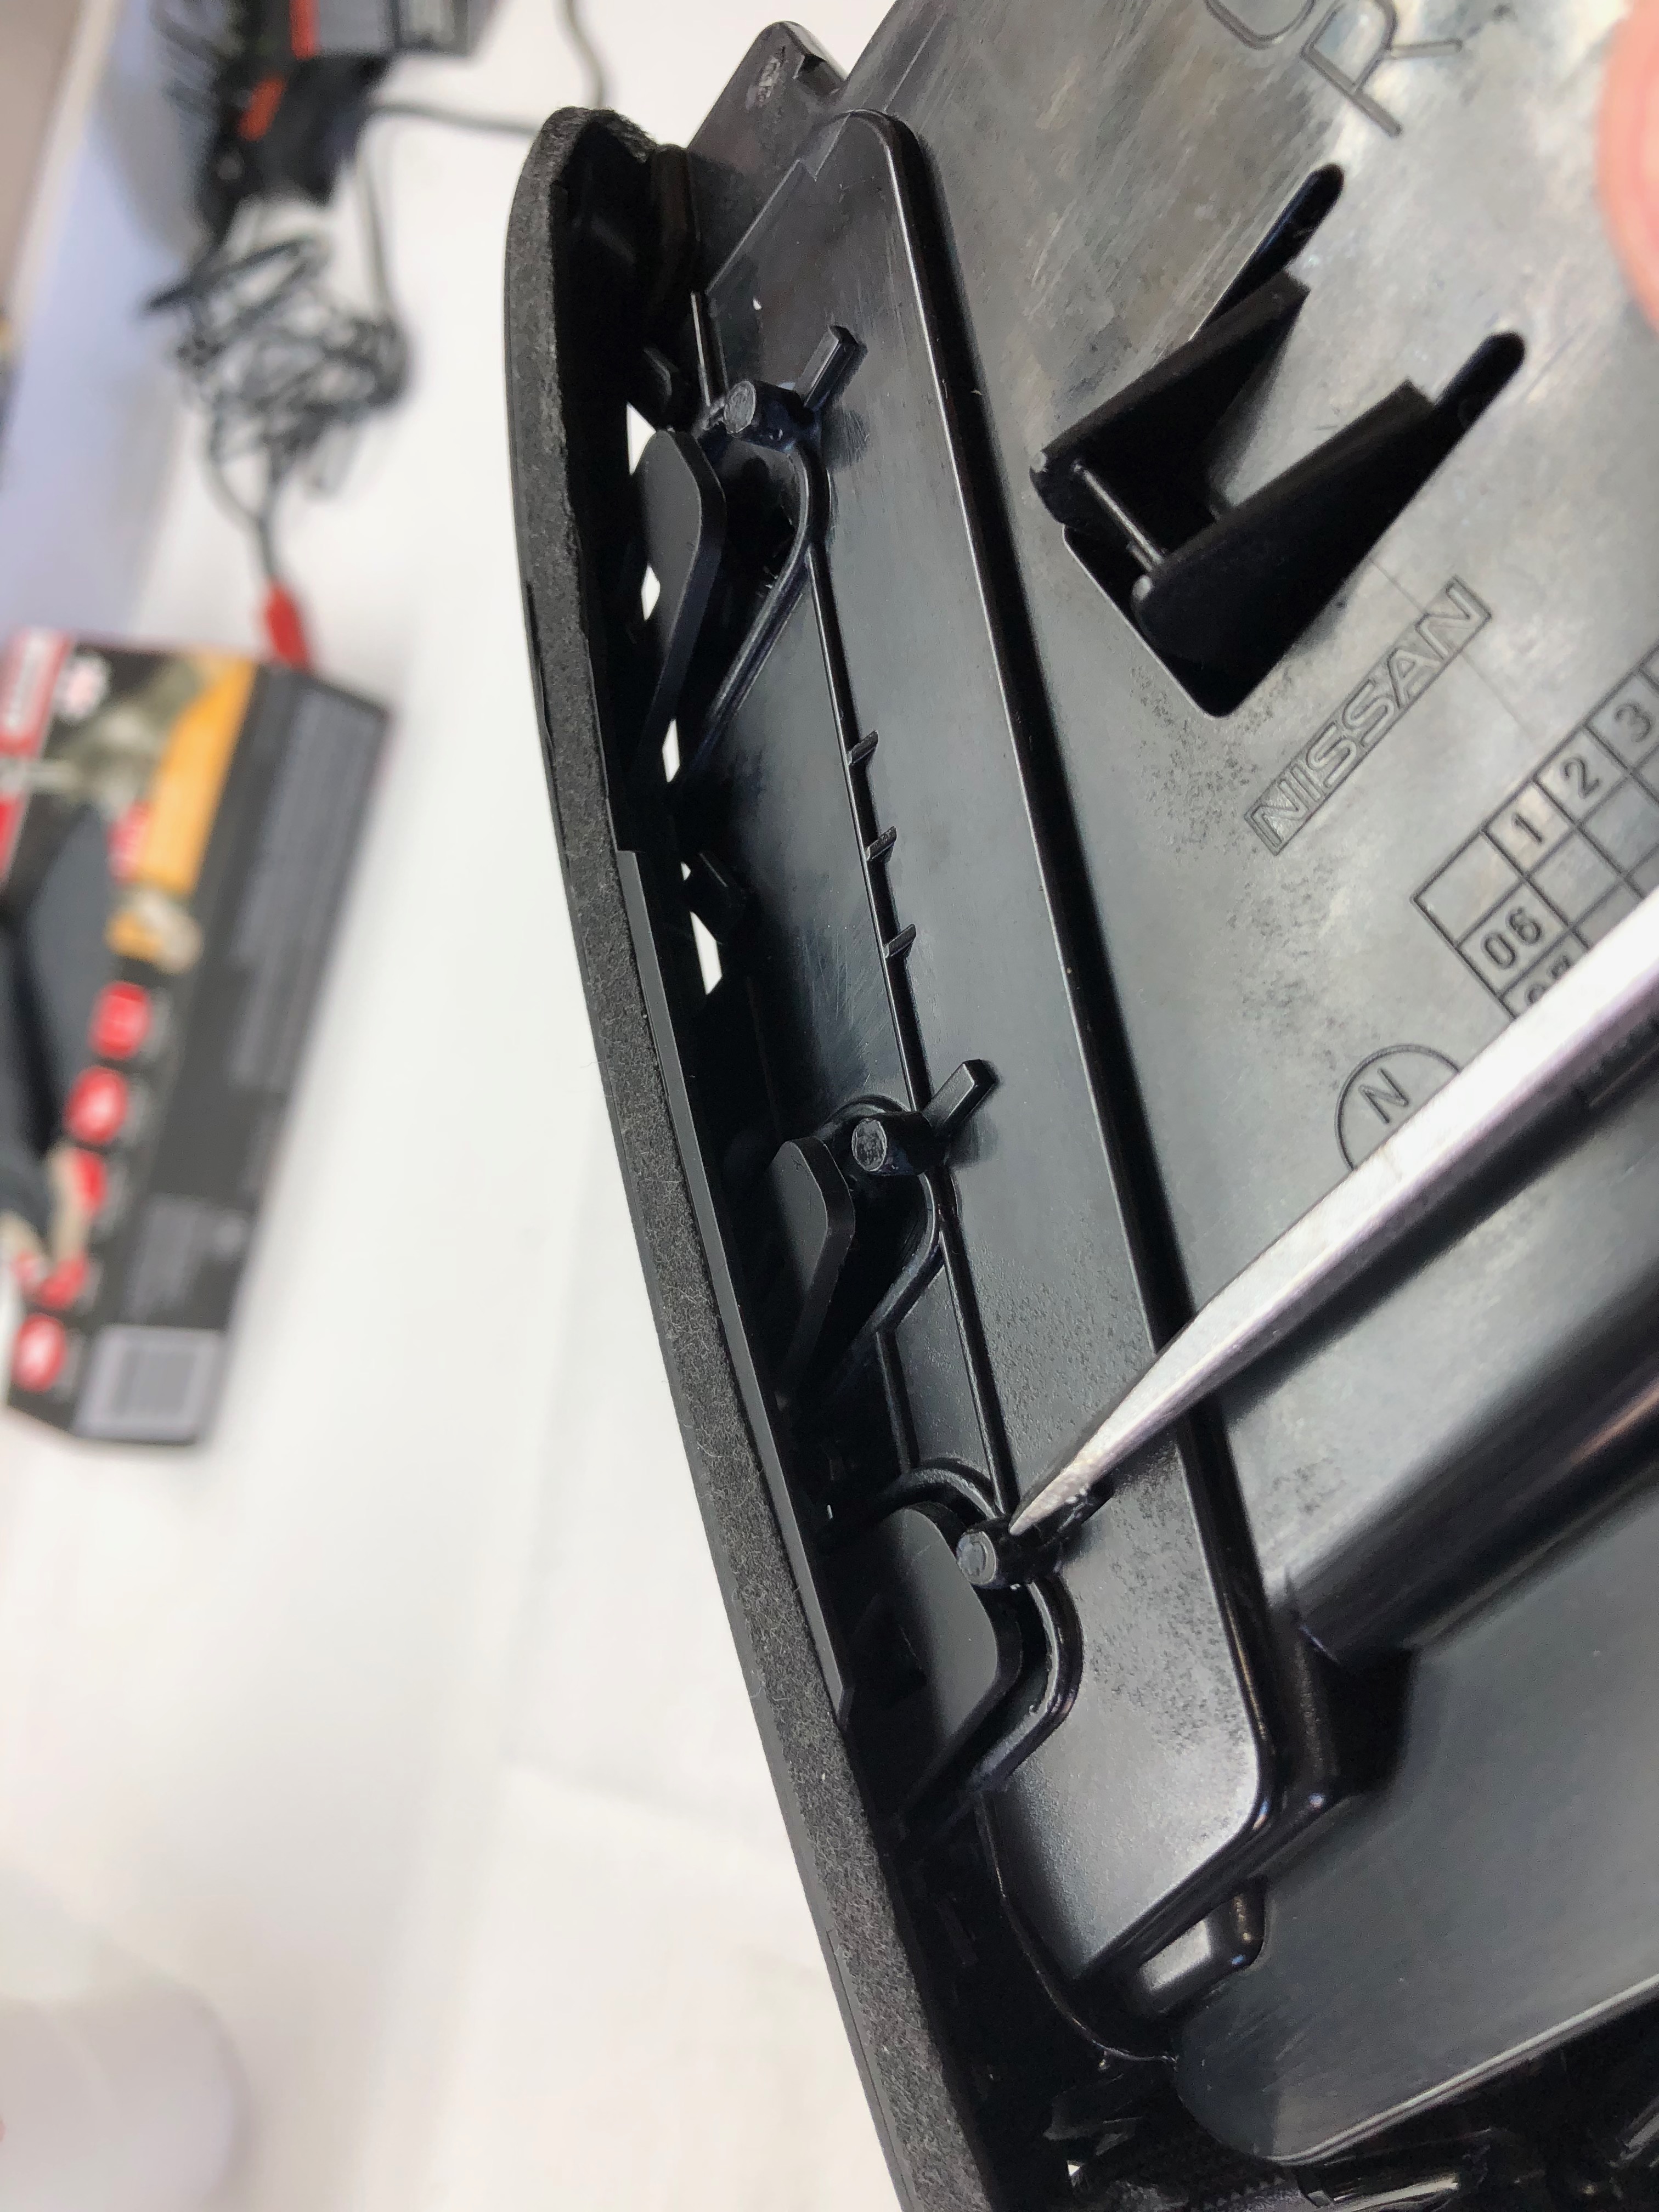
When you've pried them correctly, they should look like this:

At this point, you can carefully separate them from the center stack.
Take your radio and turn it face down on the foam layer that was in the top of the box. Reinstall the vents into the new radio face plate in reverse order. One thing that you need to be aware of; there is a tab on the inside edge that fits in to a slot on the new frame. If you don't seat this in your vents will not fit correctly and there will be a weird gap. Don't ask me how I know this. The yellow arrow above points to it.
Once you have them re-mounted, you'll end up with this:


In part three, I'll go over wiring, etc.
Last edited by Dat240zg; 01-13-2019 at 06:17 PM.
The following 6 users liked this post by Dat240zg:
Baadnewsburr (01-14-2019),
DrippDroppz (08-22-2019),
dtg11 (02-14-2020),
InitialC (01-20-2019),
Scarab Armor (01-15-2019),
and 1 others liked this post.
01-13-2019, 03:00 PM
#119
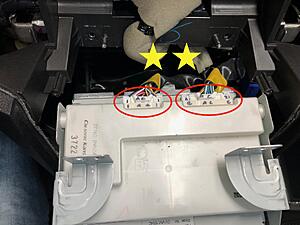
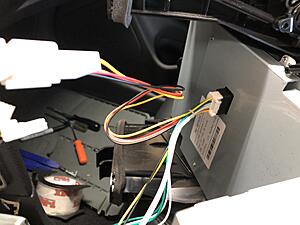
Part three - wiring. If there is anything that's lacking about the setup, its the instructions for wiring/connections. This should save you time. I went through all of the posts on the Facebook page to get mine done correctly.
Important: The white thin box on top of the CD player is your AC controller. Mark the order that the two harnesses plug in to the back or you'll blow fuses or worse...
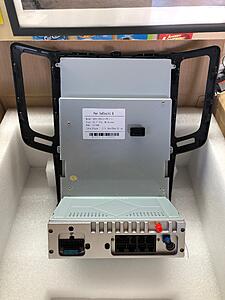
Here's the back of the factory radio for reference. The red arrow points to the OEM USB wiring. You'll need this.
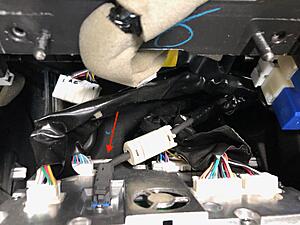
Go ahead and disconnect the wiring on the back of the OEM radio and remove and set aside.
Piece of advice: Look at the colors of the wires on both sides (car and radio) to determine if you're plugging them in correctly. This sheet shows the location of where things are plugged in to the back of the radio:
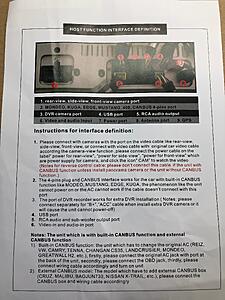
I chose to mount the GPS antenna (you have to use theirs) to a frame piece. I took a alcohol swab to clean it, and installed it there:
Part four coming...
Important: The white thin box on top of the CD player is your AC controller. Mark the order that the two harnesses plug in to the back or you'll blow fuses or worse...

Here's the back of the factory radio for reference. The red arrow points to the OEM USB wiring. You'll need this.

Go ahead and disconnect the wiring on the back of the OEM radio and remove and set aside.

Piece of advice: Look at the colors of the wires on both sides (car and radio) to determine if you're plugging them in correctly. This sheet shows the location of where things are plugged in to the back of the radio:

I chose to mount the GPS antenna (you have to use theirs) to a frame piece. I took a alcohol swab to clean it, and installed it there:


Part four coming...
Last edited by Dat240zg; 01-13-2019 at 06:22 PM.
The following 6 users liked this post by Dat240zg:
Baadnewsburr (01-14-2019),
frank37 (01-14-2019),
InitialC (01-20-2019),
InvincibleMoose (12-22-2019),
Scarab Armor (01-15-2019),
and 1 others liked this post.
01-13-2019, 03:13 PM
#120
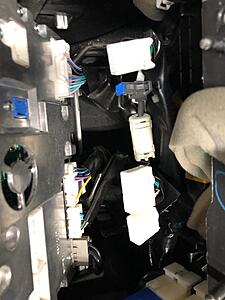
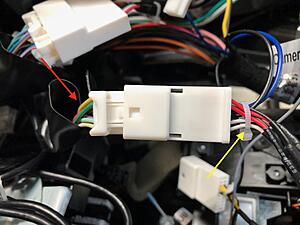
Part four - connecting the wires.
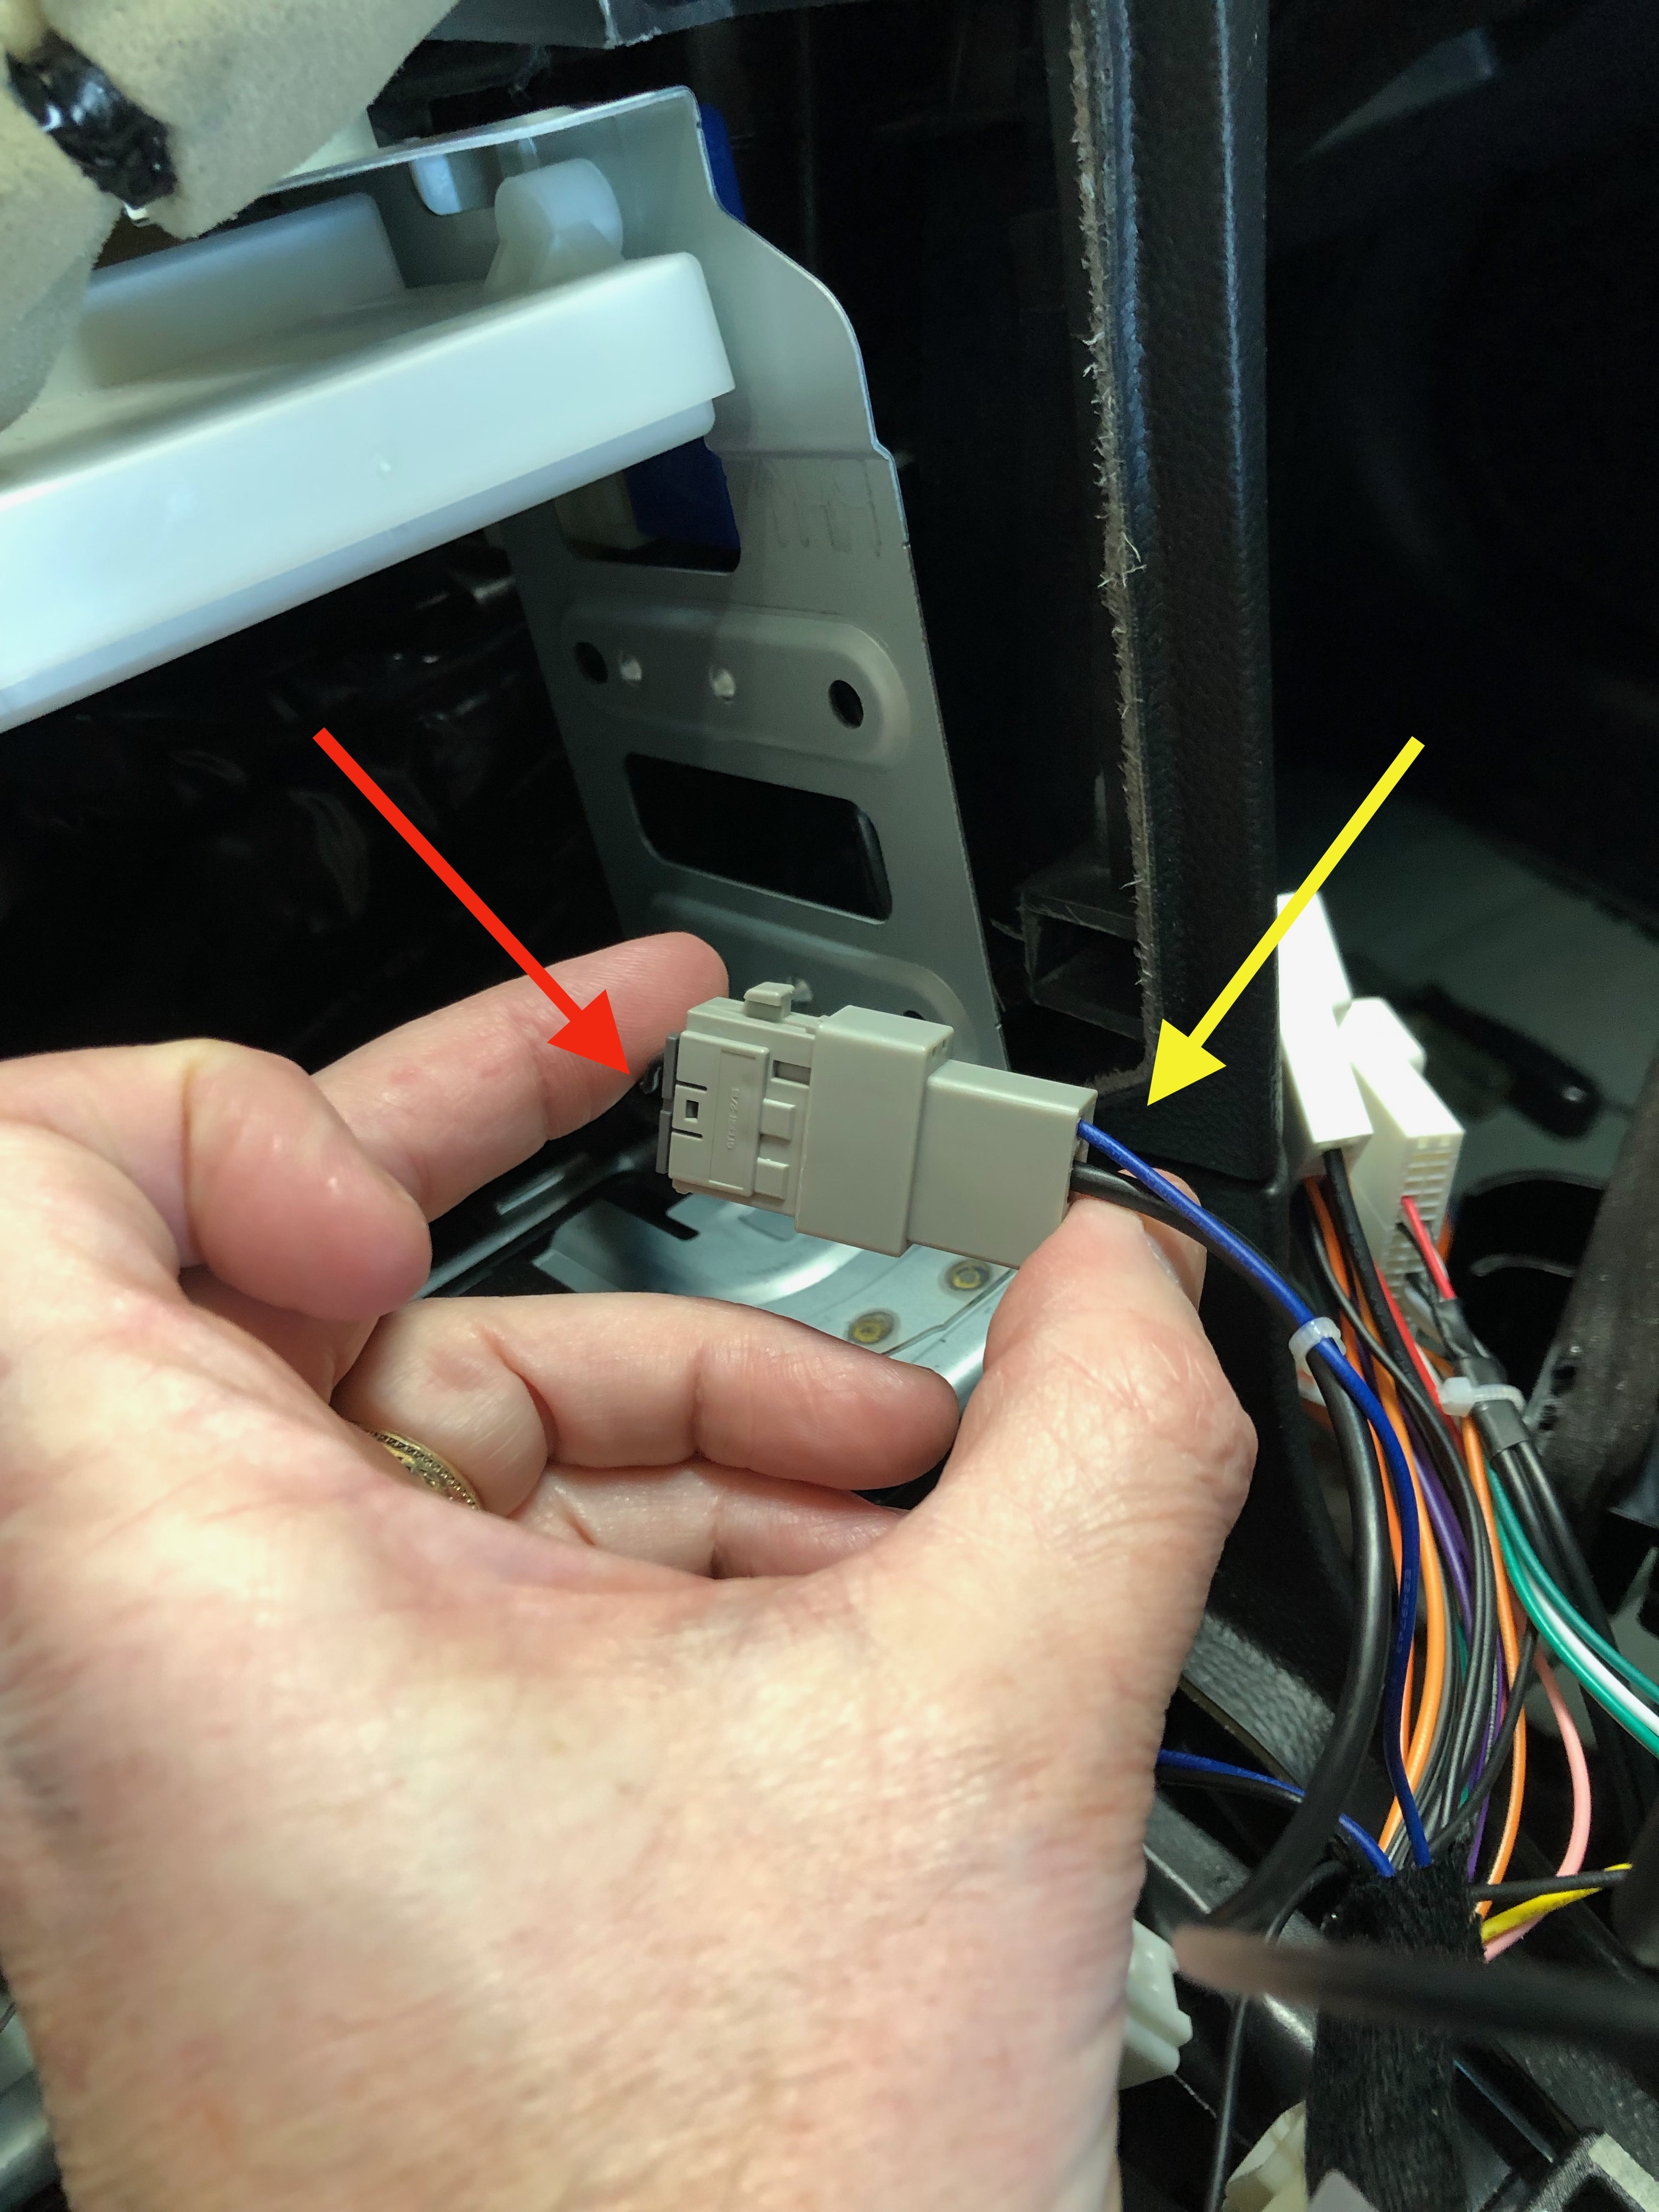
Red arrow indicates factory harness, yellow arrow indicates radio harness.

Note: This small harness from the radio plugs in to a small hookup just to the left of the left red arrow in the picture below. Don't miss it. It's the airbag indicator harness.
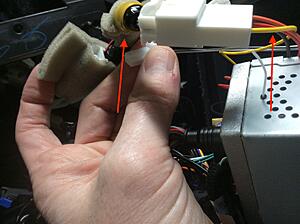

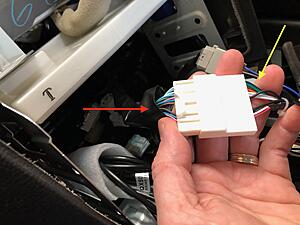
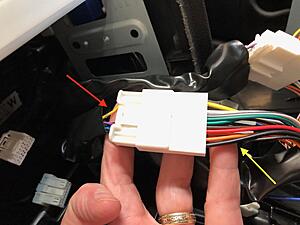
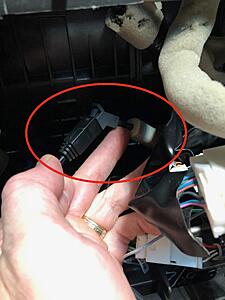
USB plug in to the factory USB cable:
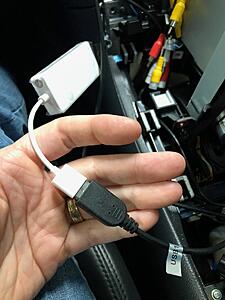
I plugged in the CarPlay dongle to one of the two USB ports.
I then took some thin shipping foam and wrapped it up so that I wouldn't have any rattling.
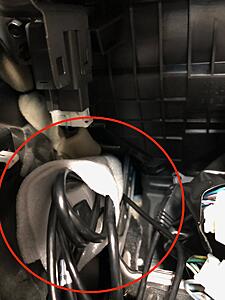
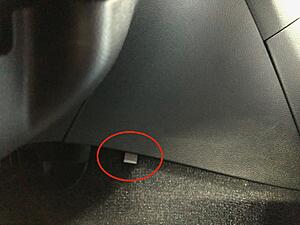
I ran the other USB to the lower edge of the center console. It sticks out just enough that I can plug in my 1tb flash drive. You don't even see it unless you're looking for it:
Red arrow indicates factory harness, yellow arrow indicates radio harness.


Note: This small harness from the radio plugs in to a small hookup just to the left of the left red arrow in the picture below. Don't miss it. It's the airbag indicator harness.


USB plug in to the factory USB cable:

I plugged in the CarPlay dongle to one of the two USB ports.

I then took some thin shipping foam and wrapped it up so that I wouldn't have any rattling.

I ran the other USB to the lower edge of the center console. It sticks out just enough that I can plug in my 1tb flash drive. You don't even see it unless you're looking for it:

Last edited by Dat240zg; 01-13-2019 at 06:29 PM.
The following 6 users liked this post by Dat240zg:
Baadnewsburr (01-14-2019),
frank37 (01-14-2019),
InitialC (01-20-2019),
Jrizzy (05-02-2019),
Scarab Armor (01-15-2019),
and 1 others liked this post.