DYI: 30-min Invisible Trailer Hitch Mod
 11-06-2015, 12:22 AM
#1

DYI: 30-min Invisible Trailer Hitch Mod
I got this idea from baileyrx on GTR life.
DIY- light load trailer hitch for my G37x - Detailing & Cleaning - GT-R Life
I'm an avid cyclist, mountain biking junkie and DH degenerate.
But I really dig my G and the capper to a great day would be a relaxing drive back from the ride in my hot little hooptie.
I know the performance purists will pop their craniums at the thought of putting a trailer hitch on a G, let alone a bike rack.... but then they didn't by my car...I did.
That said, I'm not too keen on the hitch look either but it's a buttload better than a roof rack IMO.

So I looked at the market offerings and they involved removing the bumper facade & beam, fishing bolts through the beam and a fair bit of cutting in the facade.
Meh.
Bailey's solution is very elegant, involves no cutting at all, except a minor bit of trimming purely for piece of mind.
And best of all, it is totally invisible when not in use.
No soccer-mom, truck-nutz vacant hitch reciever when I'm not biking.
Here's how it goes,
From Northern Tool, I ordered:
Ultra-Tow Step Bumper Receiver – Class II, 3,500-Lb. GTW, 2in.
Item# 33476
$24.99
Ultra-Tow 3-Position Adjustable Ball Mount
Item# 605684
$49.99
And (4) 0.5"x3.5" Bolts from Home Depot.
and (4) 0.5" washers.
(I also used the washers, nuts and lock washers that came with the hitch)
I also bought a 9/16" metal cutting drill bit.
You will also need some blue loctite and appropriate sized ratchet and/or wrenches.
Some blue tape is helpful too, but any tape will do.
And a dremel with a cutoff wheel if you choose to trim your bumper facade. (or a sharp utility knife and a steady strong hand)
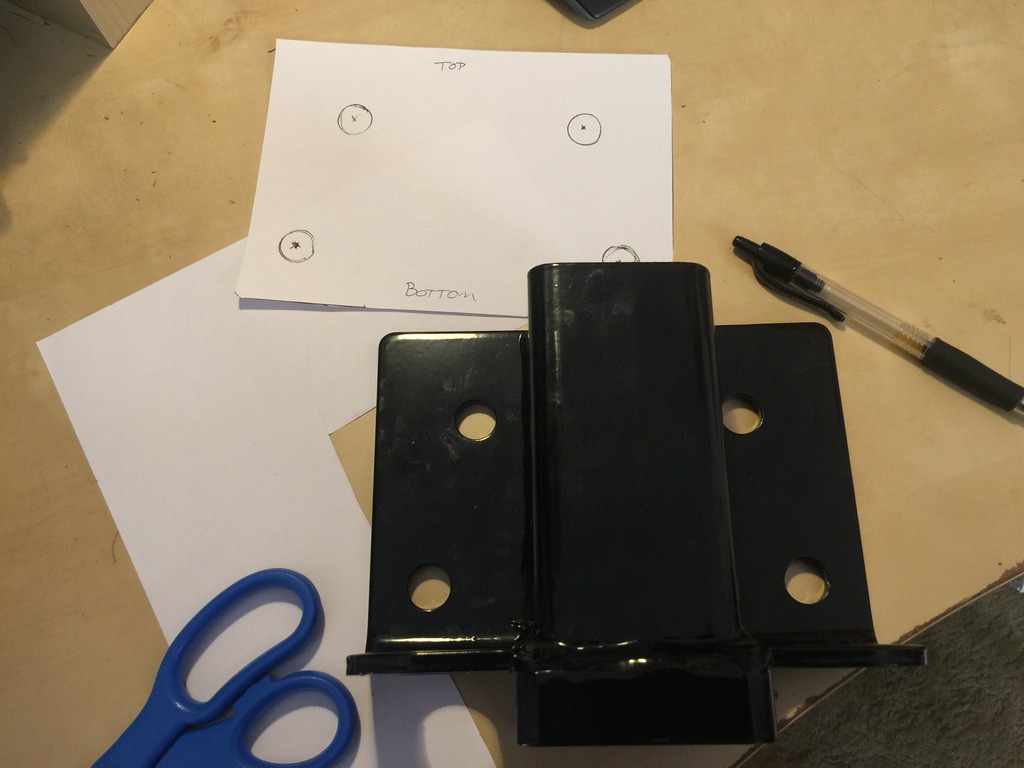
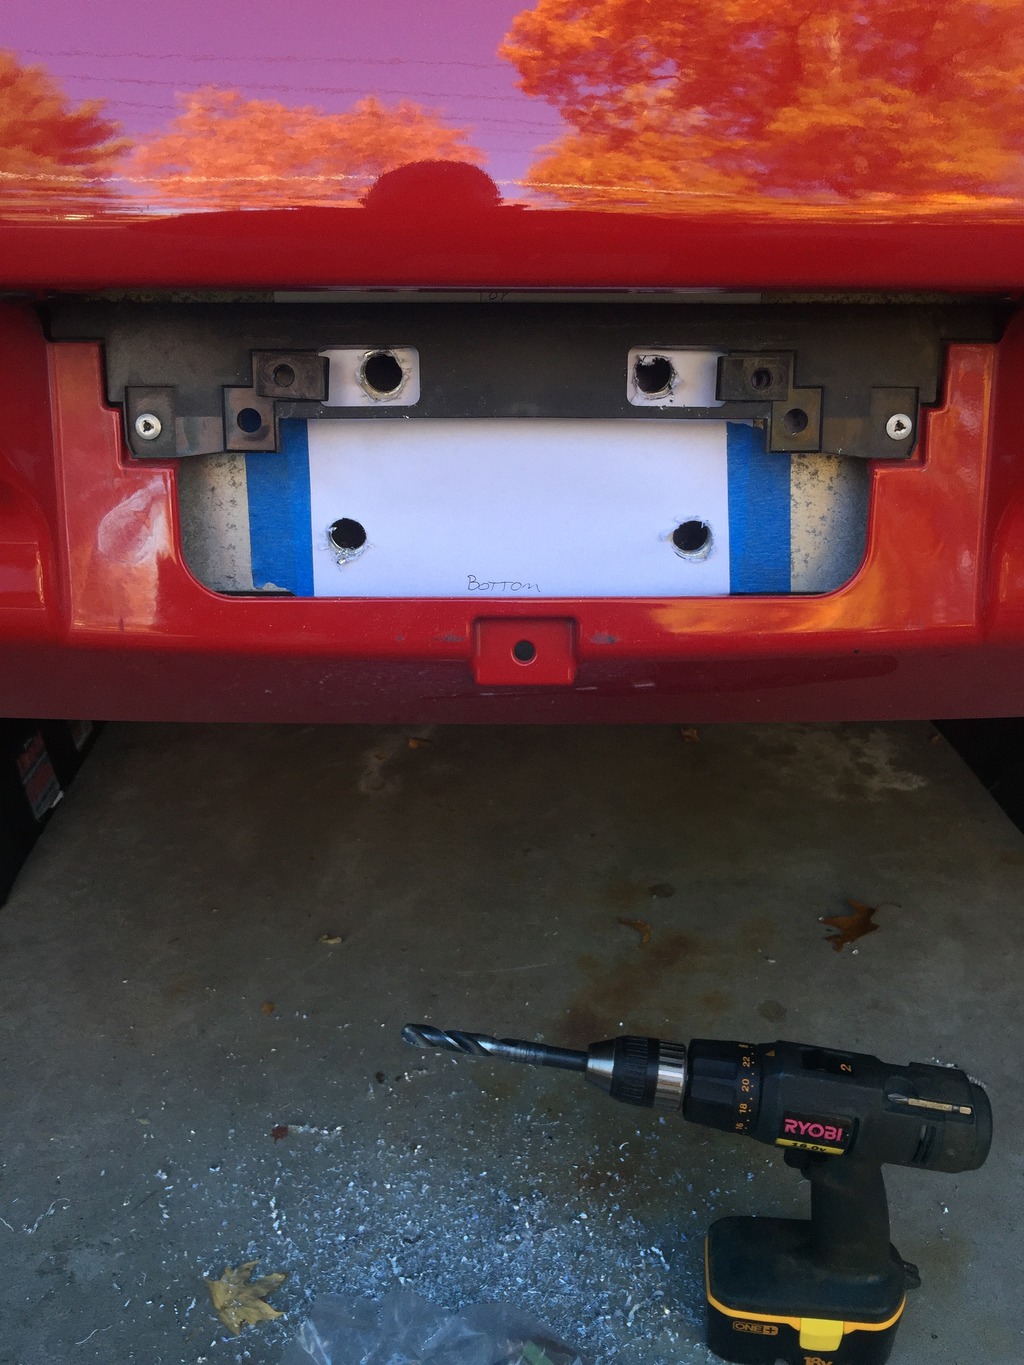
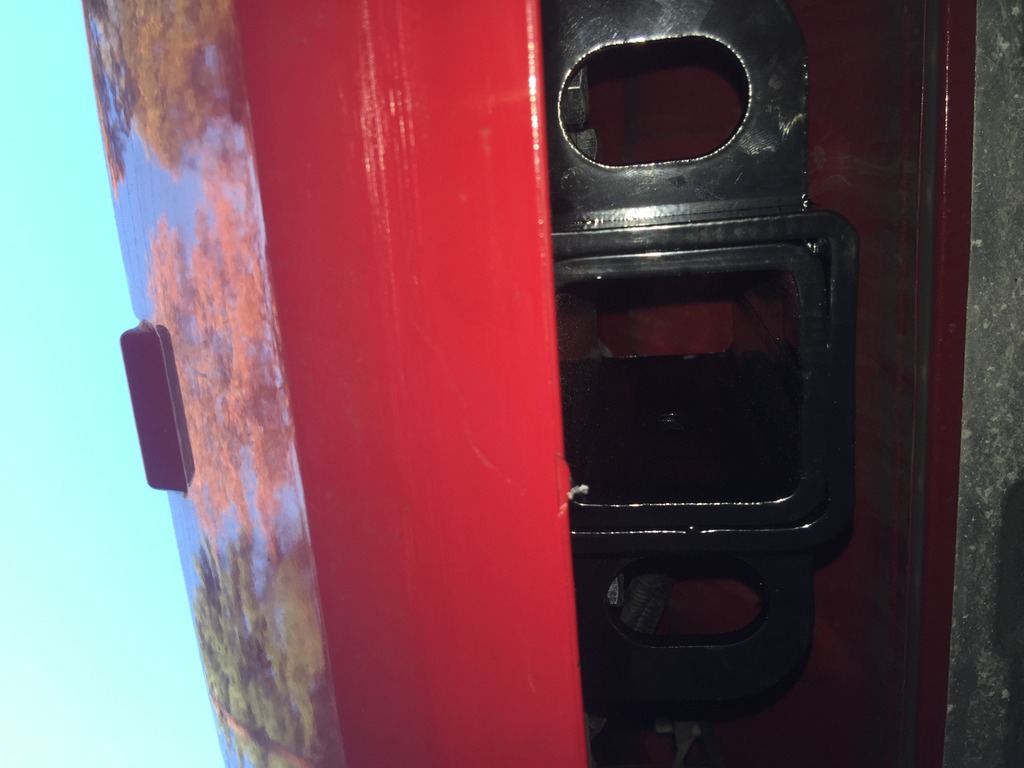
I made a template by tracing the step receiver bracket and it's holes.
The bumper beam is directly behind the facade but you don't have to remove it to get at it.
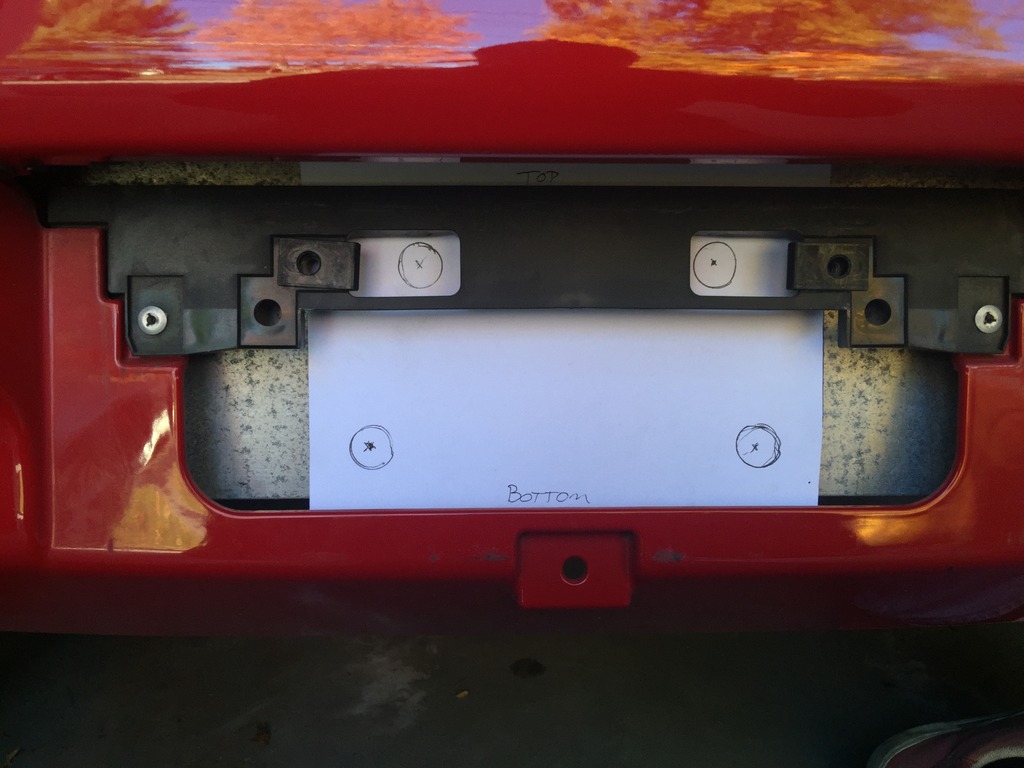
You only have to remove the rear license plate, and slip the paper template underneath. Center it with the existing licence plate bracket holes.
Next, I made some starter dimples using a smaller drill bit, then cut the full size holes using the 9/16" bit.

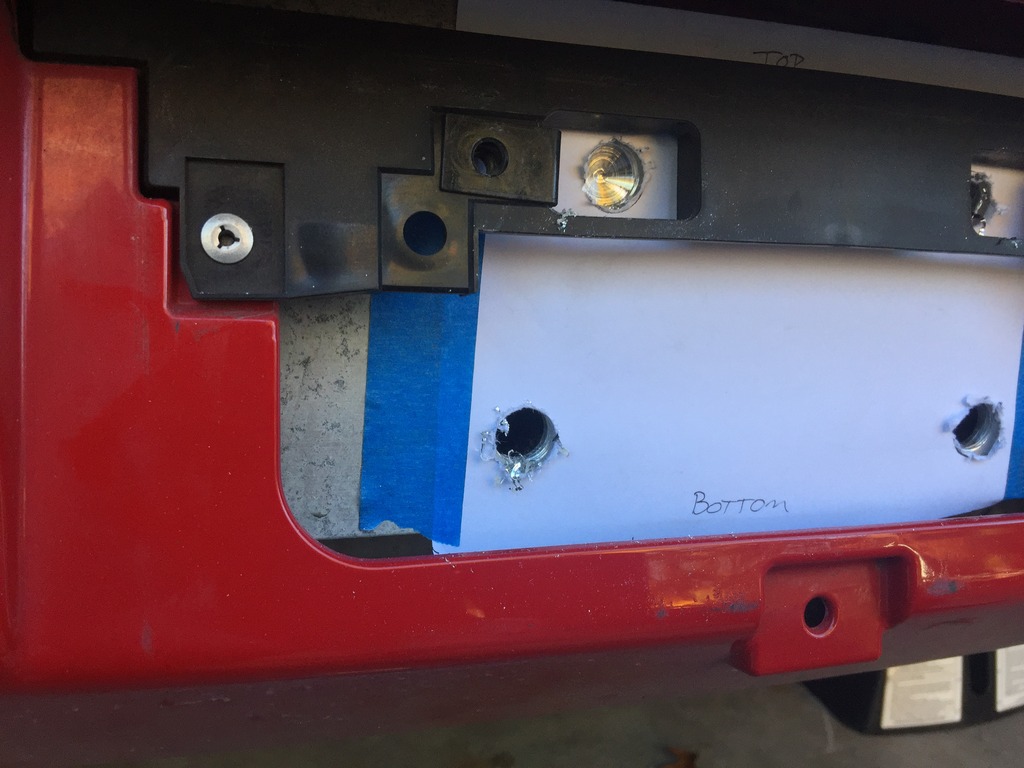
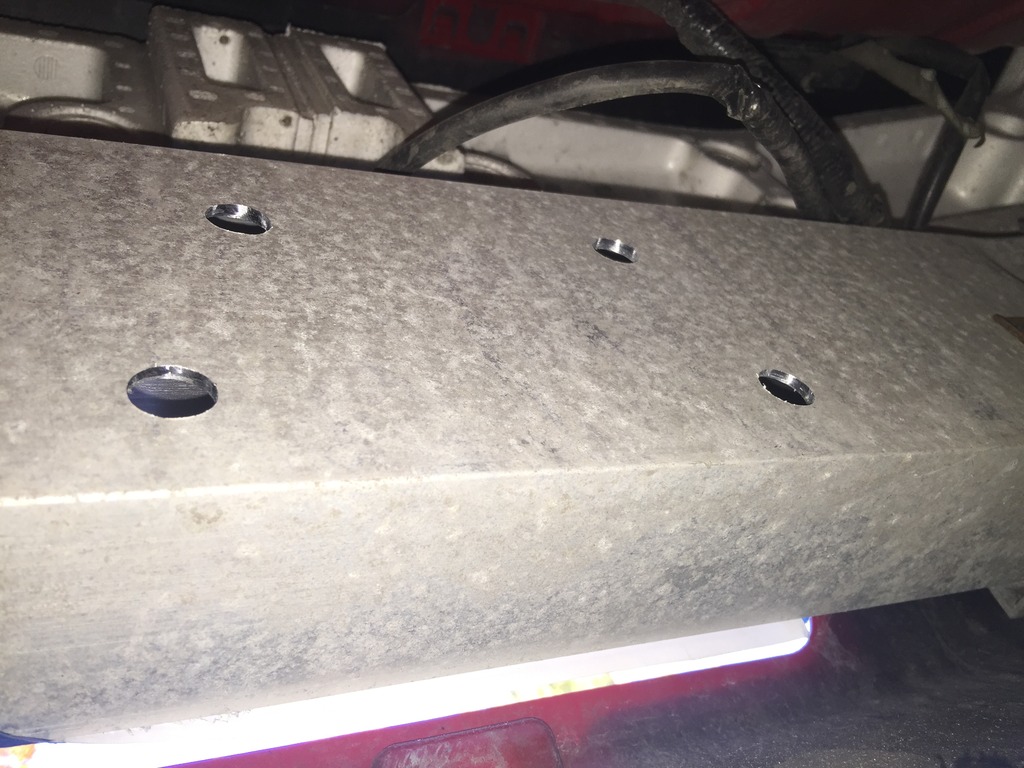
Remember: you are essentially drilling 8 holes, 4 on each side of the bumper beam since it is hollow. So if you are using a cordless like I was, it might be helpful to have a spare battery on hand. Drill straight through, try to keep the drill straight and level so the holes line up on both sides.
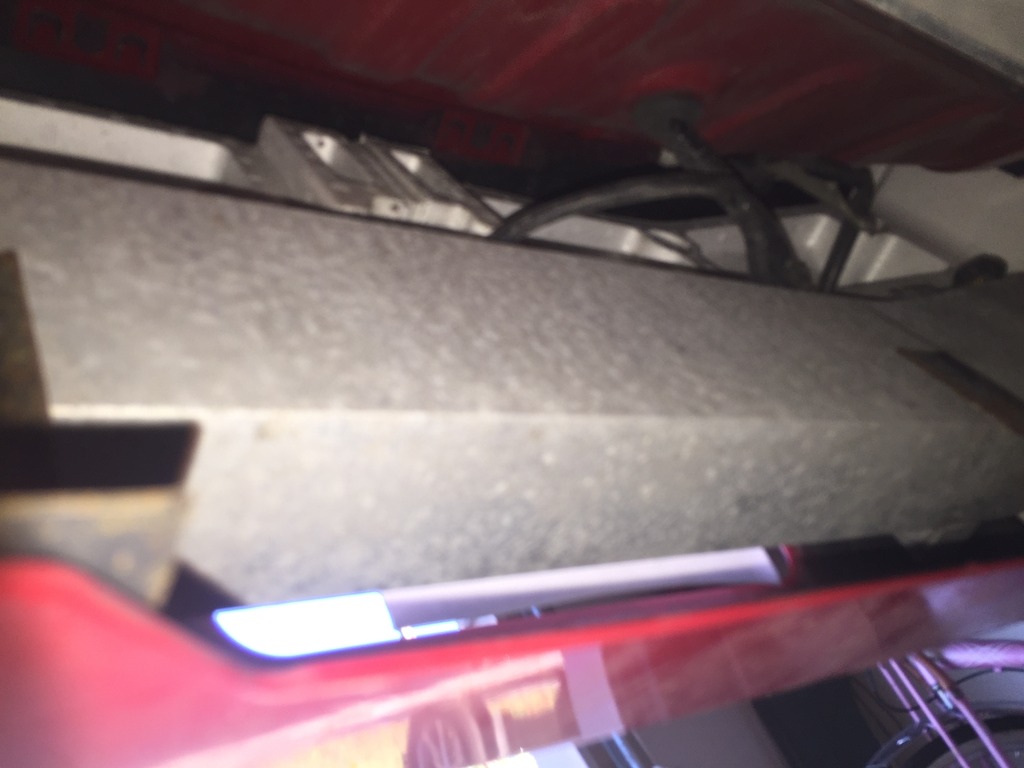
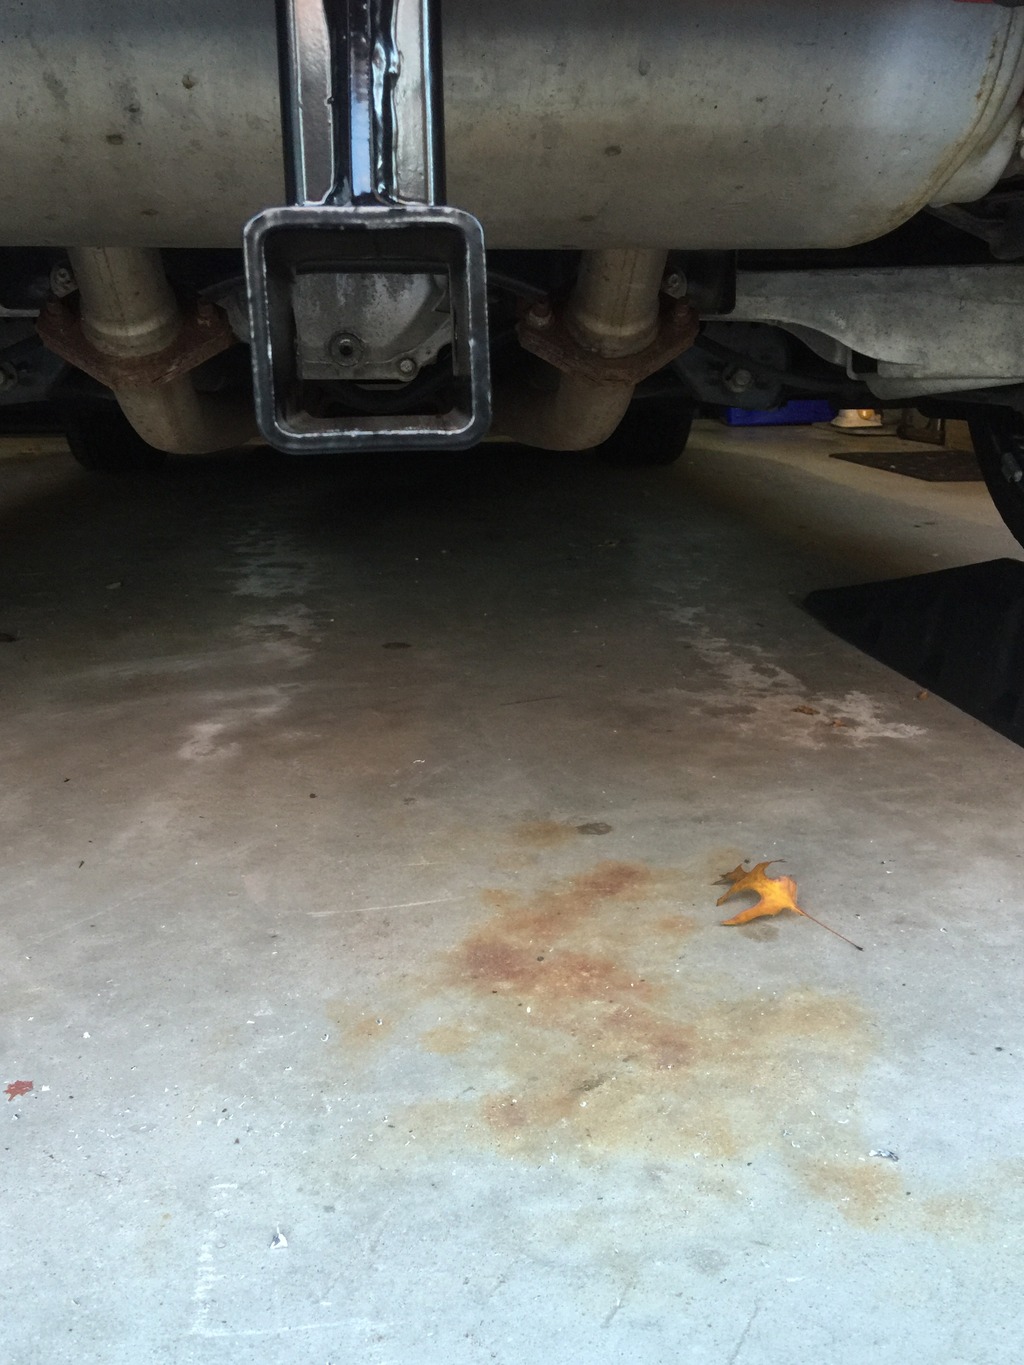
Here's the backside again (Between the facade and the muffler). If you drill straight from the license plate side you don't have to do anything on the inside other than sweep up all the cuttings on the floor and on the bumper facade. The cuttings can be a PITA.
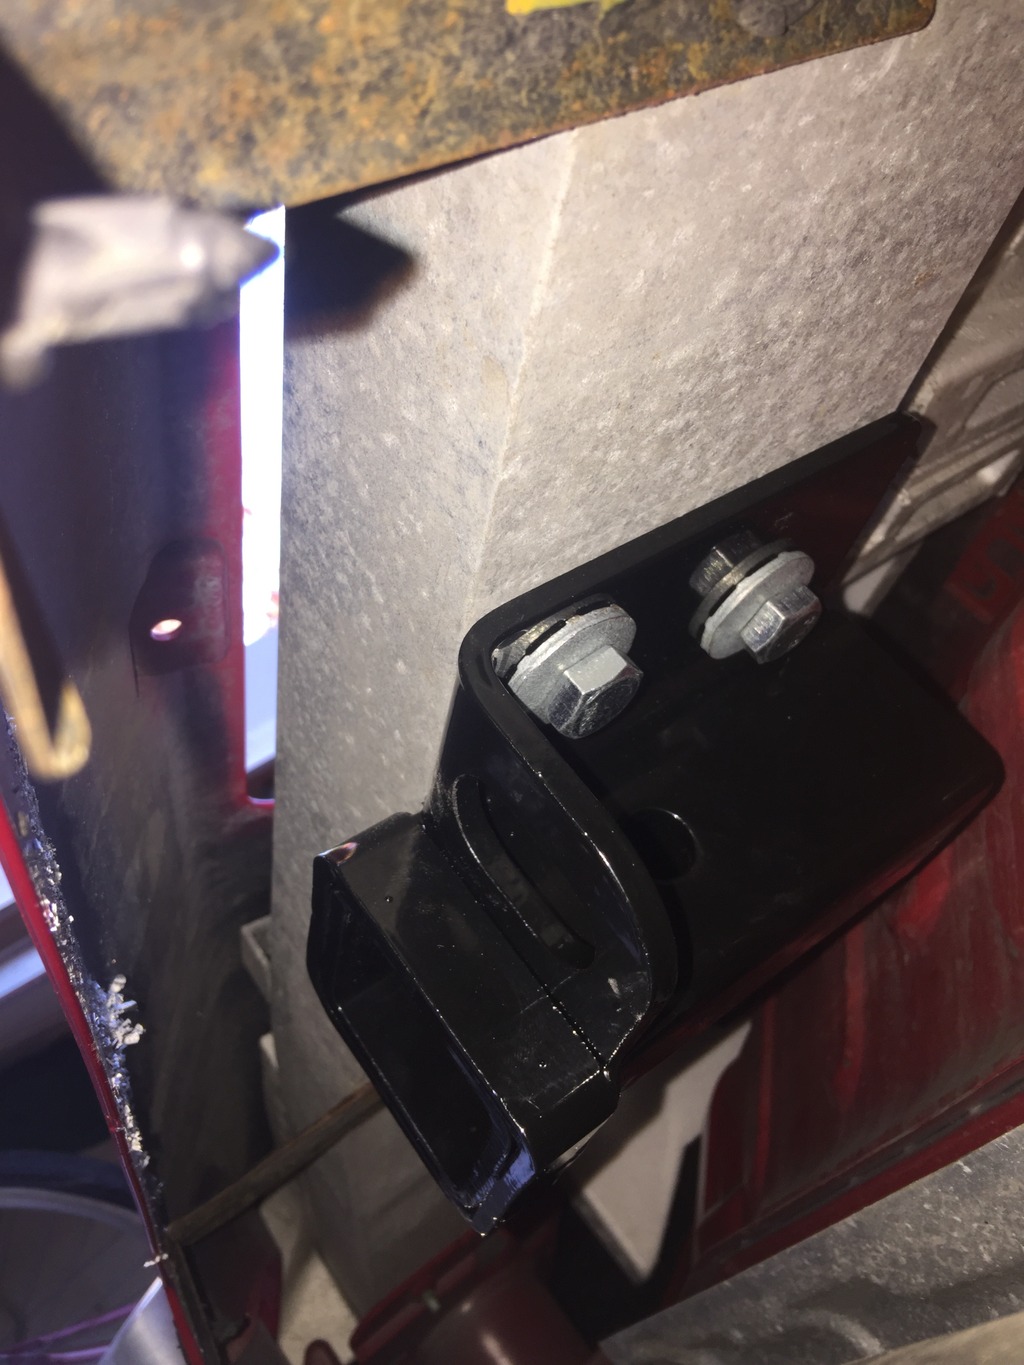
Now lift the hitch receiver into place and slip in the bolts with washers. Pointing from the inside to the outside.
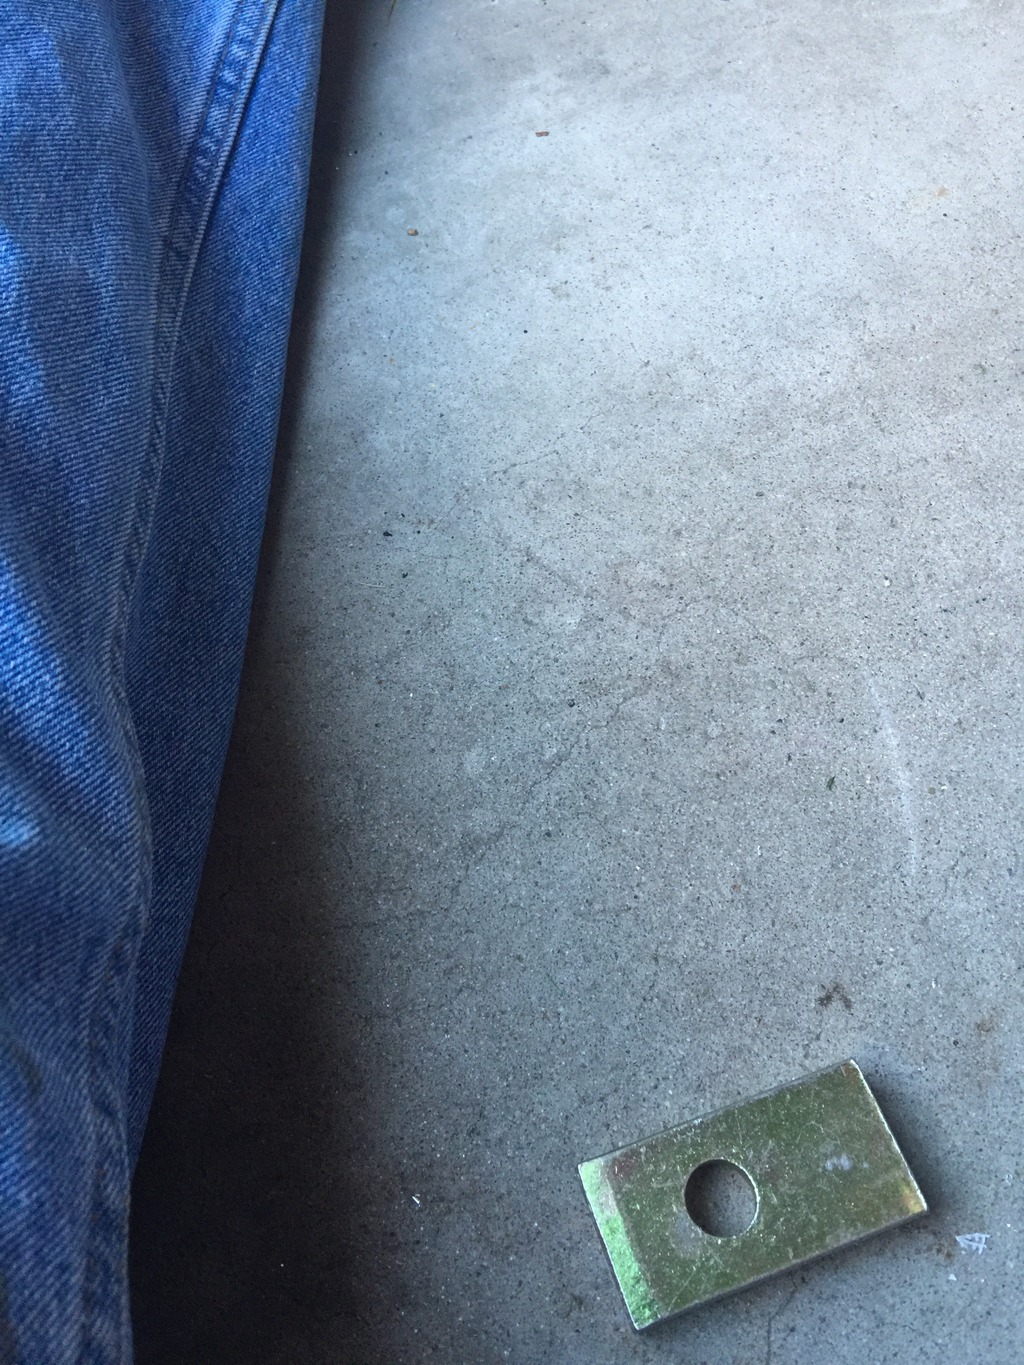
*OPTION* you might want to use the included 1/2" mounting spacers between the step hitch and the bracket It will give you a little extra distance from the facade. I chose not to use them so I could have the greatest contact between the parts.
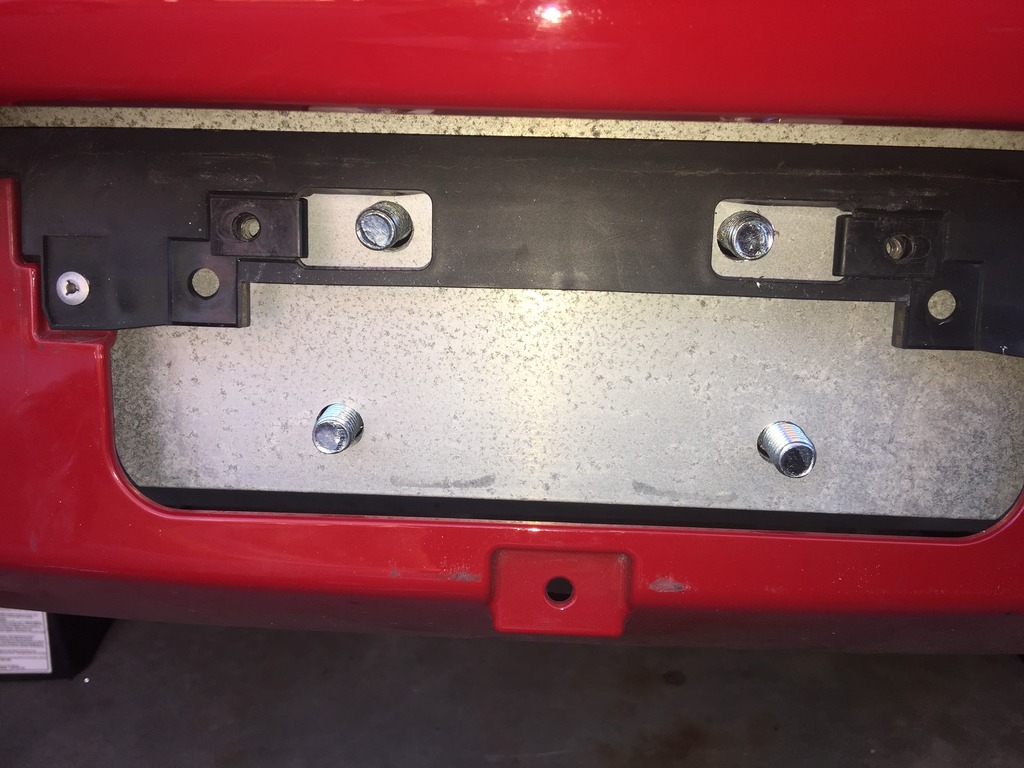
It will line up nicely with the license plate holder
Put some blue loctite on the bolts and perhaps a drop or two on the nut threads, then put the nuts on along with the flat and split/lock washers.
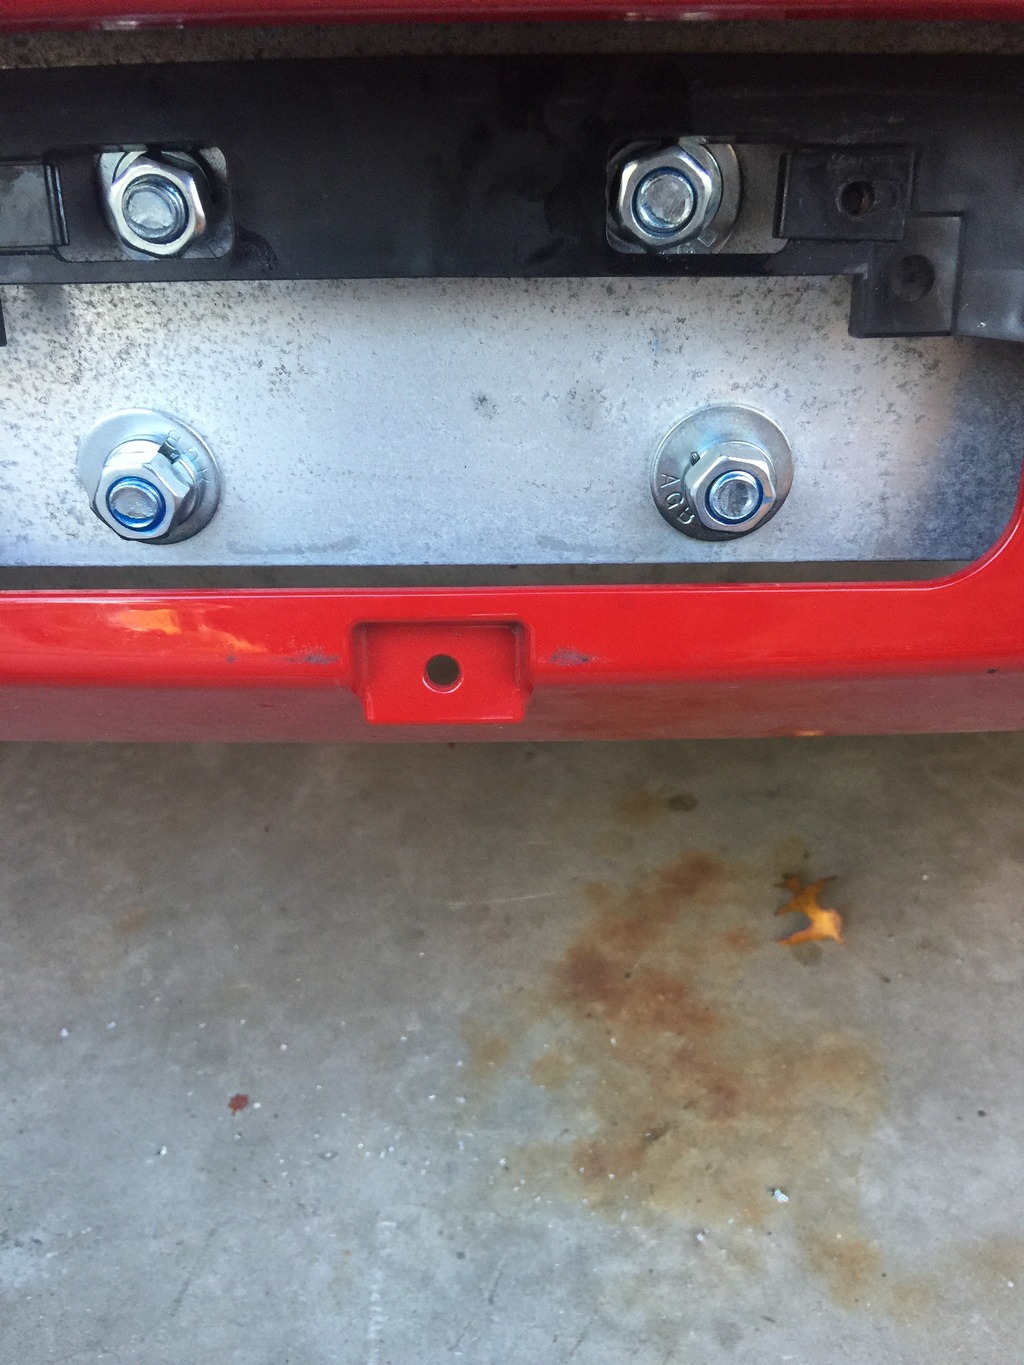
Slide the L-bracket/adjustable receiver into the step receiver and lock it in with the hitch pin.
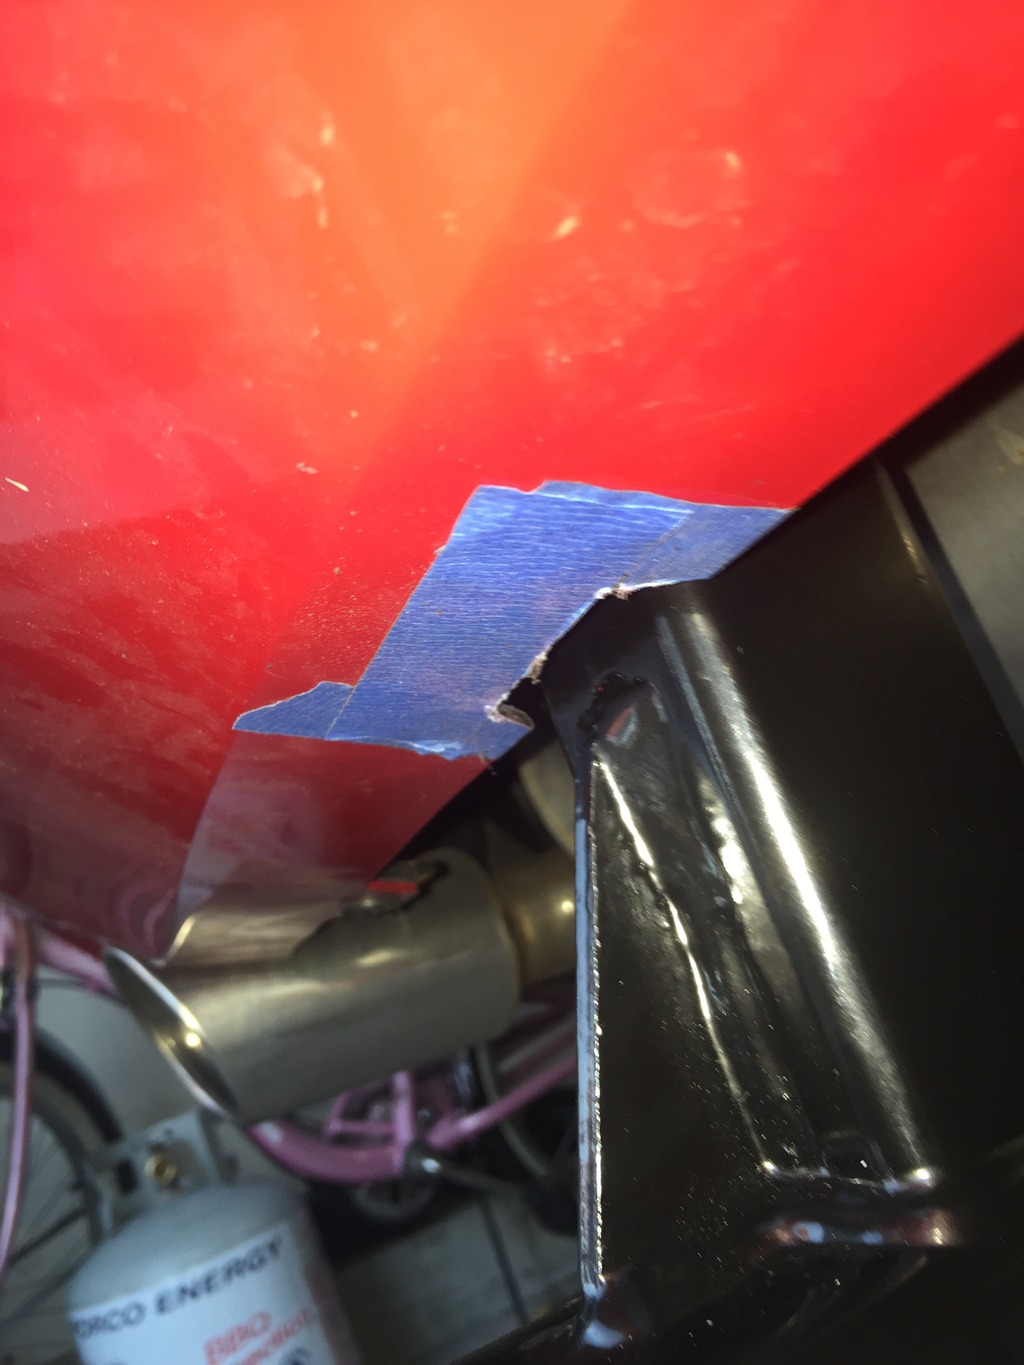
You will immediately see the drop hitch just barely touches the bumper facade.
This is where the optional spacers make a difference. I chose to notch the bumper facade just a tad bit to allow for movement.
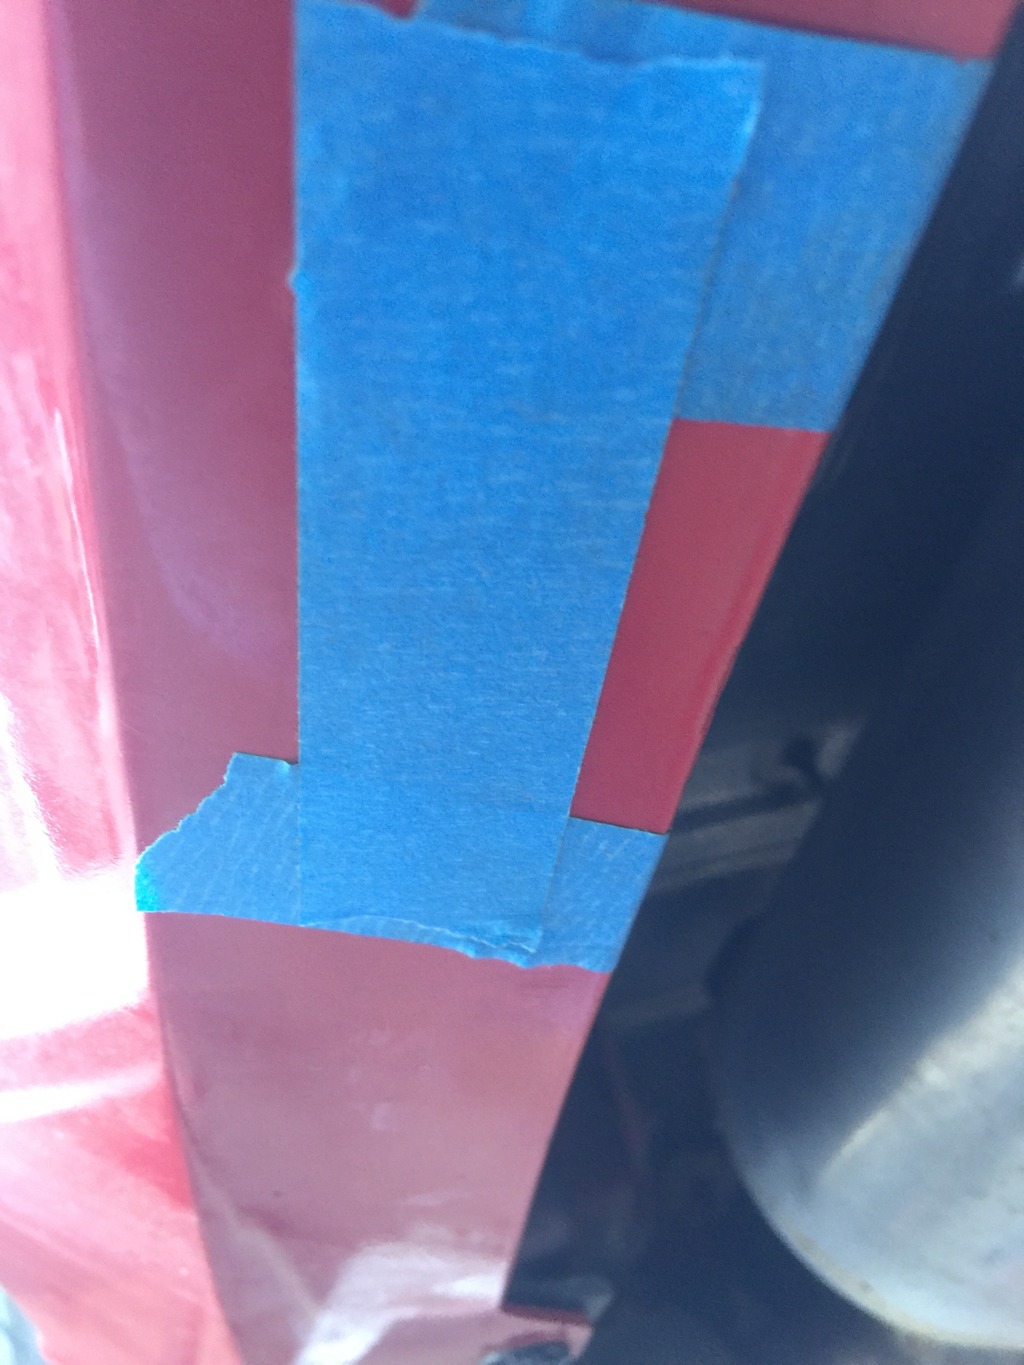
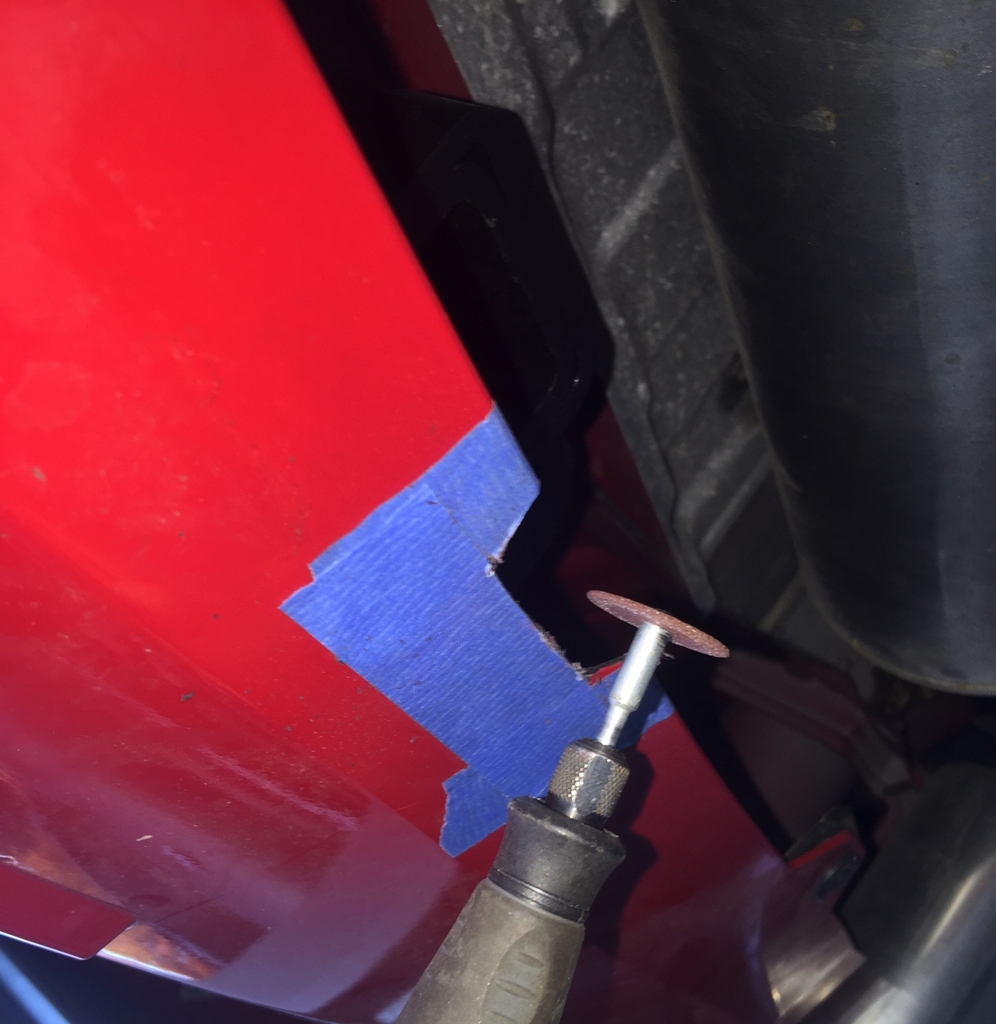
The dremel makes short work of the facade trimming.
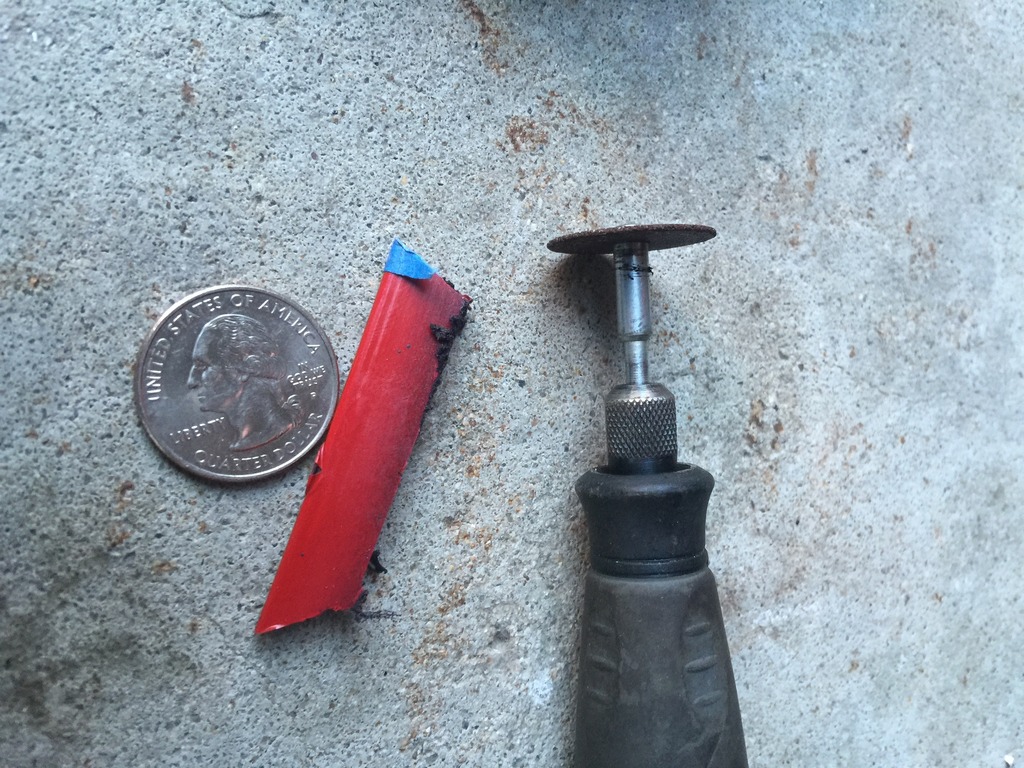
There wasn't much to cut.
That's pretty much it!
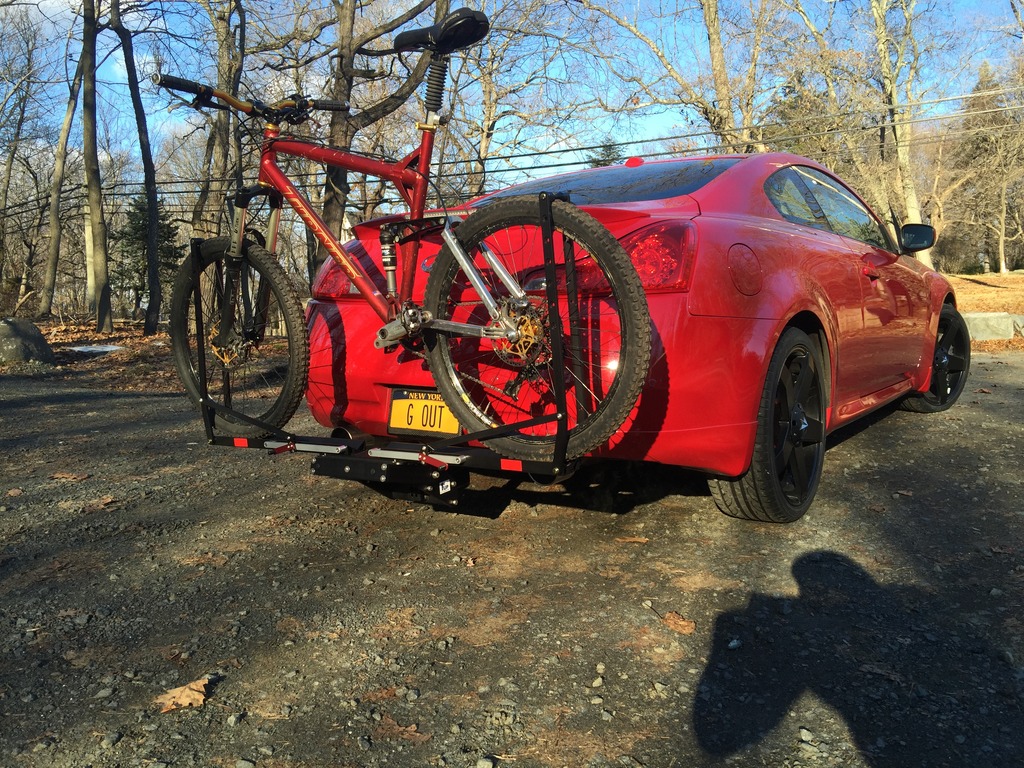
The lowest point on the hitch is ~7" on a stock height '13 G37xS
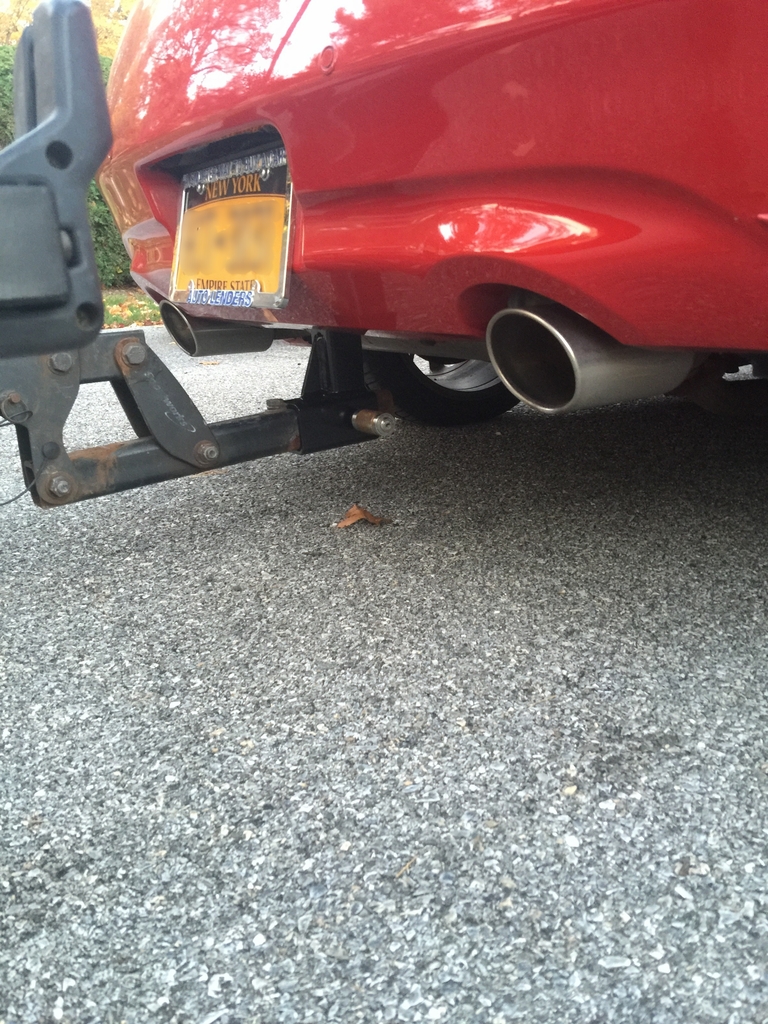
It is still higher than the exhaust pipes under the car.
**** Final Thoughts ****
I found it easy to install, maybe 30-45 mins.
The bumper beam is unexpectedly flexy in my opinion. I wouldn't get carried away with putting too much of a load on it. Even if etrailer, u-haul and curtis make hitches that bolt on in a similar way. I wouldn't tow anthing that isn't light and I'd lean towards one or two bikes on a light rack.
I'll let you know how it holds up when my new rack arrives. The OP in the link above seemed pretty satisfied with it over time though.
DIY- light load trailer hitch for my G37x - Detailing & Cleaning - GT-R Life
I'm an avid cyclist, mountain biking junkie and DH degenerate.
But I really dig my G and the capper to a great day would be a relaxing drive back from the ride in my hot little hooptie.
I know the performance purists will pop their craniums at the thought of putting a trailer hitch on a G, let alone a bike rack.... but then they didn't by my car...I did.
That said, I'm not too keen on the hitch look either but it's a buttload better than a roof rack IMO.
So I looked at the market offerings and they involved removing the bumper facade & beam, fishing bolts through the beam and a fair bit of cutting in the facade.
Meh.
Bailey's solution is very elegant, involves no cutting at all, except a minor bit of trimming purely for piece of mind.
And best of all, it is totally invisible when not in use.
No soccer-mom, truck-nutz vacant hitch reciever when I'm not biking.
Here's how it goes,
From Northern Tool, I ordered:
Ultra-Tow Step Bumper Receiver – Class II, 3,500-Lb. GTW, 2in.
Item# 33476
$24.99
Ultra-Tow 3-Position Adjustable Ball Mount
Item# 605684
$49.99
And (4) 0.5"x3.5" Bolts from Home Depot.
and (4) 0.5" washers.
(I also used the washers, nuts and lock washers that came with the hitch)
I also bought a 9/16" metal cutting drill bit.
You will also need some blue loctite and appropriate sized ratchet and/or wrenches.
Some blue tape is helpful too, but any tape will do.
And a dremel with a cutoff wheel if you choose to trim your bumper facade. (or a sharp utility knife and a steady strong hand)
I made a template by tracing the step receiver bracket and it's holes.
The bumper beam is directly behind the facade but you don't have to remove it to get at it.
You only have to remove the rear license plate, and slip the paper template underneath. Center it with the existing licence plate bracket holes.
Next, I made some starter dimples using a smaller drill bit, then cut the full size holes using the 9/16" bit.
Remember: you are essentially drilling 8 holes, 4 on each side of the bumper beam since it is hollow. So if you are using a cordless like I was, it might be helpful to have a spare battery on hand. Drill straight through, try to keep the drill straight and level so the holes line up on both sides.
Here's the backside again (Between the facade and the muffler). If you drill straight from the license plate side you don't have to do anything on the inside other than sweep up all the cuttings on the floor and on the bumper facade. The cuttings can be a PITA.
Now lift the hitch receiver into place and slip in the bolts with washers. Pointing from the inside to the outside.
*OPTION* you might want to use the included 1/2" mounting spacers between the step hitch and the bracket It will give you a little extra distance from the facade. I chose not to use them so I could have the greatest contact between the parts.
It will line up nicely with the license plate holder
Put some blue loctite on the bolts and perhaps a drop or two on the nut threads, then put the nuts on along with the flat and split/lock washers.
Slide the L-bracket/adjustable receiver into the step receiver and lock it in with the hitch pin.
You will immediately see the drop hitch just barely touches the bumper facade.
This is where the optional spacers make a difference. I chose to notch the bumper facade just a tad bit to allow for movement.
The dremel makes short work of the facade trimming.
There wasn't much to cut.
That's pretty much it!
The lowest point on the hitch is ~7" on a stock height '13 G37xS
It is still higher than the exhaust pipes under the car.
**** Final Thoughts ****
I found it easy to install, maybe 30-45 mins.
The bumper beam is unexpectedly flexy in my opinion. I wouldn't get carried away with putting too much of a load on it. Even if etrailer, u-haul and curtis make hitches that bolt on in a similar way. I wouldn't tow anthing that isn't light and I'd lean towards one or two bikes on a light rack.
I'll let you know how it holds up when my new rack arrives. The OP in the link above seemed pretty satisfied with it over time though.
Last edited by bikezilla; 11-06-2015 at 12:34 AM.

 11-06-2015, 09:58 AM
#3
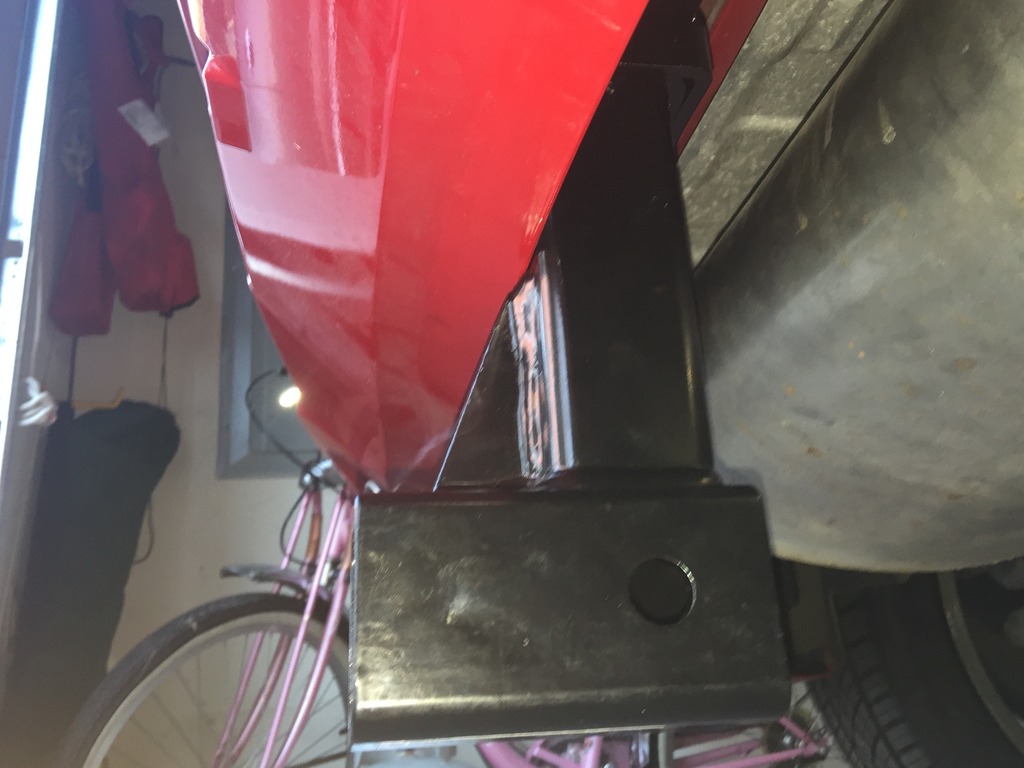
The aftermarket versions require quite a bit of cutting so I steered away from them.
As you can see from the pic above, a notch narrower than a coin wasn't much and can't be seen unless you are directly under the bumper.
Heck I'll probably end up with a carbon diffuser anyway!
12-16-2015, 12:56 PM
#4
Registered Member

Nice write up!
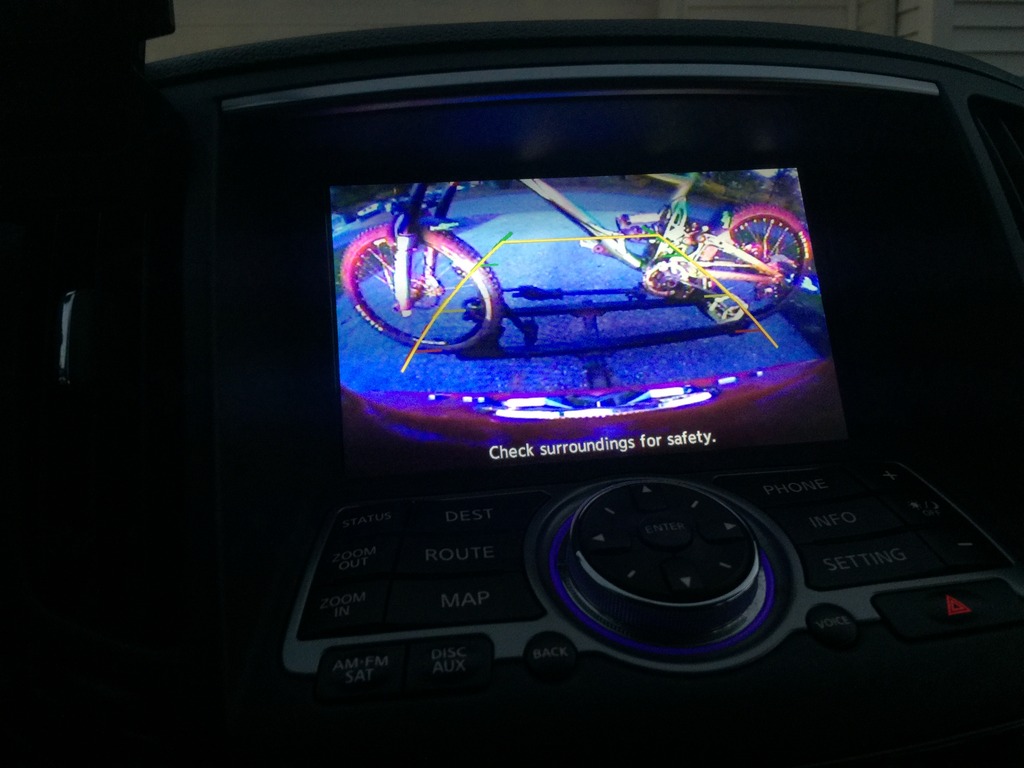
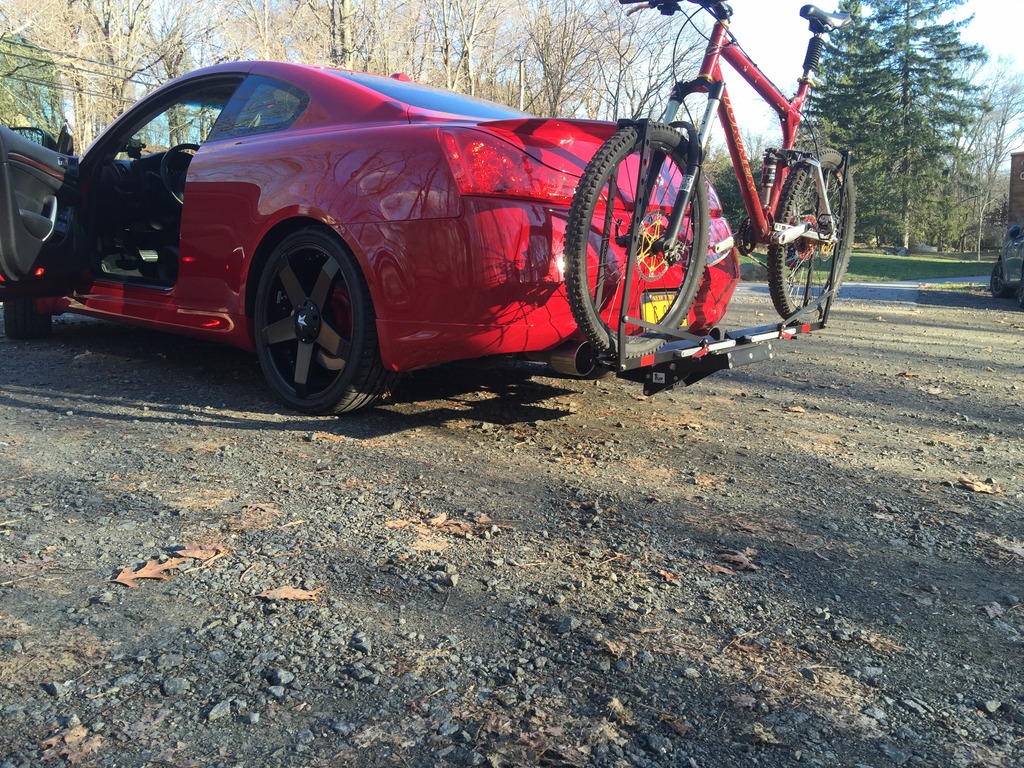
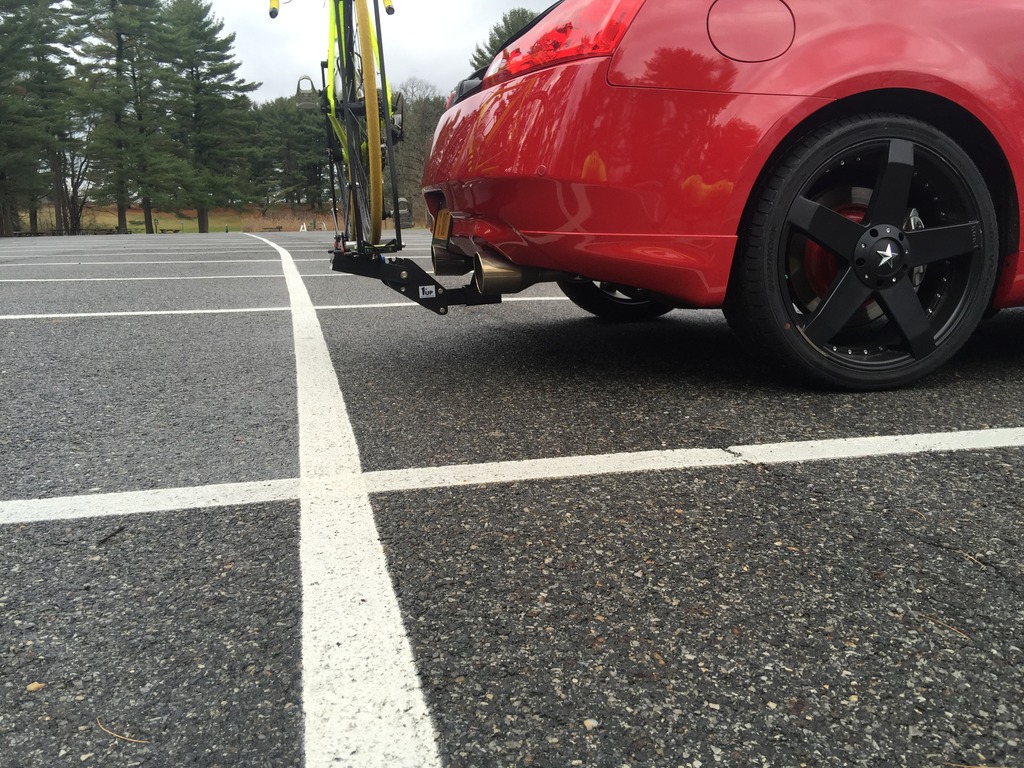
Can you get a pic from a view farther behind the car? I'm thinking even though the receiver is above the exhaust from an overall height standpoint the receiver would still make contact on lowered cars due to how much further back the receiver is than the exhaust.
I'm a MTB'er as well and would love to do this, but I can already hear the crashing noises after seeing pic 19 lol.
I guess you could always have the L receiver modified to have it exit the car much closer to the bottom of the bumper. If that were the case you'd definitely have to modify the bumper.
Edit: PS - Details on the bike?
Last edited by jfisher; 12-16-2015 at 01:02 PM.
12-16-2015, 06:20 PM
#5
Nice write up!
Can you get a pic from a view farther behind the car? I'm thinking even though the receiver is above the exhaust from an overall height standpoint the receiver would still make contact on lowered cars due to how much further back the receiver is than the exhaust.
I'm a MTB'er as well and would love to do this, but I can already hear the crashing noises after seeing pic 19 lol.
I guess you could always have the L receiver modified to have it exit the car much closer to the bottom of the bumper. If that were the case you'd definitely have to modify the bumper.
Edit: PS - Details on the bike?
Okay, I'm wondering how it will do with lowering myself, as I plan on dropping it 1.5-2" eventually.
It is safe to say if *anything* scrapes on your car now, this will likely scrape too.
Coming out of my driveway, there is a very steep corner due to settling. Even my stock front end scrapes it if I'm not careful. So I wouldn't plan on unusually steep inclines and I'd plan on going carefully over speed bumps while the rack is on.
That said the pictures above are a bit excessive as the old saggy 10y/o T2 rack I have there, actually tilts down a bit and rides lower than others.
I've since upgraded to a new 1UP and it not only does not sag down, it rides higher. I'll post pictures next time I bolt it up. (Been OTB for a while)
Re: the bike... Don't flame me
 . It's an XL '14 Turner DHR, Avalanche dampers Front and rear, CK hubs on EX823 hoops, Spank pedals, Deity bars and seat, Thomson post, Maxxis DHF-II treads...Highland Grips
 12-16-2015, 06:26 PM
#6
Or the easy way would be to cut a rectangular notch so the triangle gussett would slide up into the bumper. But it would prevent it from going much higher when it strikes the vertical receiver. I doubt the gusset is necessary as it was designed to deal with loads from a much different orientation(90degs different). And a bike and rack is far less of a load than a class-iii component is designed to handle. So I'd grind it out before I'd notch the bumper.
I'll probably end up doing just that over the winter with a dremel and a few cut-off wheels.
02-22-2016, 11:10 PM
#7
Registered User

what if you flipped the part that hangs lower around? wouldn't that fix the whole issue of rubbing? Could also drill some holes in that so it wouldn't have to hang down so far. would that work?
Trending Topics
02-23-2016, 09:47 AM
#8
Turning it around unfortunately does not gain any elevation.
The web in the L section still strikes the mouth of the vertical hitch receiver.
I'm going to cut the web out, as it really is there to provide support from a different orientation. Besides I'll be using only a fraction of the weight it is designed for. Then I'll cut a hole further down the tube so I can raise it closer to the bumper and get more overall clearance.
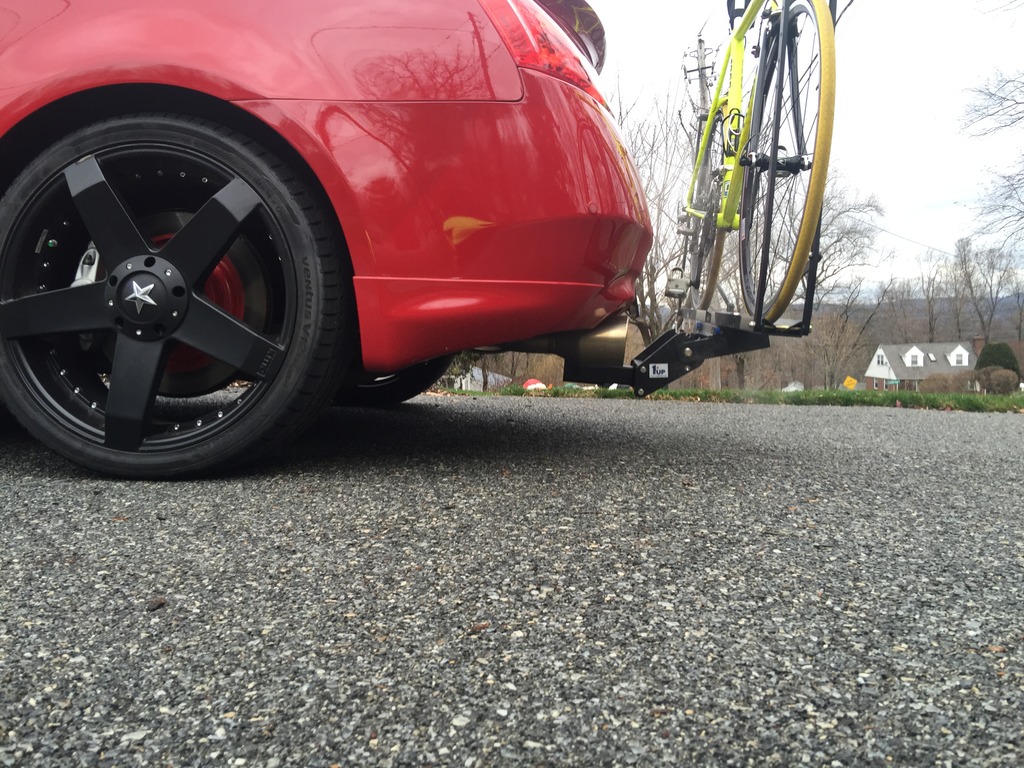
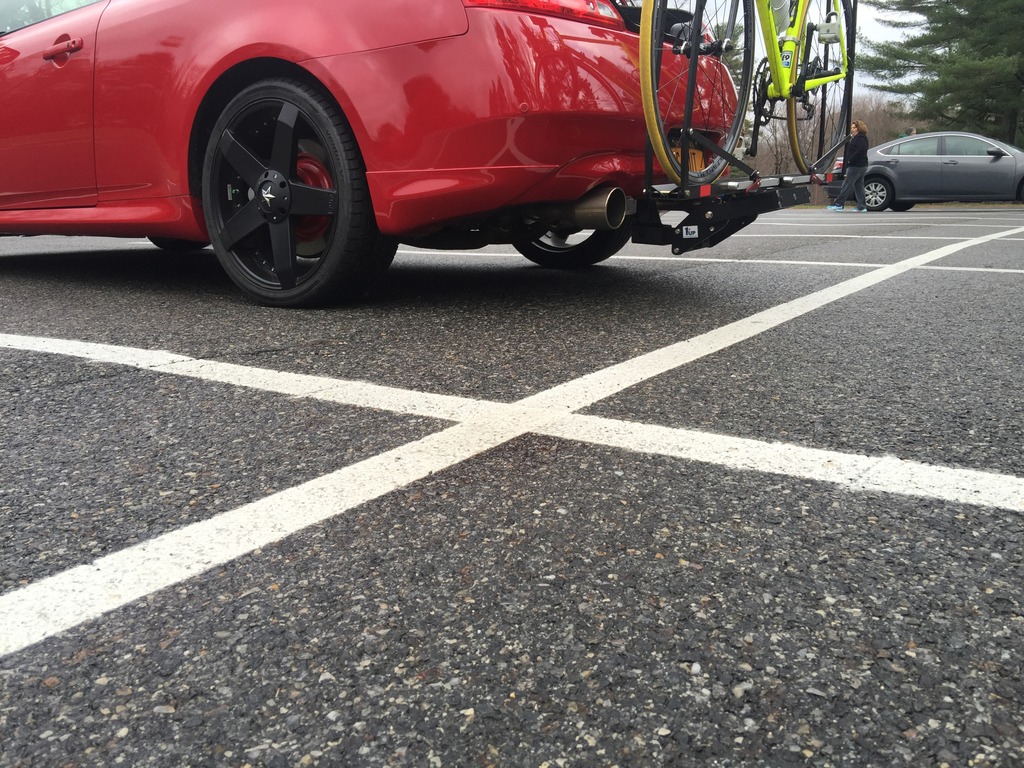
Annyway, jfisher was asking for some pictures with the rack and bike all mounted up on level ground:
 02-23-2016, 12:36 PM
#9
Registered User

Wow, great write up. I haven't taken my bike out on my car since I got my G, too afraid to put my trunk mount on the car and was wondering if there was a good way to hide a receiver and go hitch mount.
 06-16-2016, 03:51 PM
#13
I've found it sufficient to carry two bikes, no problem.
The aluminum beam seem more flexy than I'd expect but it's strong enough for the job. It is the same beam any aftermarket hitch kit will use.
What is a bottom finisher?
No clearence issues. The hitch is not too far recessed but that may depend on the rack type you choose. Most have a fairly long spar to make sure the rack and bikes clear the vehicle.
