DIY: Whiteline Differential bushings
 04-30-2013, 10:37 AM
#46

Drivetrain rumble when accelerating is solved! Whiteline's KDT911 instructions to position the smaller vertical diff. mount bushing at the top and larger vertical diff. mount bushing at the bottom caused an out of phase pinion angle at the diff. end of the drive shaft (pinion nose up). To recover the OEM pinion angle, we reversed the bushing positions (larger on the top and smaller on the bottom). I am not sure if the diff. pinion angles between the G35 and the G37 are indeed different but our experience hints that that may be the case. If anyone senses drivetrain rumbling like I did, this may be a way to fix it.
This has been discussed extensively in the 370 and 350 forums.
If you have a 7AT, the shaft has no u joint on the rear, thus the pinion points up with the angle of the shaft.
If you have a 6MT, that might be something to think about.
As long as it fixed your issue, then alls well!!
 04-30-2013, 01:27 PM
#47
Registered User

My 6MT does have a u-joint on the rear. So indeed pinion angle is something to consider when doing this upgrade on a 6MT. Encountering others with my issue is probably rare since the majority who do this mod drive automatics.
Last edited by Veloz G; 04-30-2013 at 01:35 PM.
04-30-2013, 02:47 PM
#48

Drivetrain rumble when accelerating is solved! Whiteline's KDT911 instructions to position the smaller vertical diff. mount bushing at the top and larger vertical diff. mount bushing at the bottom caused an out of phase pinion angle at the diff. end of the drive shaft (pinion nose up). To recover the OEM pinion angle, we reversed the bushing positions (larger on the top and smaller on the bottom). I am not sure if the diff. pinion angles between the G35 and the G37 are indeed different but our experience hints that that may be the case. If anyone senses drivetrain rumbling like I did, this may be a way to fix it.
 04-30-2013, 05:42 PM
#49
You got me thinking...............
I went to measure the height of my original bushings, and the height of the Whiteline thin bushing, they are within 1/16".
There is no way the thick one would keep the original angle.
The rear bolt on my car, is dead perpendicular to the hole.
Look and see if your rear bolt is now pointing up.
Let me ask you this:
Did they reinstall the black metal top hat?? Above the upper bushing??
That only gets left out with SPL solid bushings.
Stock picture of 6MT diff:

Mine:

I went to measure the height of my original bushings, and the height of the Whiteline thin bushing, they are within 1/16".
There is no way the thick one would keep the original angle.
The rear bolt on my car, is dead perpendicular to the hole.
Look and see if your rear bolt is now pointing up.
Let me ask you this:
Did they reinstall the black metal top hat?? Above the upper bushing??
That only gets left out with SPL solid bushings.
Stock picture of 6MT diff:
Mine:
04-30-2013, 05:52 PM
#50
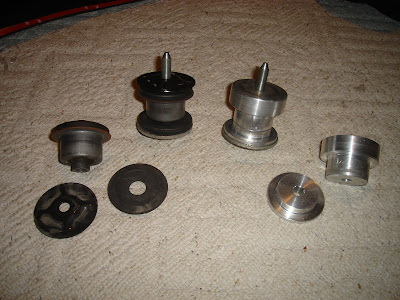
This is why I asked if your top hats were possibly left out:
Z guy thought the big one went on top, until he realized he forgot the top hat.
You can see them just above the top bushing in this post:
MY350Z.COM Forums - View Single Post - DIY - Solid diff bushing install - No subframe drop method, no c clamp either!
Z guy thought the big one went on top, until he realized he forgot the top hat.
You can see them just above the top bushing in this post:
MY350Z.COM Forums - View Single Post - DIY - Solid diff bushing install - No subframe drop method, no c clamp either!


 04-30-2013, 06:13 PM
#55
Or they fell on the ground, and were discarded, which I almost did.
Its called an "Upper Stopper" in the FSM.
It adds to the thickness.
Why would diff bushings differ from AT to MT, they are the same!!
SPL states to not use them, because the metal already compensates for the thickness.
I called Whiteline, and they responded to only replace bushings, all other hardware remain.
04-30-2013, 06:43 PM
#58
I would also think that the thicker bushing on top would add more movement, as the bushing compresses under hard acceleration.
I do hear a little more noise, due to harder bushings, but I use my ears for a living!!
On a side note Concept Z joined the bandwagon!!
Whiteline KDT911 370Z Differential Bushing Kit 09+ Z34 - Nissan performance parts
I do hear a little more noise, due to harder bushings, but I use my ears for a living!!
On a side note Concept Z joined the bandwagon!!
Whiteline KDT911 370Z Differential Bushing Kit 09+ Z34 - Nissan performance parts
04-30-2013, 07:59 PM
#59
Registered User
Bingo TVPostSound...the tophats were not installed. I still actually have them along with the large rubber washers (which you said to not use). They are about 0.25 inch in height...gave or take. By looking at these top hats closely never would I have thought they added that much height. They are concave shaped and are more like spacers than washers. By flipping the bushing around (thick part on top), I assume we made up for the "height" provided by this missing piece. It's funny, prior to my installation I have seen pics of these bushings installed both ways (thick part on top or bottom) with or without the tophats which added to my confusion. Just for our education, my installer and I are going to do some experimenting with the bushings this weekend...reversing the bushing back to 'normal' and adding the top hats is pretty easy if you have access to a lift. It's a 15 minute affair. BTW, I do not feel and hear any measurable movement or noise as installed right now (thick part on top w/o the tophat) which was what I was seeking. I'll keep you guys posted on the outcome.
Last edited by Veloz G; 05-07-2013 at 02:43 AM.
The following 2 users liked this post by Veloz G:
Black Betty (04-30-2013),
Presto (11-28-2016)
