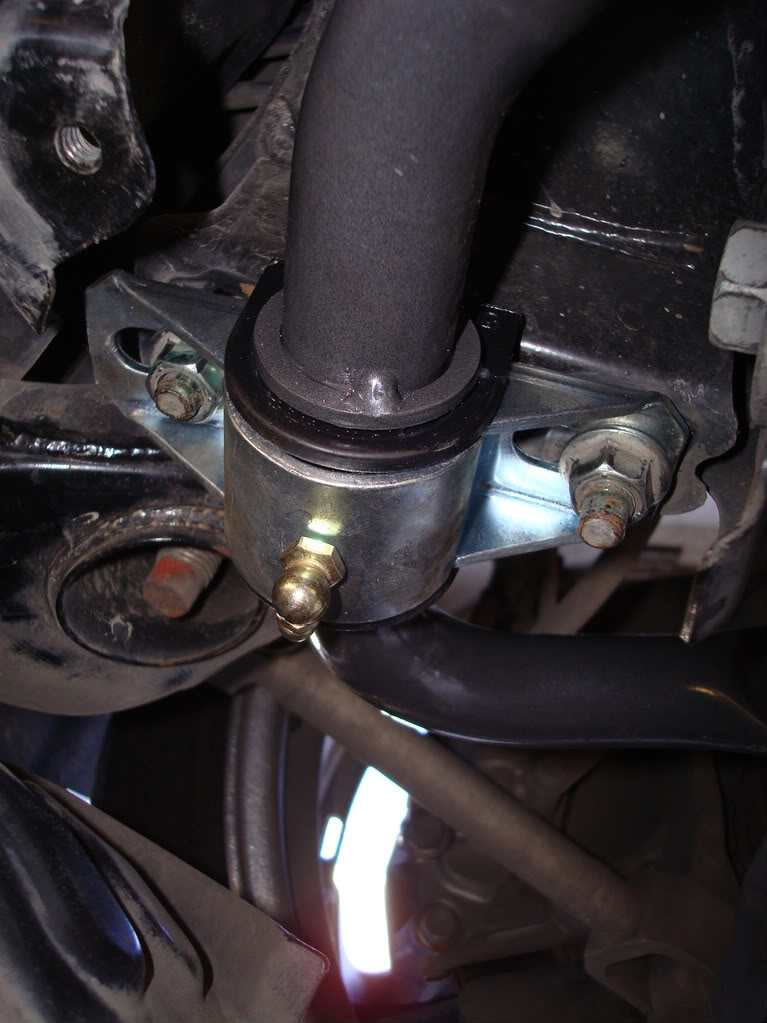
DIY: Hotchkis F&R Sway bar install
 04-26-2009, 05:57 PM
#16

 emblems go?
Something is wrong. Not tightened or lubricated would be my guess, but take it back and have them ride with you over a bump so they can hear it then ask them to go back under and fix it correctly.
 04-29-2009, 03:38 PM
#17
Registered Member

Join Date: Jul 2008
Posts: 1,093
Likes: 0
Received 0 Likes
on
0 Posts
Hey blackbetty,
Any reason why you chose those torque settings? I noticed in the factory specs they have higher torque.
Front
endlinks = 84ft-lb
bushings = 50.5ft-lb
Rears
endlinks = 55ft-lb
bushings = 33.5ft-lb

Should I be using those factory torque settings or your, and to add to the confusion.. the hotchkis manual says 40ft-lb....
***CORRECTION******
Front
Endlinks: 62ft-lbs
Bushings: 37ft-lbs
Rear
Endlinks: 41ft-lbs
Bushings: 25ft-lbs
Any reason why you chose those torque settings? I noticed in the factory specs they have higher torque.
Front
endlinks = 84ft-lb
bushings = 50.5ft-lb
Rears
endlinks = 55ft-lb
bushings = 33.5ft-lb
Should I be using those factory torque settings or your, and to add to the confusion.. the hotchkis manual says 40ft-lb....
***CORRECTION******
Front
Endlinks: 62ft-lbs
Bushings: 37ft-lbs
Rear
Endlinks: 41ft-lbs
Bushings: 25ft-lbs
Last edited by kkokko; 04-30-2009 at 03:19 AM. Reason: Corrected torque specs
04-29-2009, 03:59 PM
#18
Hey blackbetty,
Any reason why you chose those torque settings? I noticed in the factory specs they have higher torque.
Front
endlinks = 84ft-lb
bushings = 50.5ft-lb
Rears
endlinks = 55ft-lb
bushings = 33.5ft-lb
Should I be using those factory torque settings or your, and to add to the confusion.. the hotchkis manual says 40ft-lb....
However, I incorrectly said the rear end link nut should be torqued to 62 and the correct spec is actually only 41. I'll correct it now, good catch.
 09-08-2009, 01:51 AM
#20
Registered User

Join Date: Oct 2008
Location: Sydney Australia
Posts: 99
Likes: 0
Received 0 Likes
on
0 Posts
very helpful writeup thanks
quick question as i am a newbie to suspension diy how do i torque the bolts to the specific settings you described? special wrench/feel? I was just going to undo the bolts and tighten them back up as tight as possible when i replaced the sways lol
quick question as i am a newbie to suspension diy how do i torque the bolts to the specific settings you described? special wrench/feel? I was just going to undo the bolts and tighten them back up as tight as possible when i replaced the sways lol
 07-22-2010, 02:51 AM
#23
Registered User

Join Date: Jul 2010
Posts: 14
Likes: 0
Received 0 Likes
on
0 Posts
My car: 2009 G37S sedan
After some research on these forums (thanks to black betty for his insightful reviews and dyi) I upgraded to hotchkis bars.
I installed the front one myself (just because all the shops were busy) and I didn't want to wait, but ended up installing the rear at Beshoff dealership.
1) Torque specs posted by black betty are for g37 coupe. The 2009 g37 sedan torque spec for bushings is somewhat different.
Front bar:
Bushings: 38 ft/lbs
Endlinks: 62 ft/lbs
Rear bar:
Bushings: 33 ft/lbs
Endlinks: 41 ft/lbs
2) Be careful not to loose the bags with silicon grease if doing your own install because it seems it is not that easily obtainable as I thought. A visit to Kragen and a local auto parts store turned up nothing but lithium based grease.
3) Unless you can borrow or already have all the necessary tools, really like to work on you car, like to lie beneath the car for couple of hours - I would recommend to do a professional install. The professional install costs vary from $130-$160 for both bars.
Just the parts alone will cost in the vicinity of $140 including breaker bar, metric ratchets, ramps, torque wrench, wheels chocks, and etc.
4) Unlike the front bar, the rear bar sits much futher away from the rear end of the car. If you have a stock exhaust and will require the tunnel brace to be removed, then having car raised using the blitz ramps will not give you really much clearance to work in the center portion of you car.
5) Feelings about the handling after the install:
Performance:
The turn-in, the steering response time and crispiness are all extremely improved. What seemed to be an immense body roll when taking a corner is now gone. Even when driving in the straight line you get some feeling of the whole car being more wound up and awaiting for your command. I had the chance to take the car to the twisties on highway 9 (big basin) and the drive seemed spectacular - suddenly you were not simply driving a "large" heavy luxury sedan. Going from one corner to the next corner, the car seemed amazingly nimble, always ready to play. And since the body roll was now a thing of the past, you could actually use that power under the hood to propel it out of the corner sooner. Fun - unlocked. I can only wonder at how the car handles with quality coilovers installed and the car lowered.
Ride comfort: At first I was going to write that the car should have come setup this way from the beginning. But after having a chance to drive it some more time, I now realize that the ride might not satisfy everyone. The ride quality does suffer, with the ride becoming harsher and bumpier. I felt more imperfections of the road and also the noise levels on some rough road surfaces seemed to increase. This is all especially true, since the ride of the Infiniti is hardly on the suppleness level of say BMW to begin with. Overall however, the small deterioration of the ride quality is a welcome tradeoff for those seeking a true sport performance from their g37.
 08-06-2010, 01:11 PM
#25
Registered User

My car: 2009 G37S sedan
After some research on these forums (thanks to black betty for his insightful reviews and dyi) I upgraded to hotchkis bars.
I installed the front one myself (just because all the shops were busy) and I didn't want to wait, but ended up installing the rear at Beshoff dealership.
1) Torque specs posted by black betty are for g37 coupe. The 2009 g37 sedan torque spec for bushings is somewhat different.
Front bar:
Bushings: 38 ft/lbs
Endlinks: 62 ft/lbs
Rear bar:
Bushings: 33 ft/lbs
Endlinks: 41 ft/lbs
2) Be careful not to loose the bags with silicon grease if doing your own install because it seems it is not that easily obtainable as I thought. A visit to Kragen and a local auto parts store turned up nothing but lithium based grease.
3) Unless you can borrow or already have all the necessary tools, really like to work on you car, like to lie beneath the car for couple of hours - I would recommend to do a professional install. The professional install costs vary from $130-$160 for both bars.
Just the parts alone will cost in the vicinity of $140 including breaker bar, metric ratchets, ramps, torque wrench, wheels chocks, and etc.
4) Unlike the front bar, the rear bar sits much futher away from the rear end of the car. If you have a stock exhaust and will require the tunnel brace to be removed, then having car raised using the blitz ramps will not give you really much clearance to work in the center portion of you car.
5) Feelings about the handling after the install:
Performance:
The turn-in, the steering response time and crispiness are all extremely improved. What seemed to be an immense body roll when taking a corner is now gone. Even when driving in the straight line you get some feeling of the whole car being more wound up and awaiting for your command. I had the chance to take the car to the twisties on highway 9 (big basin) and the drive seemed spectacular - suddenly you were not simply driving a "large" heavy luxury sedan. Going from one corner to the next corner, the car seemed amazingly nimble, always ready to play. And since the body roll was now a thing of the past, you could actually use that power under the hood to propel it out of the corner sooner. Fun - unlocked. I can only wonder at how the car handles with quality coilovers installed and the car lowered.
Ride comfort: At first I was going to write that the car should have come setup this way from the beginning. But after having a chance to drive it some more time, I now realize that the ride might not satisfy everyone. The ride quality does suffer, with the ride becoming harsher and bumpier. I felt more imperfections of the road and also the noise levels on some rough road surfaces seemed to increase. This is all especially true, since the ride of the Infiniti is hardly on the suppleness level of say BMW to begin with. Overall however, the small deterioration of the ride quality is a welcome tradeoff for those seeking a true sport performance from their g37.
After some research on these forums (thanks to black betty for his insightful reviews and dyi) I upgraded to hotchkis bars.
I installed the front one myself (just because all the shops were busy) and I didn't want to wait, but ended up installing the rear at Beshoff dealership.
1) Torque specs posted by black betty are for g37 coupe. The 2009 g37 sedan torque spec for bushings is somewhat different.
Front bar:
Bushings: 38 ft/lbs
Endlinks: 62 ft/lbs
Rear bar:
Bushings: 33 ft/lbs
Endlinks: 41 ft/lbs
2) Be careful not to loose the bags with silicon grease if doing your own install because it seems it is not that easily obtainable as I thought. A visit to Kragen and a local auto parts store turned up nothing but lithium based grease.
3) Unless you can borrow or already have all the necessary tools, really like to work on you car, like to lie beneath the car for couple of hours - I would recommend to do a professional install. The professional install costs vary from $130-$160 for both bars.
Just the parts alone will cost in the vicinity of $140 including breaker bar, metric ratchets, ramps, torque wrench, wheels chocks, and etc.
4) Unlike the front bar, the rear bar sits much futher away from the rear end of the car. If you have a stock exhaust and will require the tunnel brace to be removed, then having car raised using the blitz ramps will not give you really much clearance to work in the center portion of you car.
5) Feelings about the handling after the install:
Performance:
The turn-in, the steering response time and crispiness are all extremely improved. What seemed to be an immense body roll when taking a corner is now gone. Even when driving in the straight line you get some feeling of the whole car being more wound up and awaiting for your command. I had the chance to take the car to the twisties on highway 9 (big basin) and the drive seemed spectacular - suddenly you were not simply driving a "large" heavy luxury sedan. Going from one corner to the next corner, the car seemed amazingly nimble, always ready to play. And since the body roll was now a thing of the past, you could actually use that power under the hood to propel it out of the corner sooner. Fun - unlocked. I can only wonder at how the car handles with quality coilovers installed and the car lowered.
Ride comfort: At first I was going to write that the car should have come setup this way from the beginning. But after having a chance to drive it some more time, I now realize that the ride might not satisfy everyone. The ride quality does suffer, with the ride becoming harsher and bumpier. I felt more imperfections of the road and also the noise levels on some rough road surfaces seemed to increase. This is all especially true, since the ride of the Infiniti is hardly on the suppleness level of say BMW to begin with. Overall however, the small deterioration of the ride quality is a welcome tradeoff for those seeking a true sport performance from their g37.
What settings did you put your bars on? Do you think the ride deterioration depends on the bar settings or just upgrading the bars is enough to deteriorate even on the lowest setting?
Thanks for the great info!!


 08-31-2010, 10:49 PM
#28
 09-25-2010, 03:14 PM
#29
Registered User
Join Date: Jul 2010
Posts: 14
Likes: 0
Received 0 Likes
on
0 Posts
Hi, I was thinking of having Beshoff install a Stillen exhaust and these Hotchkis bars. What did they charge you just to install the rear bar?
What settings did you put your bars on? Do you think the ride deterioration depends on the bar settings or just upgrading the bars is enough to deteriorate even on the lowest setting?
Thanks for the great info!!
What settings did you put your bars on? Do you think the ride deterioration depends on the bar settings or just upgrading the bars is enough to deteriorate even on the lowest setting?
Thanks for the great info!!
I don't think the deterioration in the comfort is that significant - probably very small. But many people think that stock Sport suspension is already pretty harsh so I just wanted to warn that you don't get something for nothing.
However, as mentioned in many forums, middle hole is the advised and recommended setting used by many board members. Changing rear bar stiffness will also affect oversteer/understeer and wheel traction with the road.
