DIY: Headlight and Foglight Adjustment
 01-14-2009, 11:34 AM
#1

Headlight and Foglight Adjustment
Pre-determined Adjustment Measurement Chart - for Headlights
** Note these are pre-determined heights based on measuring from center of projector to floor and subtracting 2 inches to get the height adjustment measurement.
================================
Stock no drop (rims & Tires) = 25 inches from ground
Eibach Pro (stock rims & tires) = 24 inches from ground
Eibach Sportline = ***
Tein H (non 08)Tech = ***
Tein S (non 08)Tech = ***
H&R Sport = (stock rims & tires) 23 inches from ground
-----------------------------------------
DOT SAFETY NOTE*
Make sure after adjusting to test your headlights so that you are not blinding on-coming drivers.
With projectors you have a sharp cut-off line that is very noticeable to gage.
-----------------------------------------
HEADLIGHT
What You will need:
1) Phillips medium sized screwdriver
2) Masking tape or Painters Tape
3) Pencil
4) Tape Measure
5) A place to do this at (example: parking garage - usually has leveled floors)
6) A Leveler - if you want it precise
7) Flashlight if its dark
Set-UP: - See third attachment below for these steps.
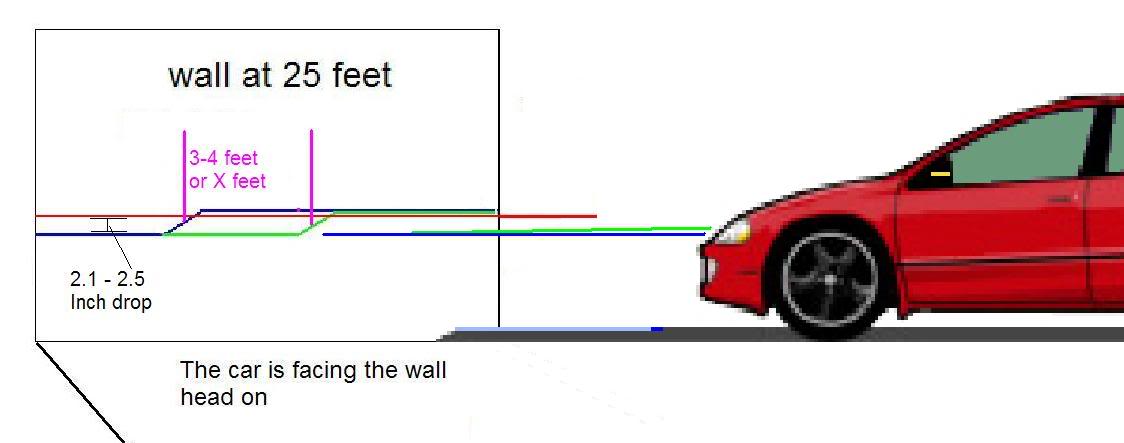
1) If you have your pre-determined adjustment height from above you may skip this first step. First measure vertically the distance from the ground up to the center of your headlight projector. Once you have your measurement (example: 2 feet & 4 inches) subtract 2 inches form your measurement to get your final adjustment measurement.
2) Now go to the wall and from the bottom up measure out your adjustment measurement twice at a distance of about 6 feet apart and create a horizontal line with the masking/painters tape - make sure to use the bottom of the tapes line as the exact distance to mark your adjustment measurement.
3) Now on the floor measure out 25 feet from the bottom of the wall out - do this twice gain at a distance of about 6 feet.
4) Now connect both measurements at the 25 foot mark to create a horizontal line on the floor as a marker to where you need to pull up your car - use the tape to mark this out. (This should be a 25 foot line from the wall)
5) Now pull your car up to the line so that your headlights projector lens lines up with it. Now your ready to adjust your headlights.
6) Now adjust the right beam to be above the left beam by 1/2 of an inch(this last step is dot spec). Done!
ADJUSTMENT INSTRUCTIONS:
1) Open your hood and if you look closely there are 2 rubber seals on both the left side and right side. These seals have 2 plastic rivets that hold them in place near where they meet the center rubber seal. You want to pop-up these plastic rivets with a screwdriver (or by hand - but grab as close to it as possible and pull up). ** You do not need to remove the entire left or right side seal - you will only pull it back to gain access to the headlight adjustment. ** SEE PICTURE "A" BELOW
2) Now if you look below seals (use a flash light) you will see the 2 adjustment gears for both Fog and Headlight (easy access and easy to see)
** SEE PICTURE "B" BELOW
3) Place the screwdriver in the slot and slowly turn to adjust by looking at the wall to see results.
4) Align cut-of line of the projectors light at exactly the mark on the wall (example: 24" inches - 2 feet)
5) Done!
-----------------------------------------------------------------------------------------------------------------
FOGLIGHT
Use the same wall and distance (25 feet) after doing your headlights to adjust your fogs.
For your fog lights you want your lighting to just cut in half way below your headlights. This you have to adjust by eye since the lighting bleeds.
<br><br>
** Note these are pre-determined heights based on measuring from center of projector to floor and subtracting 2 inches to get the height adjustment measurement.
================================
Stock no drop (rims & Tires) = 25 inches from ground
Eibach Pro (stock rims & tires) = 24 inches from ground
Eibach Sportline = ***
Tein H (non 08)Tech = ***
Tein S (non 08)Tech = ***
H&R Sport = (stock rims & tires) 23 inches from ground
-----------------------------------------
DOT SAFETY NOTE*
Make sure after adjusting to test your headlights so that you are not blinding on-coming drivers.
With projectors you have a sharp cut-off line that is very noticeable to gage.
-----------------------------------------
HEADLIGHT
What You will need:
1) Phillips medium sized screwdriver
2) Masking tape or Painters Tape
3) Pencil
4) Tape Measure
5) A place to do this at (example: parking garage - usually has leveled floors)
6) A Leveler - if you want it precise
7) Flashlight if its dark
Set-UP: - See third attachment below for these steps.
1) If you have your pre-determined adjustment height from above you may skip this first step. First measure vertically the distance from the ground up to the center of your headlight projector. Once you have your measurement (example: 2 feet & 4 inches) subtract 2 inches form your measurement to get your final adjustment measurement.
2) Now go to the wall and from the bottom up measure out your adjustment measurement twice at a distance of about 6 feet apart and create a horizontal line with the masking/painters tape - make sure to use the bottom of the tapes line as the exact distance to mark your adjustment measurement.
3) Now on the floor measure out 25 feet from the bottom of the wall out - do this twice gain at a distance of about 6 feet.
4) Now connect both measurements at the 25 foot mark to create a horizontal line on the floor as a marker to where you need to pull up your car - use the tape to mark this out. (This should be a 25 foot line from the wall)
5) Now pull your car up to the line so that your headlights projector lens lines up with it. Now your ready to adjust your headlights.
6) Now adjust the right beam to be above the left beam by 1/2 of an inch(this last step is dot spec). Done!
ADJUSTMENT INSTRUCTIONS:
1) Open your hood and if you look closely there are 2 rubber seals on both the left side and right side. These seals have 2 plastic rivets that hold them in place near where they meet the center rubber seal. You want to pop-up these plastic rivets with a screwdriver (or by hand - but grab as close to it as possible and pull up). ** You do not need to remove the entire left or right side seal - you will only pull it back to gain access to the headlight adjustment. ** SEE PICTURE "A" BELOW
2) Now if you look below seals (use a flash light) you will see the 2 adjustment gears for both Fog and Headlight (easy access and easy to see)
** SEE PICTURE "B" BELOW
3) Place the screwdriver in the slot and slowly turn to adjust by looking at the wall to see results.
4) Align cut-of line of the projectors light at exactly the mark on the wall (example: 24" inches - 2 feet)
5) Done!
-----------------------------------------------------------------------------------------------------------------
FOGLIGHT
Use the same wall and distance (25 feet) after doing your headlights to adjust your fogs.
For your fog lights you want your lighting to just cut in half way below your headlights. This you have to adjust by eye since the lighting bleeds.
<br><br>
Last edited by Black Betty; 10-29-2010 at 04:34 PM.

The following 4 users liked this post by Xcalibur:


 03-24-2009, 03:40 PM
#7
because you don't want to introduce glare to oncoming traffic.
Follow this DIY from G35 Driver. http://g35driver.com/forums/body-int...rojectors.html
It shows you proper DOT headlight aiming...
Follow this DIY from G35 Driver. http://g35driver.com/forums/body-int...rojectors.html
It shows you proper DOT headlight aiming...
Trending Topics
03-24-2009, 05:35 PM
#9
Registered User
iTrader: (1)

Join Date: Apr 2008
Location: ۞ DALLAS ۞
Posts: 5,066
Likes: 0
Received 0 Likes
on
0 Posts
I'm glad that "Search" button actually worked. The dealer was like "you can't adjust the lights they're sealed." I'm like STFU!
I typed in "Time Vampire" and this thread came up. Good stuff!
I typed in "Time Vampire" and this thread came up. Good stuff!
 03-25-2009, 08:18 AM
#11
Thanks finagle69. I'll add a note later today in reference to ofset but I'm sure it's not inches. 1 inch is alot of adjustment. You should test your lights adjustment out by driving around after. Mine is a tad higher on the right side. My view over stock adjustment is almost twice the distance with no glare to other drivers. Projectors are easy to adjust because of the sharp cut-off line and are less likely to blind someone.