Ape's IPL build (How Nissan should have done it)
 01-03-2017, 01:07 AM
#31

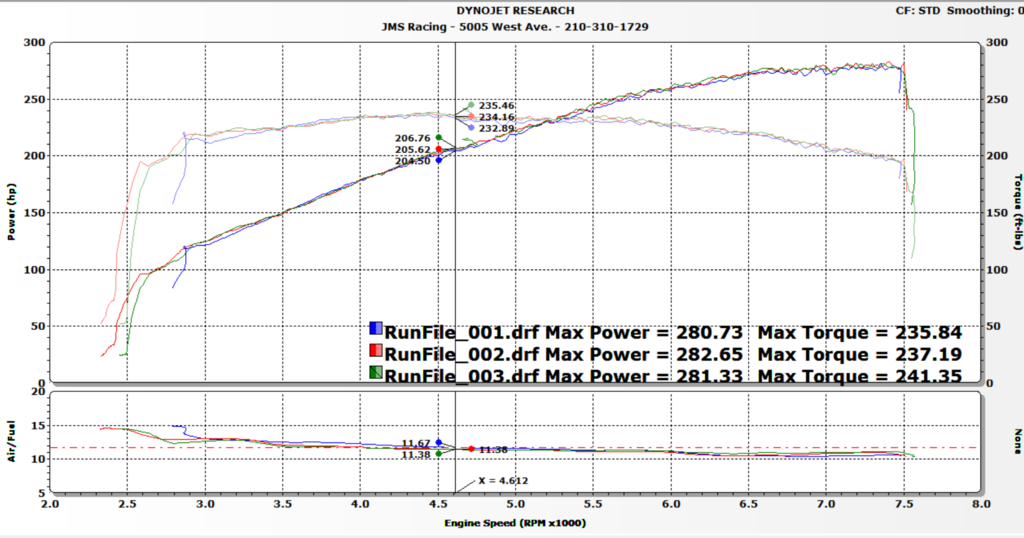
Ok dyno plots. Finally!
Car was dyno'd at JMS Racing in San Antonio. I think they've stuck a 2JZ in just about every car imaginable. They had a lot of cool stuff in the workshop.
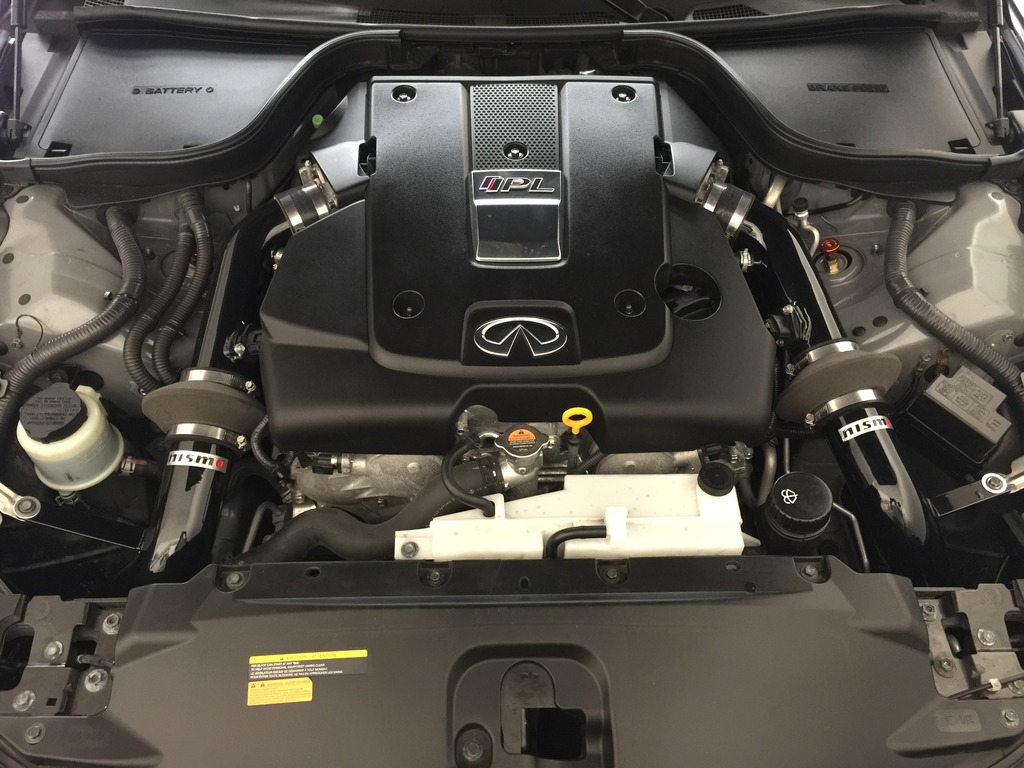
Anyway the dyno operator/tuner was very cool, knowledgeable and a Floridian to boot (my former haunt). We did three runs with the wideband hooked up. The only power mod is the Nismo intake. Everything else on the car is stock.
I need to talk to any Nismo 370Z owners who may have the Nismo intake and have dynode the car. Want to see if they go rich after 6K as well. He said it's most likely due to the intake messing with the MAF sensors. The intake does come with a venturi insert which is supposed to prevent this. Lots of power left on the table. He did comment the Stillen intake is about the only one that doesn't screw with the MAF settings. The Takeda is really bad in that regard apparently.
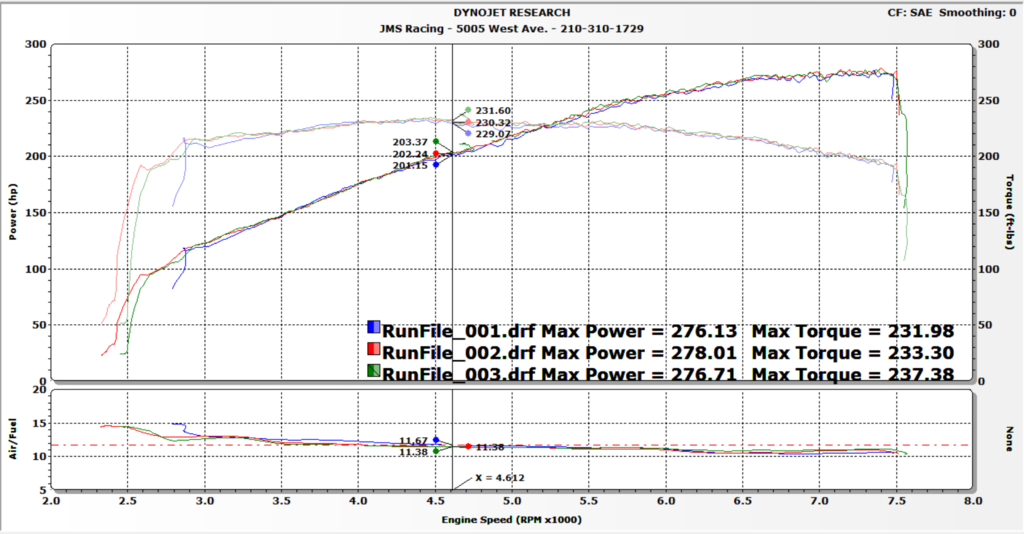
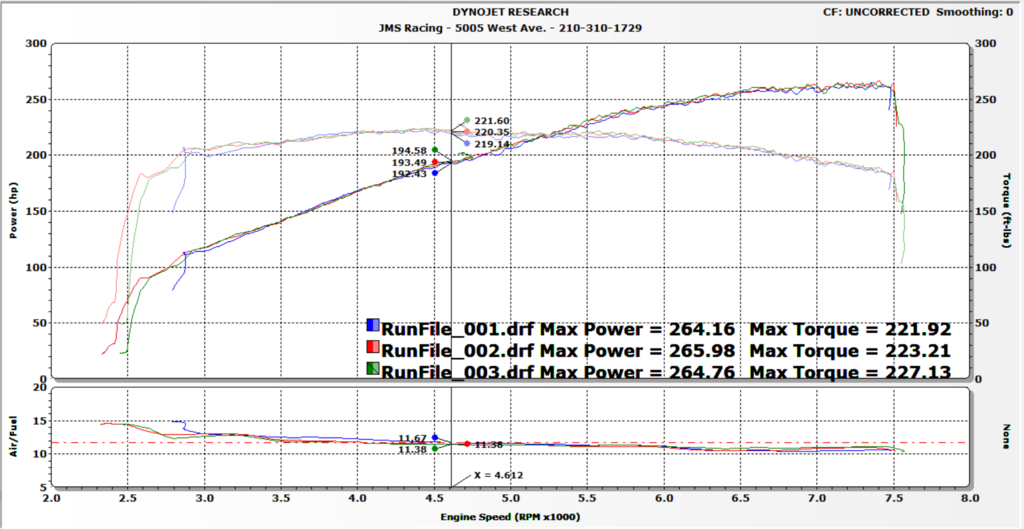
Graphs are STD, SAE Corrected and uncorrected.
Car was dyno'd at JMS Racing in San Antonio. I think they've stuck a 2JZ in just about every car imaginable. They had a lot of cool stuff in the workshop.
Anyway the dyno operator/tuner was very cool, knowledgeable and a Floridian to boot (my former haunt). We did three runs with the wideband hooked up. The only power mod is the Nismo intake. Everything else on the car is stock.
I need to talk to any Nismo 370Z owners who may have the Nismo intake and have dynode the car. Want to see if they go rich after 6K as well. He said it's most likely due to the intake messing with the MAF sensors. The intake does come with a venturi insert which is supposed to prevent this. Lots of power left on the table. He did comment the Stillen intake is about the only one that doesn't screw with the MAF settings. The Takeda is really bad in that regard apparently.
Graphs are STD, SAE Corrected and uncorrected.
Last edited by Ape Factory; 01-08-2017 at 10:20 PM.
 01-03-2017, 01:17 AM
#32
Something I figured out recently, with the help of another forum member, was the stock fuel maps richen up the mixture considerably when it's hot out. I'm assuming it's air intake temp based. So I may be seeing my extremely rich a/f temps due to this and not due to the Nismo design and the venturi design around the MAF's. I've since datalogged in cooler temps this winter and my air to fuel ratios are far better but still not optimal. I think I hit the high 10's but I was mostly in the 11's. Just something to keep in mind.
Lots of improvements to be had with a proper tune.
Lots of improvements to be had with a proper tune.
01-03-2017, 10:21 AM
#33
Damn, haven't missed a beat! How do you find all the time to detail this the way you do?? Just incredible, and that Black Jack shop sounds awesome, nice company Tim Duncan keeps 
It's so rare to see such thought in this kind of build execution, this one just grabs you and won't let go~I'm hooked!
It's so rare to see such thought in this kind of build execution, this one just grabs you and won't let go~I'm hooked!
01-03-2017, 10:54 AM
#34
Administrator

iTrader: (8)

OP, it reads like you installed the R2C intake kit, modified to suit your particular customization needs. And then immediately ripped it out and installed the NISMO CAI kit... all in the same weekend.

 01-03-2017, 11:03 AM
#35
Damn, haven't missed a beat! How do you find all the time to detail this the way you do?? Just incredible, and that Black Jack shop sounds awesome, nice company Tim Duncan keeps
It's so rare to see such thought in this kind of build execution, this one just grabs you and won't let go~I'm hooked!
It's so rare to see such thought in this kind of build execution, this one just grabs you and won't let go~I'm hooked!
I'm simply taking most of this from my original postings in various forums and coagulating them here in some kind of orderly fashion and updating anything that needs updating. That way it's all in one spot.
01-03-2017, 11:04 AM
#36
It certainly is fascinating. It's also a little overwhelming. I love it when someone comes along with experience, means, camera & writing skills. But damn... this is exhausting.
OP, it reads like you installed the R2C intake kit, modified to suit your particular customization needs. And then immediately ripped it out and installed the NISMO CAI kit... all in the same weekend.
OP, it reads like you installed the R2C intake kit, modified to suit your particular customization needs. And then immediately ripped it out and installed the NISMO CAI kit... all in the same weekend.
I just ordered some brake upgrades from Z1. Assuming they'll be here next week!
01-07-2017, 06:27 PM
#37
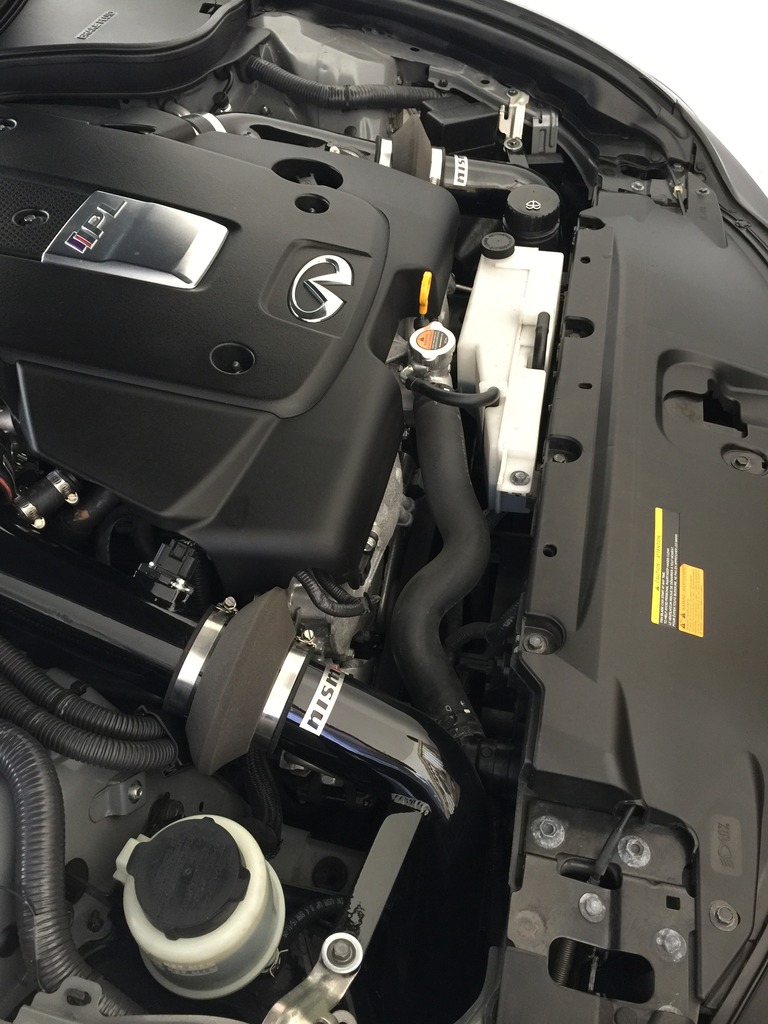
Onto the rest of the installation for the Nismo intake. The washer fluid reservoir is installed. This again is a semi-custom job but you don't need anything additional other than perhaps some quality, flexible silicone hose to run from the reservoir to the fill cap. I may end up moving the reservoir one way or the other based on my perceived need for an oil cooler in late spring before it turns diabolically hot here.
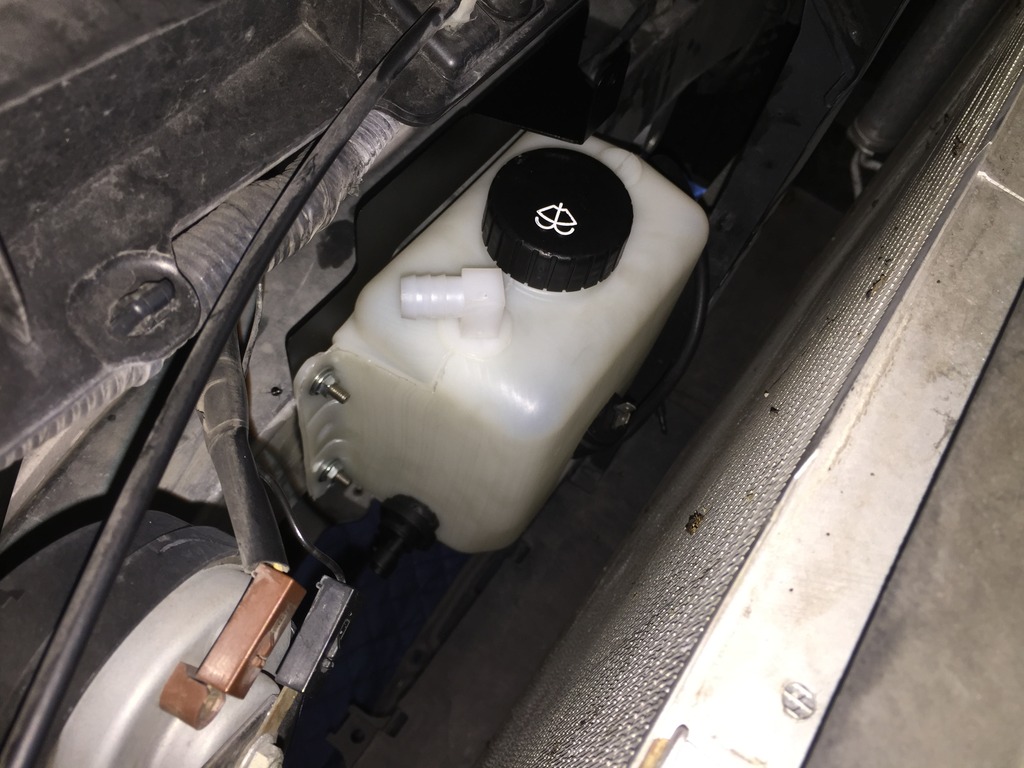
I ended up installing the reservoir just off center to the driver's side and I used the included 370Z non-nimso filler cap on the driver's side as well. Was the easiest, most logical layout.
I ran the silicone tubing from the filler nipple on the reservoir through the stock cold air duct and around to the reservoir which uses the included mount to bolt to the same spot as the radiator overflow tank. Looks totally OEM.
For the wiring, I did not cut the original harness at all. I used small spade-type connectors to insert them into the plug slots. It's a work-around for now as I try to narrow down some OEM style connectors and make a plug-and-play intermediate harness. Everything works and as others will tell you, the orientation of the fluid level sensor is critical to it working right.
Finished from the engine bay. Look on driver's side and you can see filler cap.

The kit does require you drill a few holes to mount the reservoir bracket. The subframe is aluminum and you can drill through it quite easily with cordless drill. There are two brackets that come with the kit, I'm assuming I used the non-nimso bracket. Because some of the divider plastics are different between the Z and the G, the Nismo bracket and location won't work.
I think the motor on the Nismo kit is actually stronger than the OEM motor. I rarely if ever use the wiper fluid as I tend to use RainX and we don't get the salty road conditions or billions of bugs which necessitate windshield washer fluid. Florida was a different story. Run-ins with the local love bug population can be life altering.
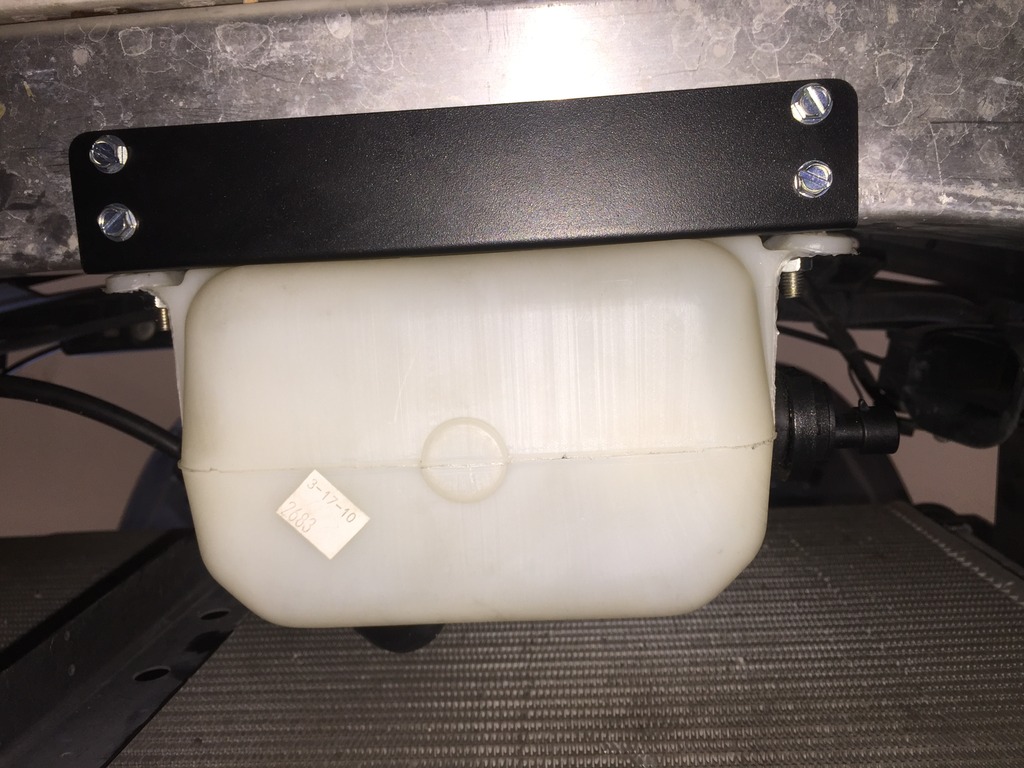
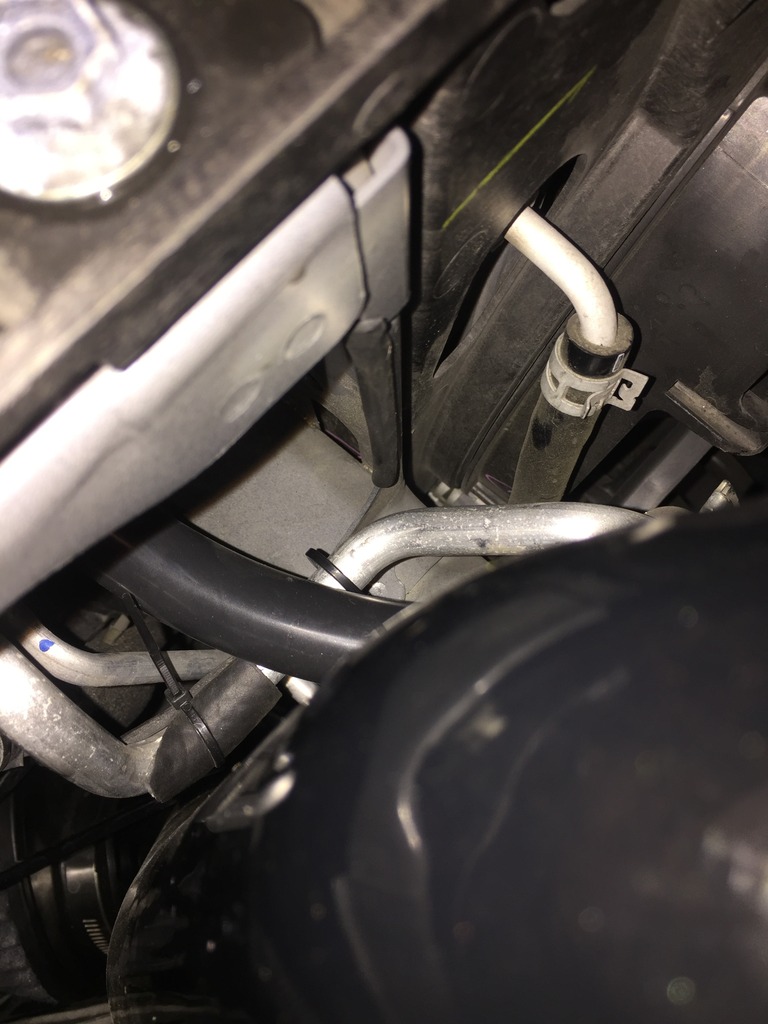
Looking from the bottom...four sheetmetal screws secure it to the crash bar.
From the top, top of the photo is the front of the car.
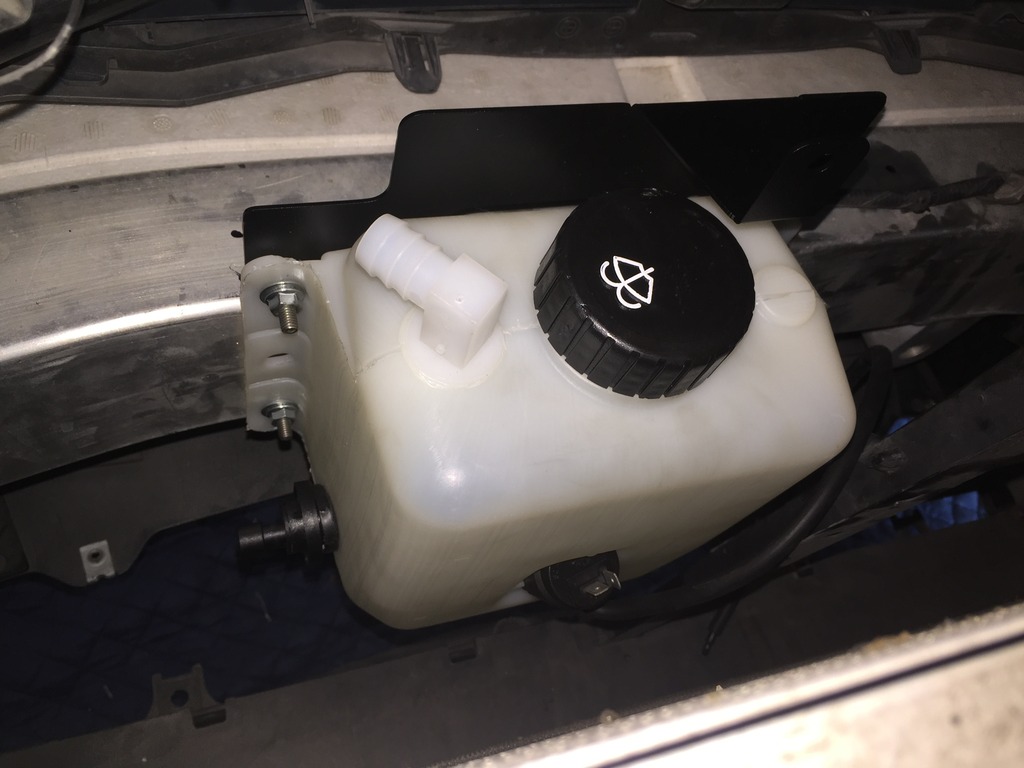
You can see the silicone tubing coming through the air inlet duct.
I ended up running the wiring along part of the OEM harness and securing with zip ties. I still need to redo the connectors and sheath all the wiring with a protective sleeve.
I ended up installing the reservoir just off center to the driver's side and I used the included 370Z non-nimso filler cap on the driver's side as well. Was the easiest, most logical layout.
I ran the silicone tubing from the filler nipple on the reservoir through the stock cold air duct and around to the reservoir which uses the included mount to bolt to the same spot as the radiator overflow tank. Looks totally OEM.
For the wiring, I did not cut the original harness at all. I used small spade-type connectors to insert them into the plug slots. It's a work-around for now as I try to narrow down some OEM style connectors and make a plug-and-play intermediate harness. Everything works and as others will tell you, the orientation of the fluid level sensor is critical to it working right.
Finished from the engine bay. Look on driver's side and you can see filler cap.
The kit does require you drill a few holes to mount the reservoir bracket. The subframe is aluminum and you can drill through it quite easily with cordless drill. There are two brackets that come with the kit, I'm assuming I used the non-nimso bracket. Because some of the divider plastics are different between the Z and the G, the Nismo bracket and location won't work.
I think the motor on the Nismo kit is actually stronger than the OEM motor. I rarely if ever use the wiper fluid as I tend to use RainX and we don't get the salty road conditions or billions of bugs which necessitate windshield washer fluid. Florida was a different story. Run-ins with the local love bug population can be life altering.
Looking from the bottom...four sheetmetal screws secure it to the crash bar.
From the top, top of the photo is the front of the car.
You can see the silicone tubing coming through the air inlet duct.
I ended up running the wiring along part of the OEM harness and securing with zip ties. I still need to redo the connectors and sheath all the wiring with a protective sleeve.
01-07-2017, 06:40 PM
#38
Ok, onto less important things like lighting. I usually don't ever do much in the way of non-functional part or things that are just cosmetic. I do consider them but they're not a high priority.
Lights are at least functional. I've pretty much replaced a majority of the bulbs in the car with LED replacements.
I've sourced them from Diode Dynamics as well as Amazon and even Ebay.
For most of the interior lights, I used the T10 wedge bulbs and I bought them in bulk off of Amazon. I bought these:
https://www.amazon.com/gp/product/B0...?ie=UTF8&psc=1
VERY bright and made a world of difference everywhere I installed them including the overhead map lights, door lights and trunk. They're cheap and they work. Far brighter than the OEM incandescent bulbs and they won't run down your battery.
I've also done the front fogs with an eBay LED plug-and-play bulb using a CREE chip. I think they were 80 watts or something stupid and they're no longer available from the vendor. I've had them in there for almost a year with no issues. The heat sink on the back, which has a fan, sticks out far enough to interfere with the Nismo filters.
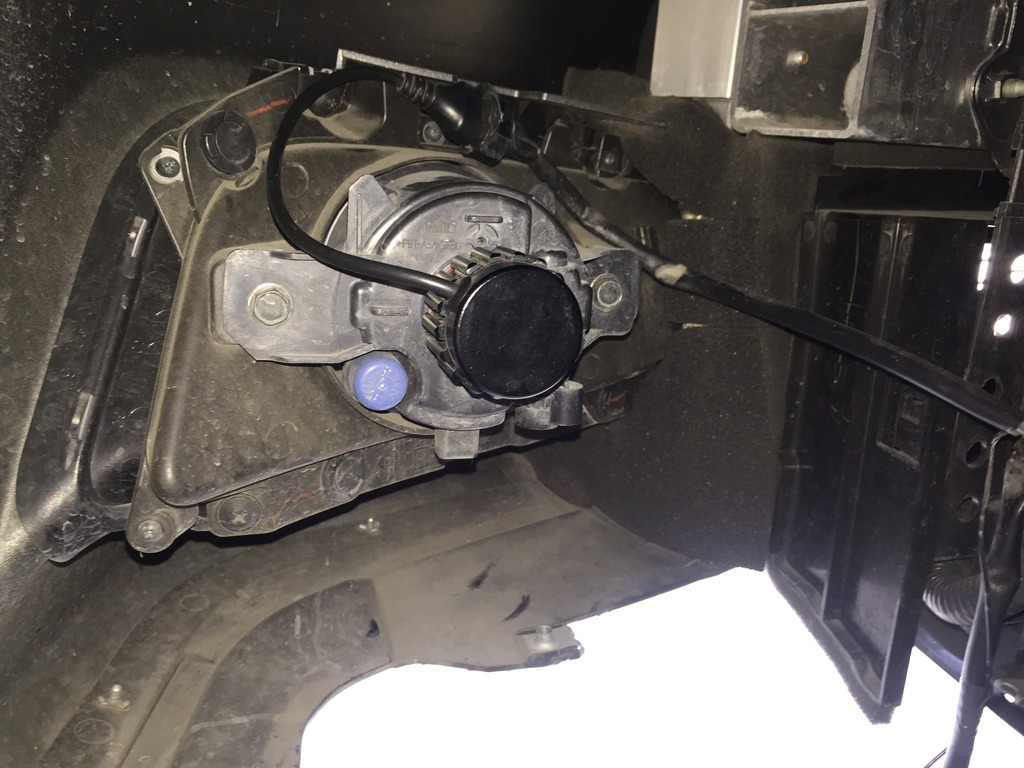
Light output wise, they're BRIGHT, probably too bright but no one has flashed me. The light is also all over the place and not directional. But it does provide substantial additional light (in all directions) over the stock fogs.
Here's a shot of the back of the fog light and you can see the back of the bulb/heat sink/fan. You can hear the fans run if you have your lights on auto and you get out of the car. Never caused a batter problem or anything. I'm actually going to install them in my QX70.
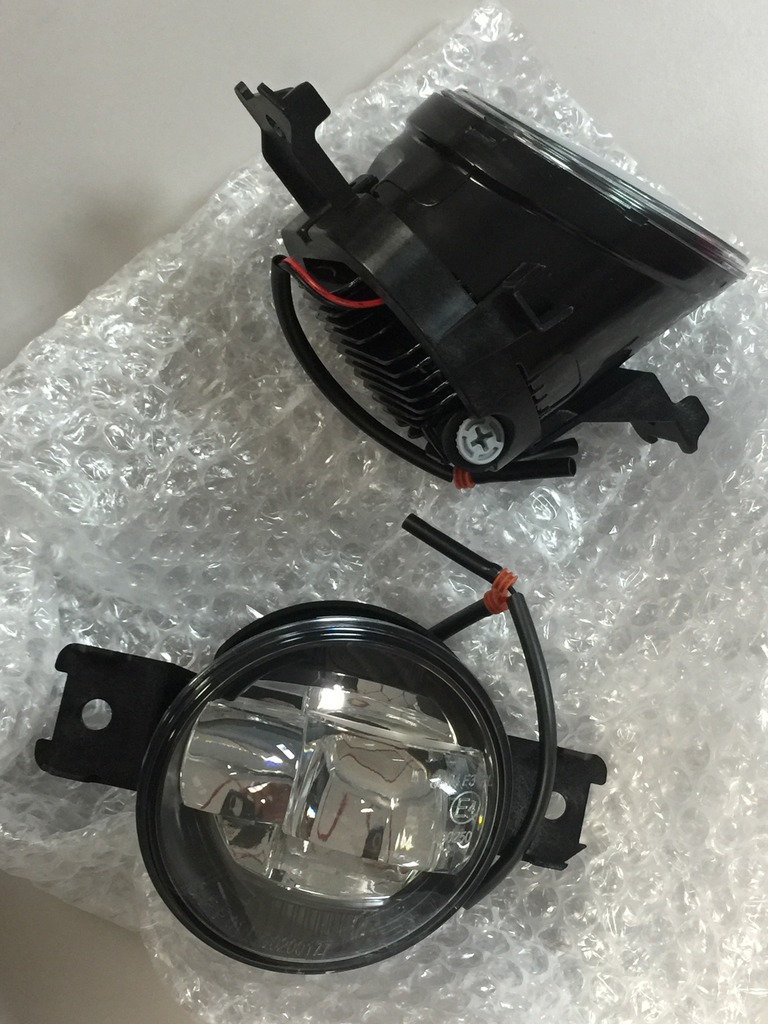
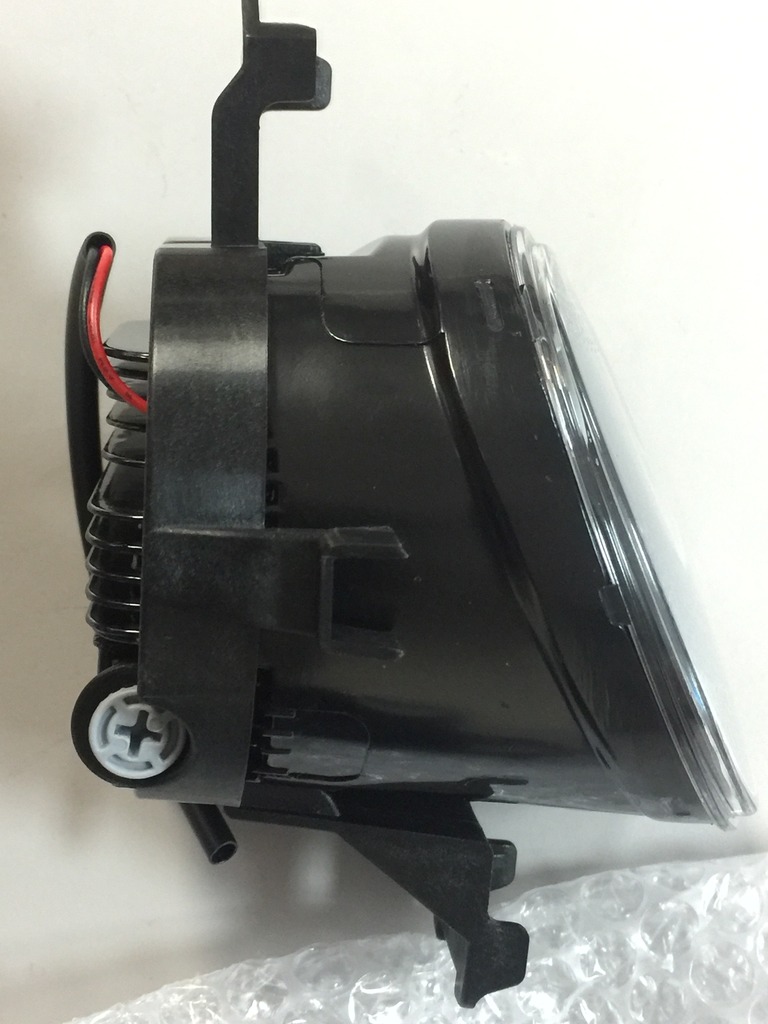
I've since upgraded these to Morimoto LED's for more clearance and a more defined light source. I've also covered the lenses with clear film to protect them from road chips as the lenses are polycarbonate. They're not quite as deep as the stock fogs with or without the LED lights.
Lights are at least functional. I've pretty much replaced a majority of the bulbs in the car with LED replacements.
I've sourced them from Diode Dynamics as well as Amazon and even Ebay.
For most of the interior lights, I used the T10 wedge bulbs and I bought them in bulk off of Amazon. I bought these:
https://www.amazon.com/gp/product/B0...?ie=UTF8&psc=1
VERY bright and made a world of difference everywhere I installed them including the overhead map lights, door lights and trunk. They're cheap and they work. Far brighter than the OEM incandescent bulbs and they won't run down your battery.
I've also done the front fogs with an eBay LED plug-and-play bulb using a CREE chip. I think they were 80 watts or something stupid and they're no longer available from the vendor. I've had them in there for almost a year with no issues. The heat sink on the back, which has a fan, sticks out far enough to interfere with the Nismo filters.
Light output wise, they're BRIGHT, probably too bright but no one has flashed me. The light is also all over the place and not directional. But it does provide substantial additional light (in all directions) over the stock fogs.
Here's a shot of the back of the fog light and you can see the back of the bulb/heat sink/fan. You can hear the fans run if you have your lights on auto and you get out of the car. Never caused a batter problem or anything. I'm actually going to install them in my QX70.
I've since upgraded these to Morimoto LED's for more clearance and a more defined light source. I've also covered the lenses with clear film to protect them from road chips as the lenses are polycarbonate. They're not quite as deep as the stock fogs with or without the LED lights.
01-07-2017, 07:16 PM
#39
I've had the Aragostas on for a while now with no other suspension modifications. Due to crappy roads and a firm suspension, my alignment had moved further out of spec.
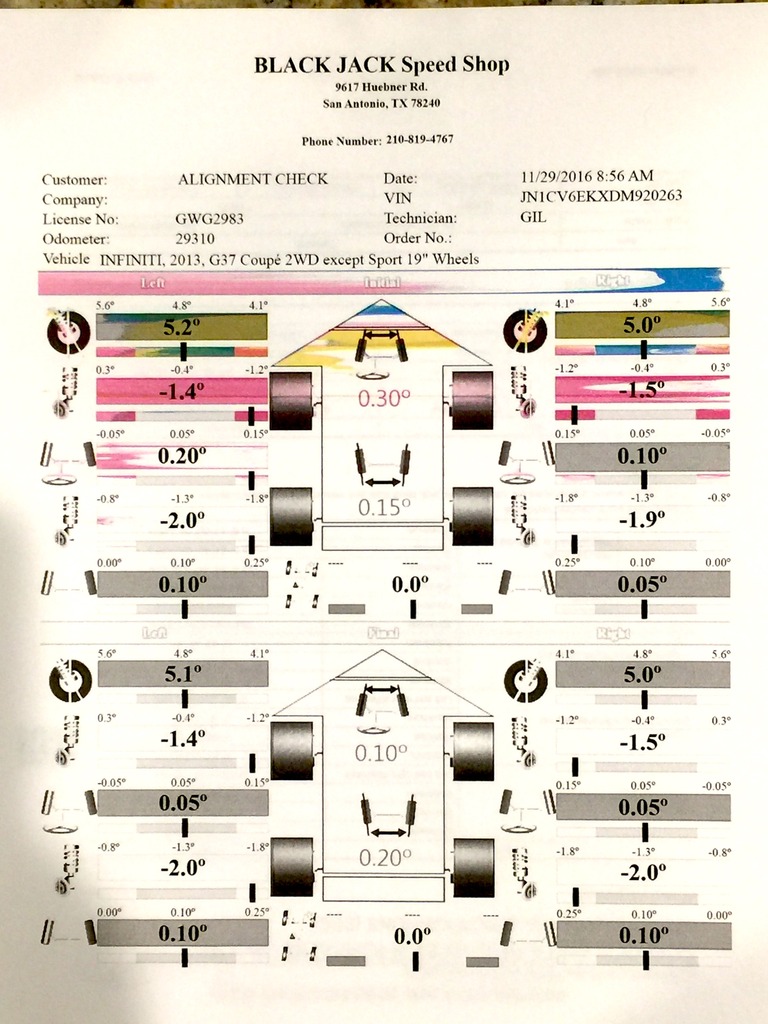
Time to do something about it. I could have easily gone a few more months, if not half a year on the OEM tires had I done it right and added suspension pieces to get camber and toe back in spec. I was hoping I wouldn't have to spend the additional funds. I was wrong!
More to come...
Time to do something about it. I could have easily gone a few more months, if not half a year on the OEM tires had I done it right and added suspension pieces to get camber and toe back in spec. I was hoping I wouldn't have to spend the additional funds. I was wrong!
More to come...
01-07-2017, 07:48 PM
#40
With the Aragostas installed and my damping taken care of, it was on to alignment and addressing the traction issues I was having. I also wanted to dial out more of the inherent understeer.
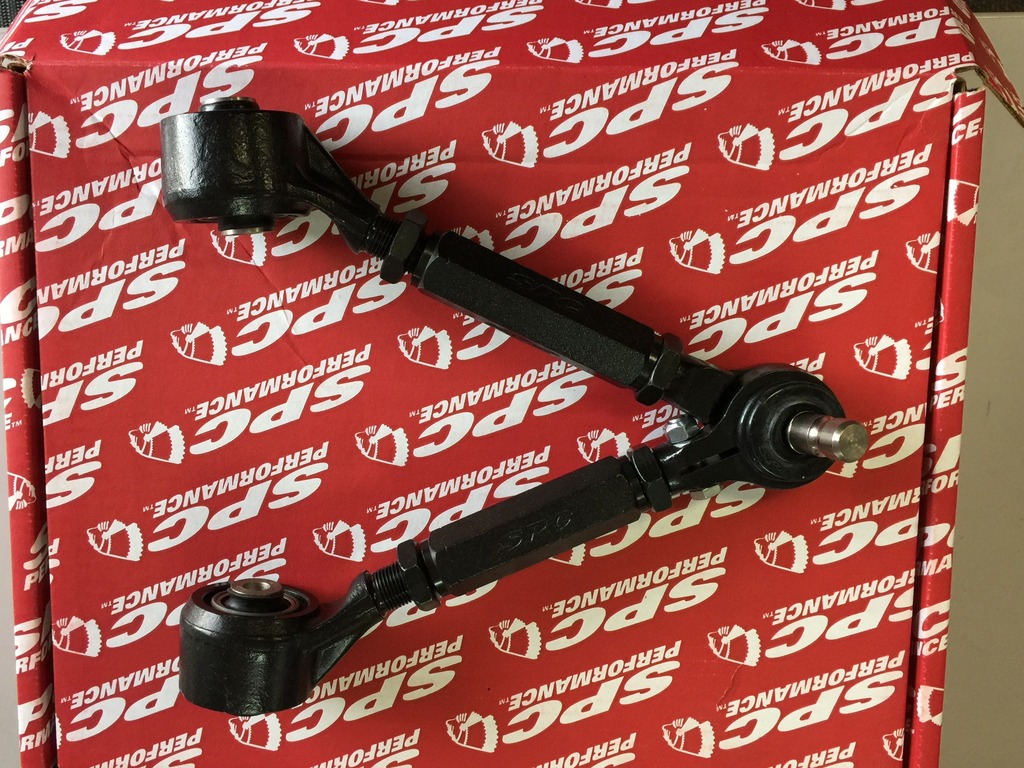
After doing a lot of reading and research, I'd settled on either the SPL or Voodoo13 upper camber arms. I had one hesitation...their solid metal bushings and my desire to keep NVH at close to stock levels. When looking at the cost associated with each, I couldn't justify the new SPC turnbuckle-style arms as they were within spitting distance of the Voodoo13's. But then Black Friday came around and I found them for far, far less than the other two and pulled the trigger.
Besides their ease of adjustability, I liked the fact they had as much clearance as the stock arms AND had insulated, sealed rubber bushings instead of the solid bushings found in the other two. Were I more track-oriented, I'd go with the Voodoo13 or SPL's hands down.
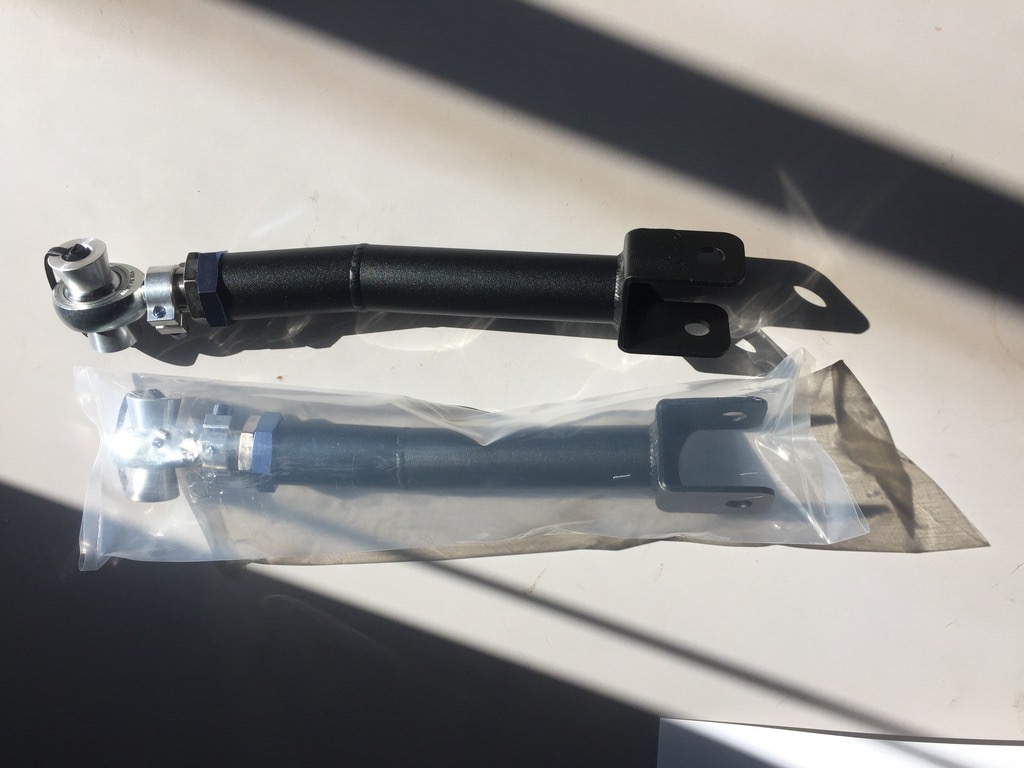
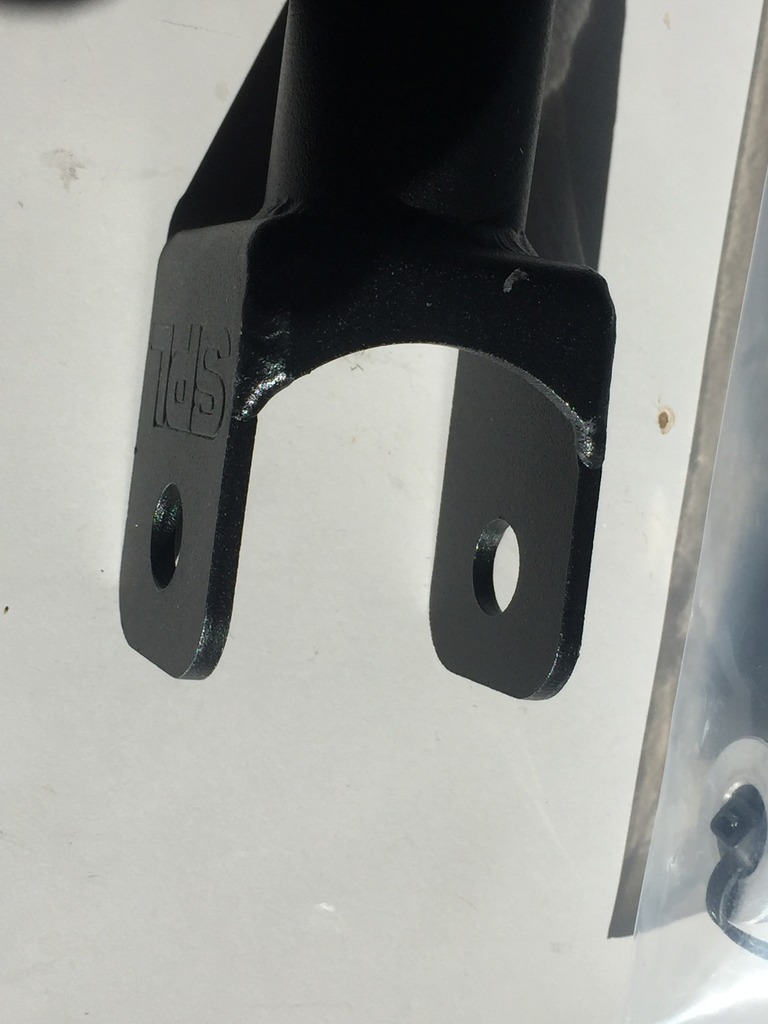
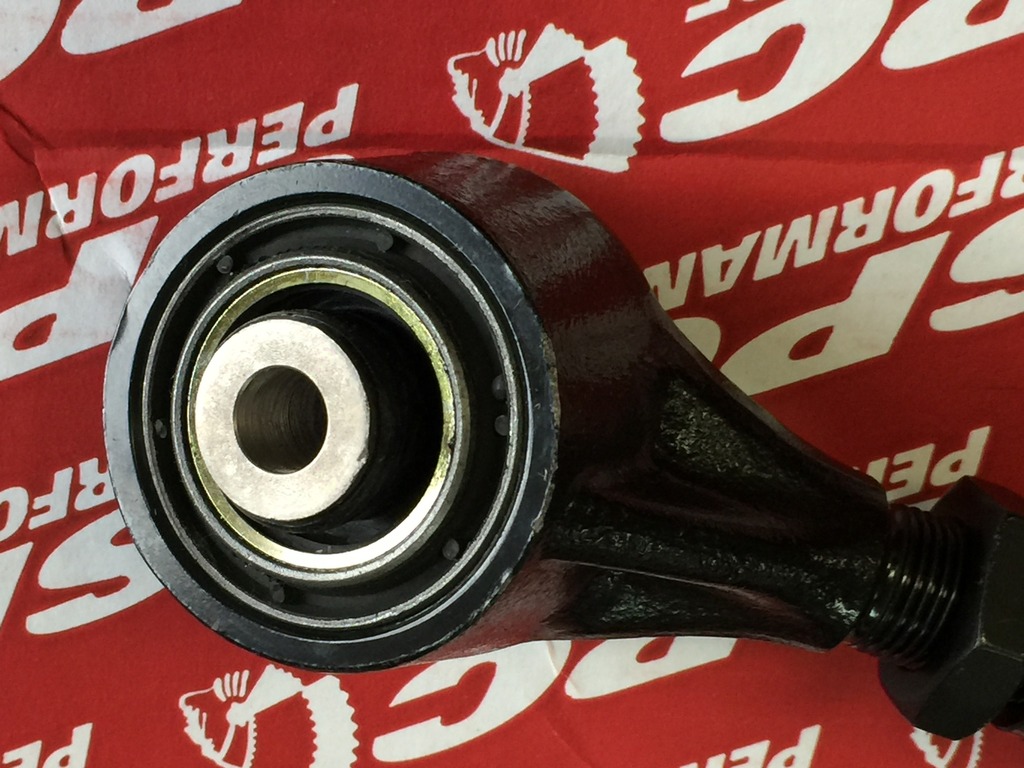
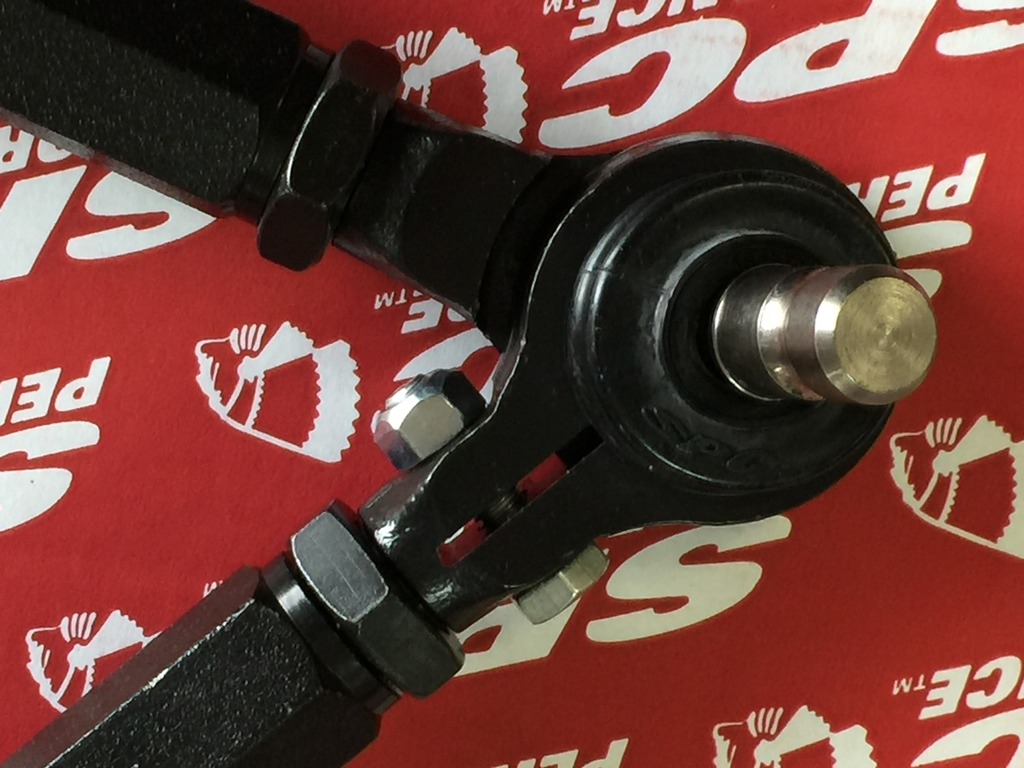
For the rear camber links, I'd originally planned on using the Voodoo13 links which are straight. But enough people talked me into the SPL's that I went with them. I was afraid the larger IPL (Nismo) sway bars would interfere with the Voodoo13 links so I played it safe. The SPL's have a "kink" in them to clear the swaybar under compression.
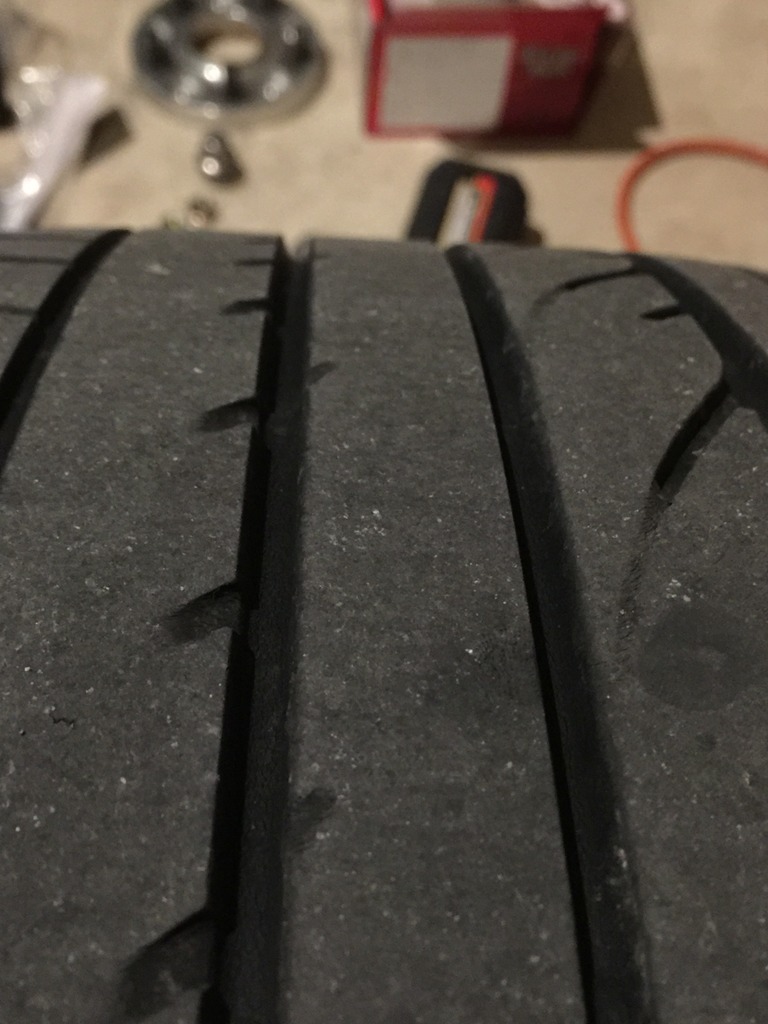
Here's one of my front tires, about a year old from new. While there's plenty of tread left in the middle, the wear becomes worse the further you get to the right side (inboard) of the tire.
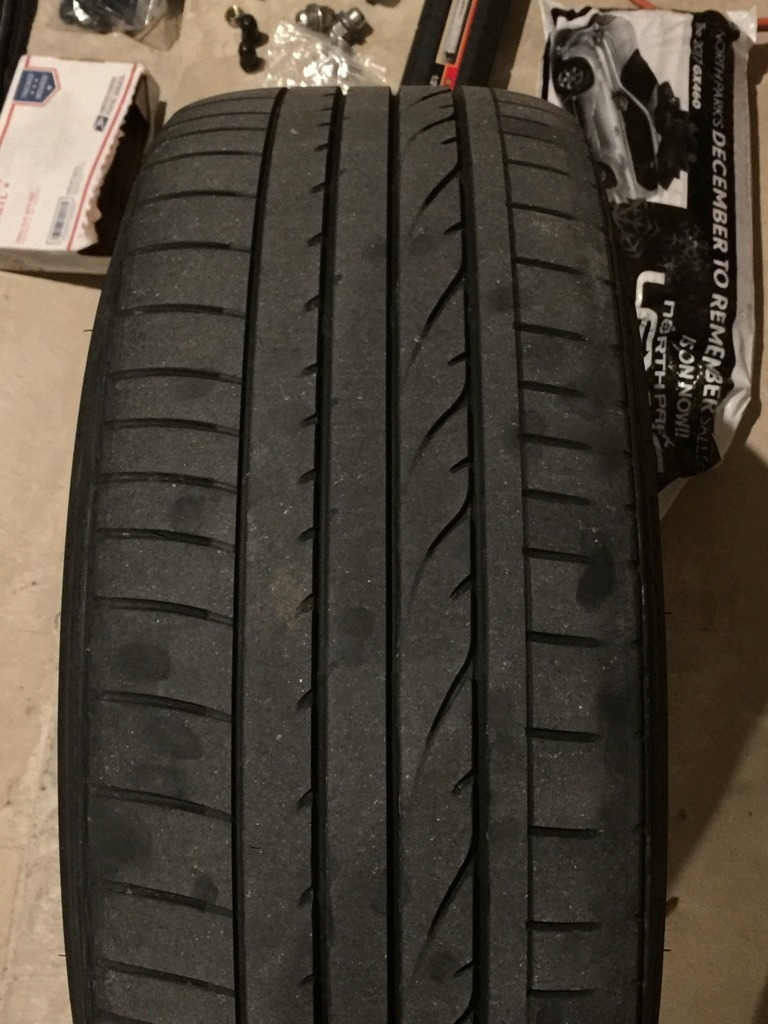
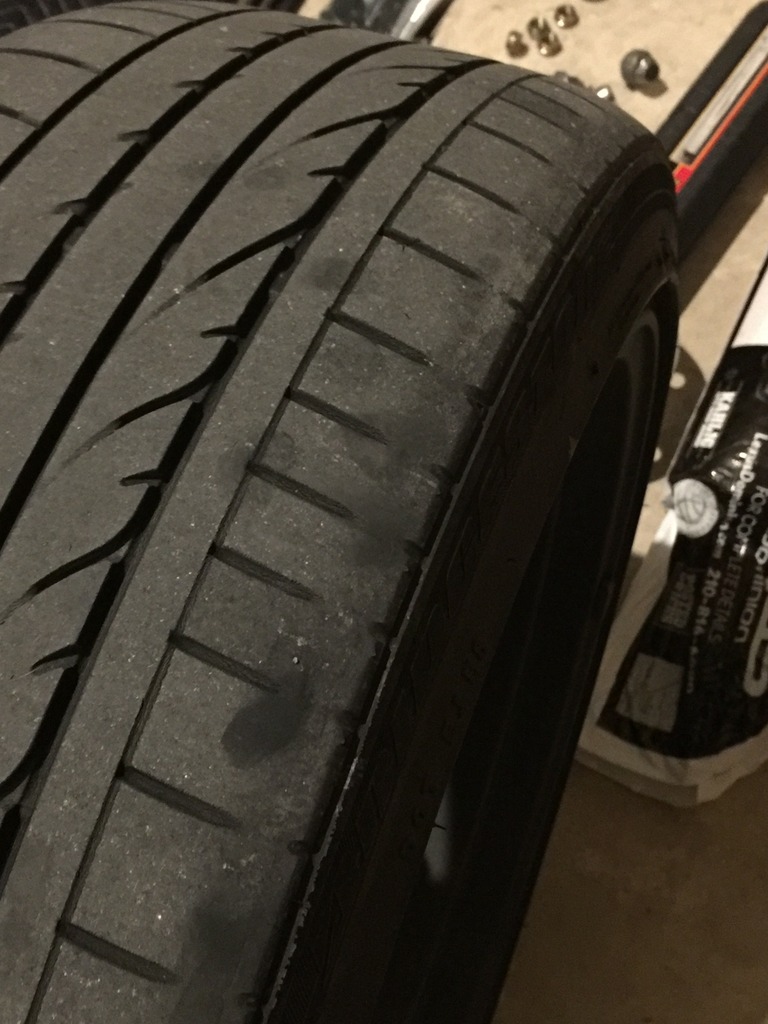
With winter approaching, I didn't want to risk things so I made the camber hardware a priority and also decided to just replace the wheels and tires while I was at it. My rear tires showed far less wear than the fronts. I was also having control issues in the rain meaning my toe was way out of spec.
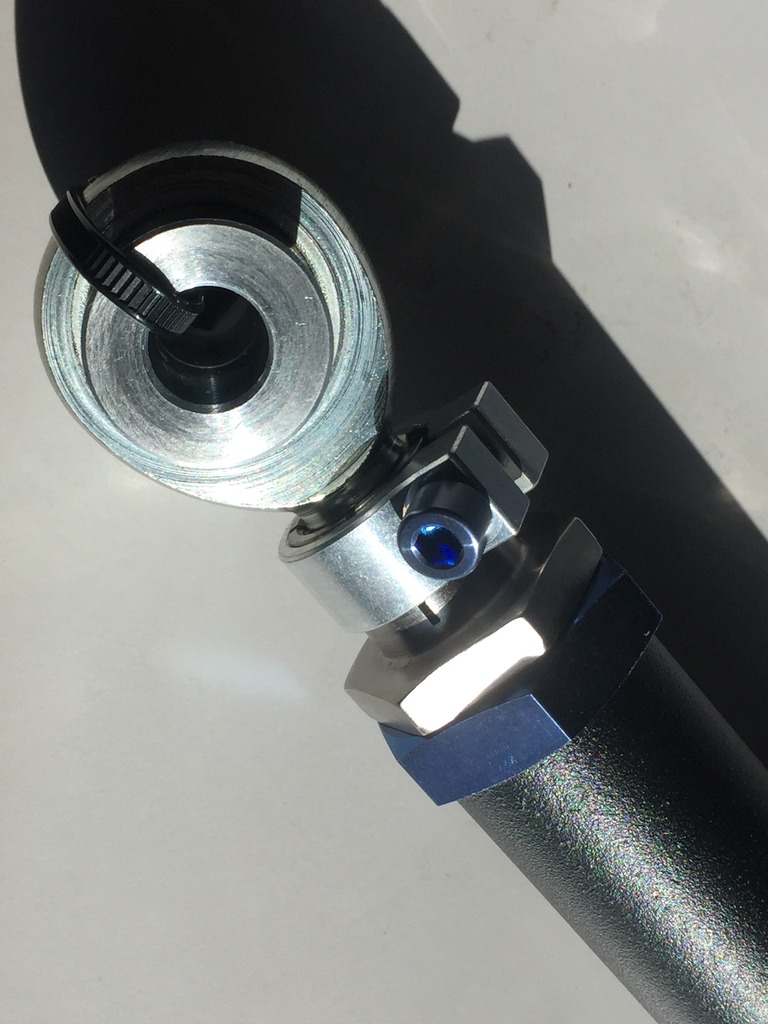
Photos of the SPL rear camber links. They have some heft and solidity to them and seem to be very well made. The titanium hardware is rugged too (blue pieces) and doesn't seem to gall easily like some titanium:
After doing a lot of reading and research, I'd settled on either the SPL or Voodoo13 upper camber arms. I had one hesitation...their solid metal bushings and my desire to keep NVH at close to stock levels. When looking at the cost associated with each, I couldn't justify the new SPC turnbuckle-style arms as they were within spitting distance of the Voodoo13's. But then Black Friday came around and I found them for far, far less than the other two and pulled the trigger.
Besides their ease of adjustability, I liked the fact they had as much clearance as the stock arms AND had insulated, sealed rubber bushings instead of the solid bushings found in the other two. Were I more track-oriented, I'd go with the Voodoo13 or SPL's hands down.
For the rear camber links, I'd originally planned on using the Voodoo13 links which are straight. But enough people talked me into the SPL's that I went with them. I was afraid the larger IPL (Nismo) sway bars would interfere with the Voodoo13 links so I played it safe. The SPL's have a "kink" in them to clear the swaybar under compression.
Here's one of my front tires, about a year old from new. While there's plenty of tread left in the middle, the wear becomes worse the further you get to the right side (inboard) of the tire.
With winter approaching, I didn't want to risk things so I made the camber hardware a priority and also decided to just replace the wheels and tires while I was at it. My rear tires showed far less wear than the fronts. I was also having control issues in the rain meaning my toe was way out of spec.
Photos of the SPL rear camber links. They have some heft and solidity to them and seem to be very well made. The titanium hardware is rugged too (blue pieces) and doesn't seem to gall easily like some titanium:
01-07-2017, 08:16 PM
#41
The SPC arms, new style, have a part number of 73005 and are a lot different from their previous arms. The section which retains the bearings is forged on all ends and I'd estimate they are about a pound heavier than the stock arms which are cast aluminum and quite light. By turning either turnbuckle, you can adjust for camber or caster.
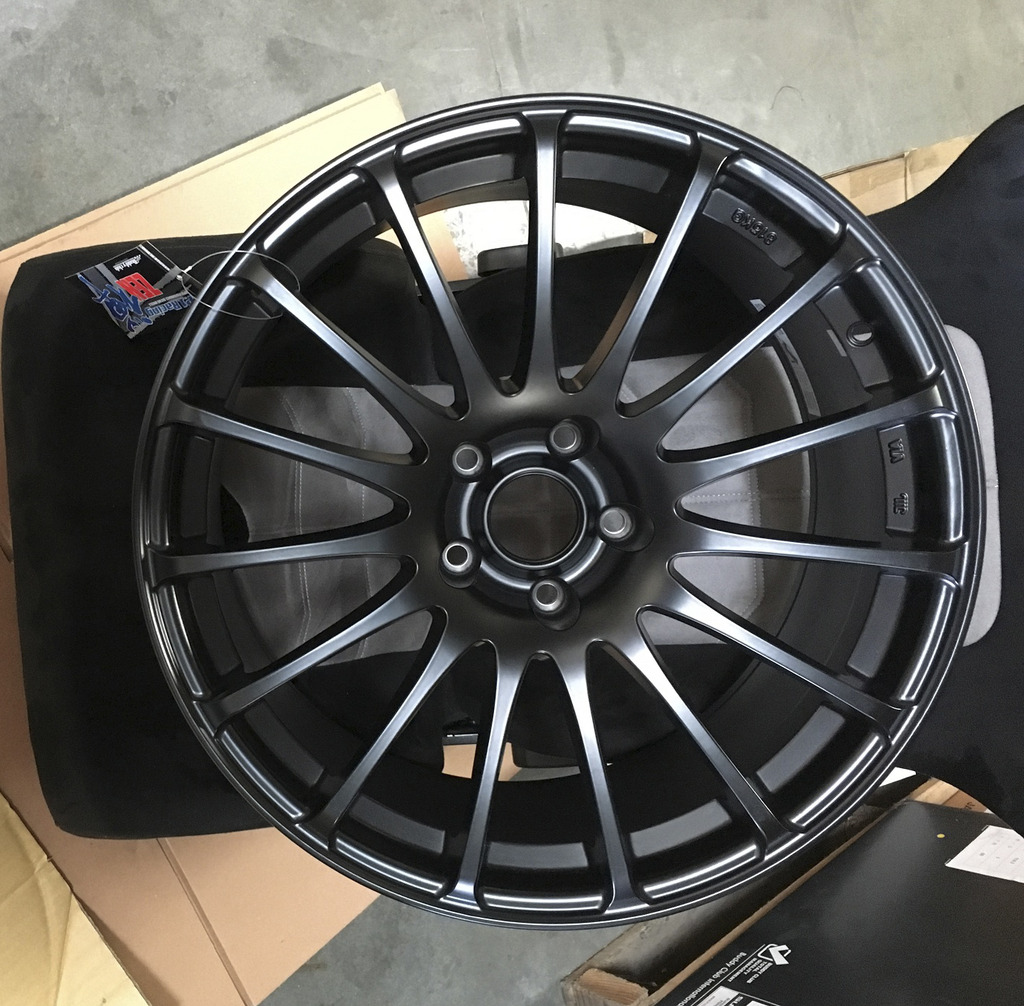
For wheels, I REALLY wanted a square setup and I researched/debated for months on which wheels to acquire. I'd wanted something that I could use, without spacers, in a hyper black, concave, multi-spoke configuration that was both wider and lighter than the OEM IPL wheels. Initially I'd planned on running four rear 9" IPL wheels all around but I could not find a decent deal on just two rears. Oh and I didn't want to spend a mint on wheels either. I could have easily gone with say, Advans or Volks that met all of my criteria but I'd be dropping $4K on wheels alone. Not interested.
I'd seen the Buddy Club Zen wheels before and due to their offset and available colors, I'd knocked them off my list. In the end, I knew I had to compromise on something and decided the best way to get a set of square wheels that I could rotate, and have the proper front/rear offset, was to use spacers.
I went so far as to contact Buddy Club directly and they were nice enough to shoot some plane jane potato iPhone photos of the wheels so I wasn't judging on a studio shot (which can be deceiving). Once I saw the photo, I was sold.
I ordered the Buddy Clubs through a forum supporter, ConceptZ along with the SPL arms and took advantage of Black Friday savings. I also ordered a set of 10mm spacers which it would turn out, I could not use.
Since I needed new lugs, I did a bit of research on those too. Rather than blindly throw money at say Project Kicks or Rays, I found a set that fit my criteria. Black, closed end, significantly lighter than stock, locking and chromoly. It looks like these lugs are available from several vendors. They're 23 grams each and most importantly, nice and strong. The closed end will keep out water and corrosion and they match the wheels.
Comparison to the stock lugs:

The Buddy Club wheels are 19x9.5" with a 45mm offset. Theoretically, you could run them without spacers and there are no clearance issues in doing so. They look decent up front like that but to me, the rears need a bit more push. The Buddy Clubs weigh in at 23 pounds.
I decided on a square setup as I knew I needed more tire front and rear but especially up front. This car just scrubs in low speed turns. I also wanted greater tire longevity and being able to rotate the tires left/right/front/back is a way to get that longevity.
For tires, again after a bit of reading and research, I settled on Michelin's excellent Pilot Super Sports or PSS as we like to refer to them. They have a new version coming out in about four months but it's unclear if they'll be offered in the size I want right off the bat.
For sizing, I went with a balance of having more tire AND a weight reduction over the Bridgestones. I didn't want to throw the speedo off dramatically so I went with the 255/40/19 (100Y) size. Being a Japanese company, I understand why Nissan went with the Bridgestone RE050-A tires. They're exceptional in the corners and stick hard through fast sweepers. Very stable. But they're heavy, quite harsh and are lacking in straight line traction. I find them stable under breaking but I can engage the ABS fairly easily when I want to.
For wheels, I REALLY wanted a square setup and I researched/debated for months on which wheels to acquire. I'd wanted something that I could use, without spacers, in a hyper black, concave, multi-spoke configuration that was both wider and lighter than the OEM IPL wheels. Initially I'd planned on running four rear 9" IPL wheels all around but I could not find a decent deal on just two rears. Oh and I didn't want to spend a mint on wheels either. I could have easily gone with say, Advans or Volks that met all of my criteria but I'd be dropping $4K on wheels alone. Not interested.
I'd seen the Buddy Club Zen wheels before and due to their offset and available colors, I'd knocked them off my list. In the end, I knew I had to compromise on something and decided the best way to get a set of square wheels that I could rotate, and have the proper front/rear offset, was to use spacers.
I went so far as to contact Buddy Club directly and they were nice enough to shoot some plane jane potato iPhone photos of the wheels so I wasn't judging on a studio shot (which can be deceiving). Once I saw the photo, I was sold.
I ordered the Buddy Clubs through a forum supporter, ConceptZ along with the SPL arms and took advantage of Black Friday savings. I also ordered a set of 10mm spacers which it would turn out, I could not use.
Since I needed new lugs, I did a bit of research on those too. Rather than blindly throw money at say Project Kicks or Rays, I found a set that fit my criteria. Black, closed end, significantly lighter than stock, locking and chromoly. It looks like these lugs are available from several vendors. They're 23 grams each and most importantly, nice and strong. The closed end will keep out water and corrosion and they match the wheels.
Comparison to the stock lugs:
The Buddy Club wheels are 19x9.5" with a 45mm offset. Theoretically, you could run them without spacers and there are no clearance issues in doing so. They look decent up front like that but to me, the rears need a bit more push. The Buddy Clubs weigh in at 23 pounds.
I decided on a square setup as I knew I needed more tire front and rear but especially up front. This car just scrubs in low speed turns. I also wanted greater tire longevity and being able to rotate the tires left/right/front/back is a way to get that longevity.
For tires, again after a bit of reading and research, I settled on Michelin's excellent Pilot Super Sports or PSS as we like to refer to them. They have a new version coming out in about four months but it's unclear if they'll be offered in the size I want right off the bat.
For sizing, I went with a balance of having more tire AND a weight reduction over the Bridgestones. I didn't want to throw the speedo off dramatically so I went with the 255/40/19 (100Y) size. Being a Japanese company, I understand why Nissan went with the Bridgestone RE050-A tires. They're exceptional in the corners and stick hard through fast sweepers. Very stable. But they're heavy, quite harsh and are lacking in straight line traction. I find them stable under breaking but I can engage the ABS fairly easily when I want to.
01-08-2017, 12:12 AM
#42

Love the build mate, coming along nicely.
Something you might want to look in to are diff bushings. I just put Z1 poly bushings in last weekend and its amazing the difference it has made to drive line and shift feel. No change to nvh and actually the car drives MUCH smoother.
To help with understeer, look at running some toe out on the front. I was also very unimpressed with the understeer, but that helped a lot. You could maybe try 0 toe for starters, see what you think and how tire wear goes, I'm running 1/32" per side, about 0.08 degrees.
The following users liked this post:
Ape Factory (01-08-2017)
