Build Threads

Hexotics' progress thread

Thread Tools
 
Search this Thread
 
Old 02-22-2016, 07:41 AM
  #31  
Rochester
Administrator
iTrader: (9)
 
Rochester's Avatar
 
Join Date: Nov 2010
Location: Rochester, NY
Posts: 18,871
Received 4,574 Likes on 3,425 Posts
Originally Posted by blnewt
Nice update, great touches in that bay, was wondering where you'd been
I get the impression that Hexotic has settled into modding his car slowly but methodically. Good for the car, good for his hobby, good for his wallet. And it allows for times when other priorities come up.

Can't say I don't approve.
The following users liked this post:
hexotic (02-22-2016)
Old 02-22-2016, 08:49 AM
  #32  
hexotic
DIY Cheapskate/Mod
Thread Starter
 
hexotic's Avatar
 
Join Date: Oct 2015
Location: Richmond Hill, ON
Posts: 1,772
Received 587 Likes on 392 Posts
That's exactly it. I've planned out what I'm going to do and when, so I don't foolishly put myself into debt. Made a savings account called 'baby gurl' putting $200 from every paycheque to go towards the car.
Old 02-22-2016, 09:01 AM
  #33  
blnewt
Movin On!
iTrader: (13)
 
blnewt's Avatar
 
Join Date: Nov 2009
Posts: 24,877
Received 4,941 Likes on 4,174 Posts
Originally Posted by hexotic
That's exactly it. I've planned out what I'm going to do and when, so I don't foolishly put myself into debt. Made a savings account called 'baby gurl' putting $200 from every paycheque to go towards the car.
Looks like John's mod method is spreading, nice to see you planning ahead. I know it was a rather hexotic start
The following users liked this post:
hexotic (02-22-2016)
Old 02-28-2016, 02:00 PM
  #34  
hexotic
DIY Cheapskate/Mod
Thread Starter
 
hexotic's Avatar
 
Join Date: Oct 2015
Location: Richmond Hill, ON
Posts: 1,772
Received 587 Likes on 392 Posts
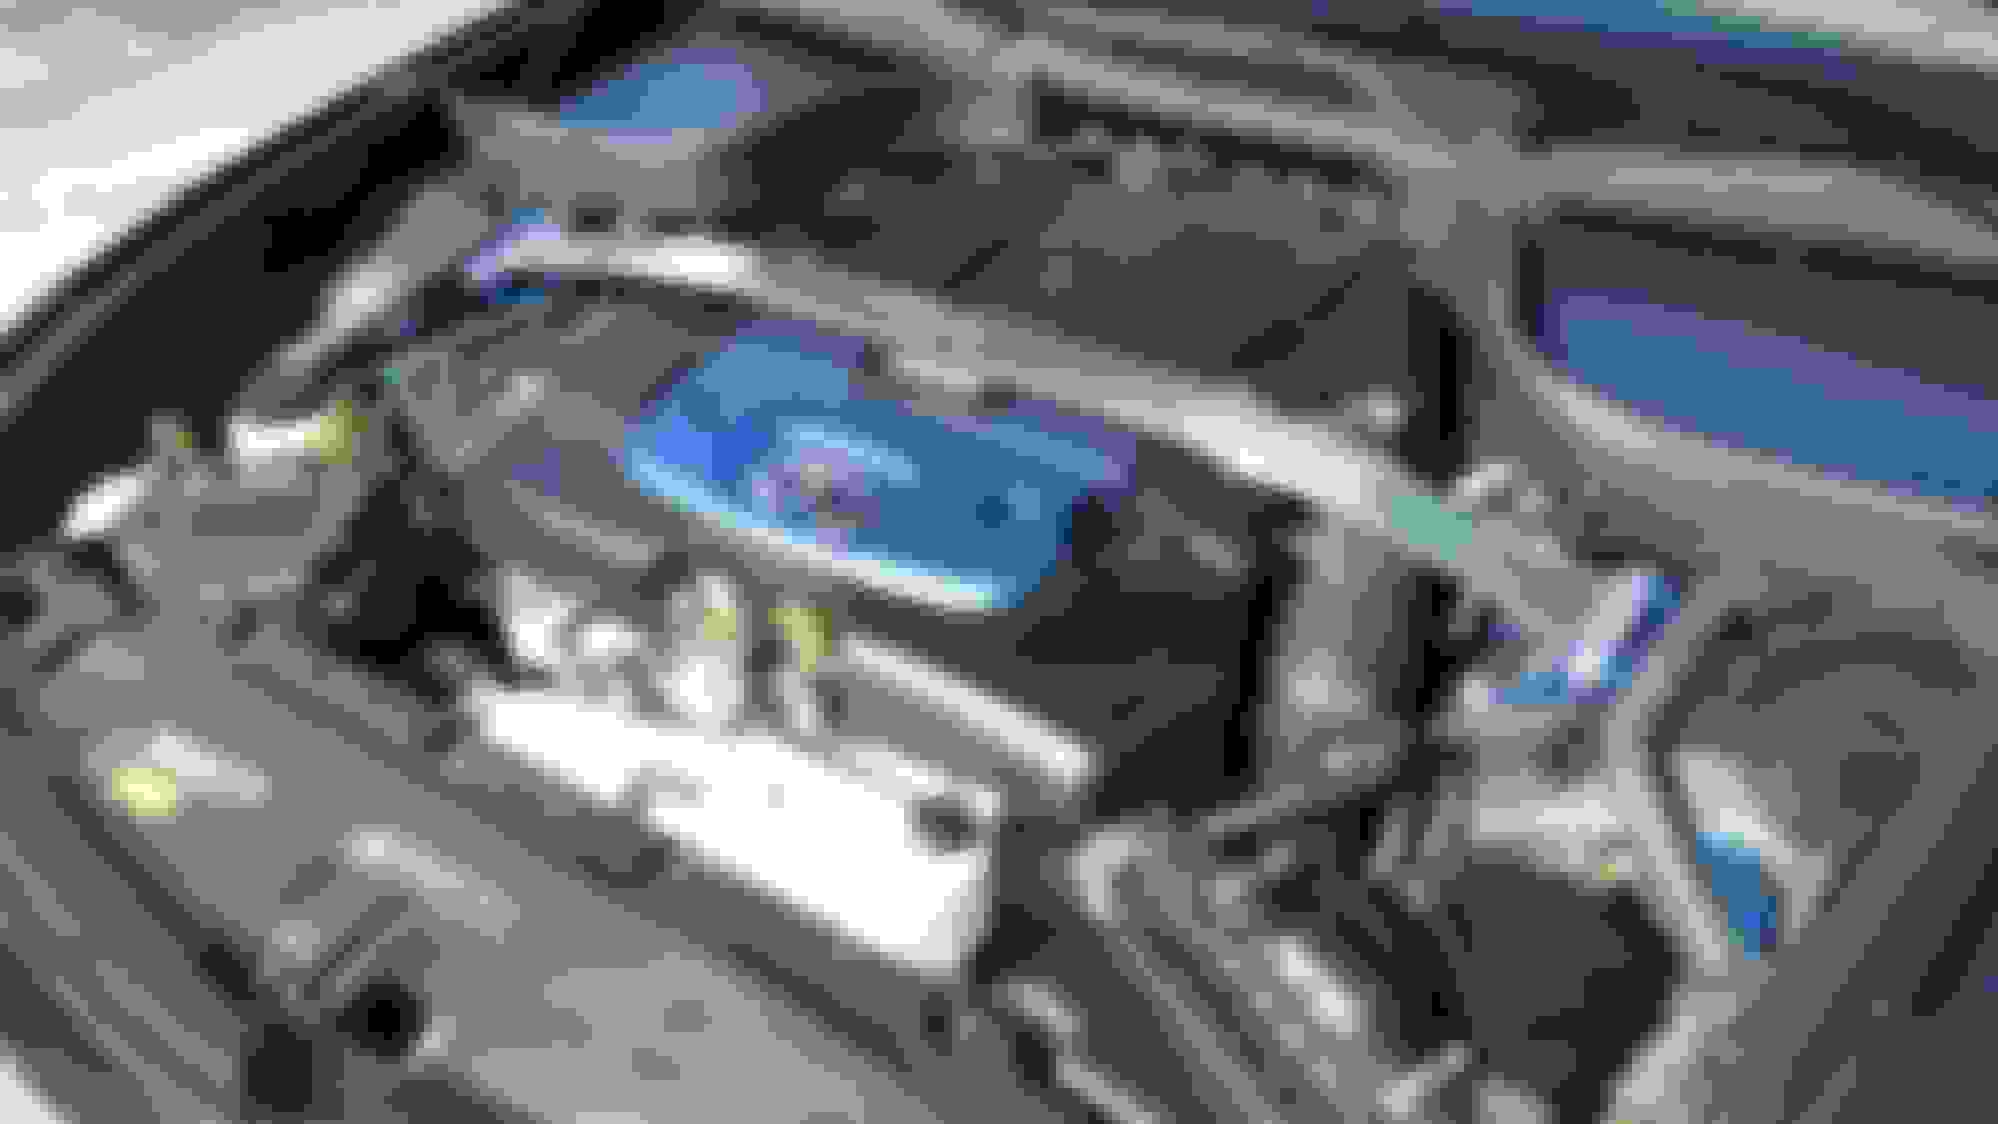
Alright. New grounding kit is in. Proper ofc cables this time. Better colour match this time too. Pardon the dirt, havent done a proper post winter cleaning yet. Winter isnt over yet.... unfortunately...


Old 02-28-2016, 02:13 PM
  #35  
Rochester
Administrator
iTrader: (9)
 
Rochester's Avatar
 
Join Date: Nov 2010
Location: Rochester, NY
Posts: 18,871
Received 4,574 Likes on 3,425 Posts
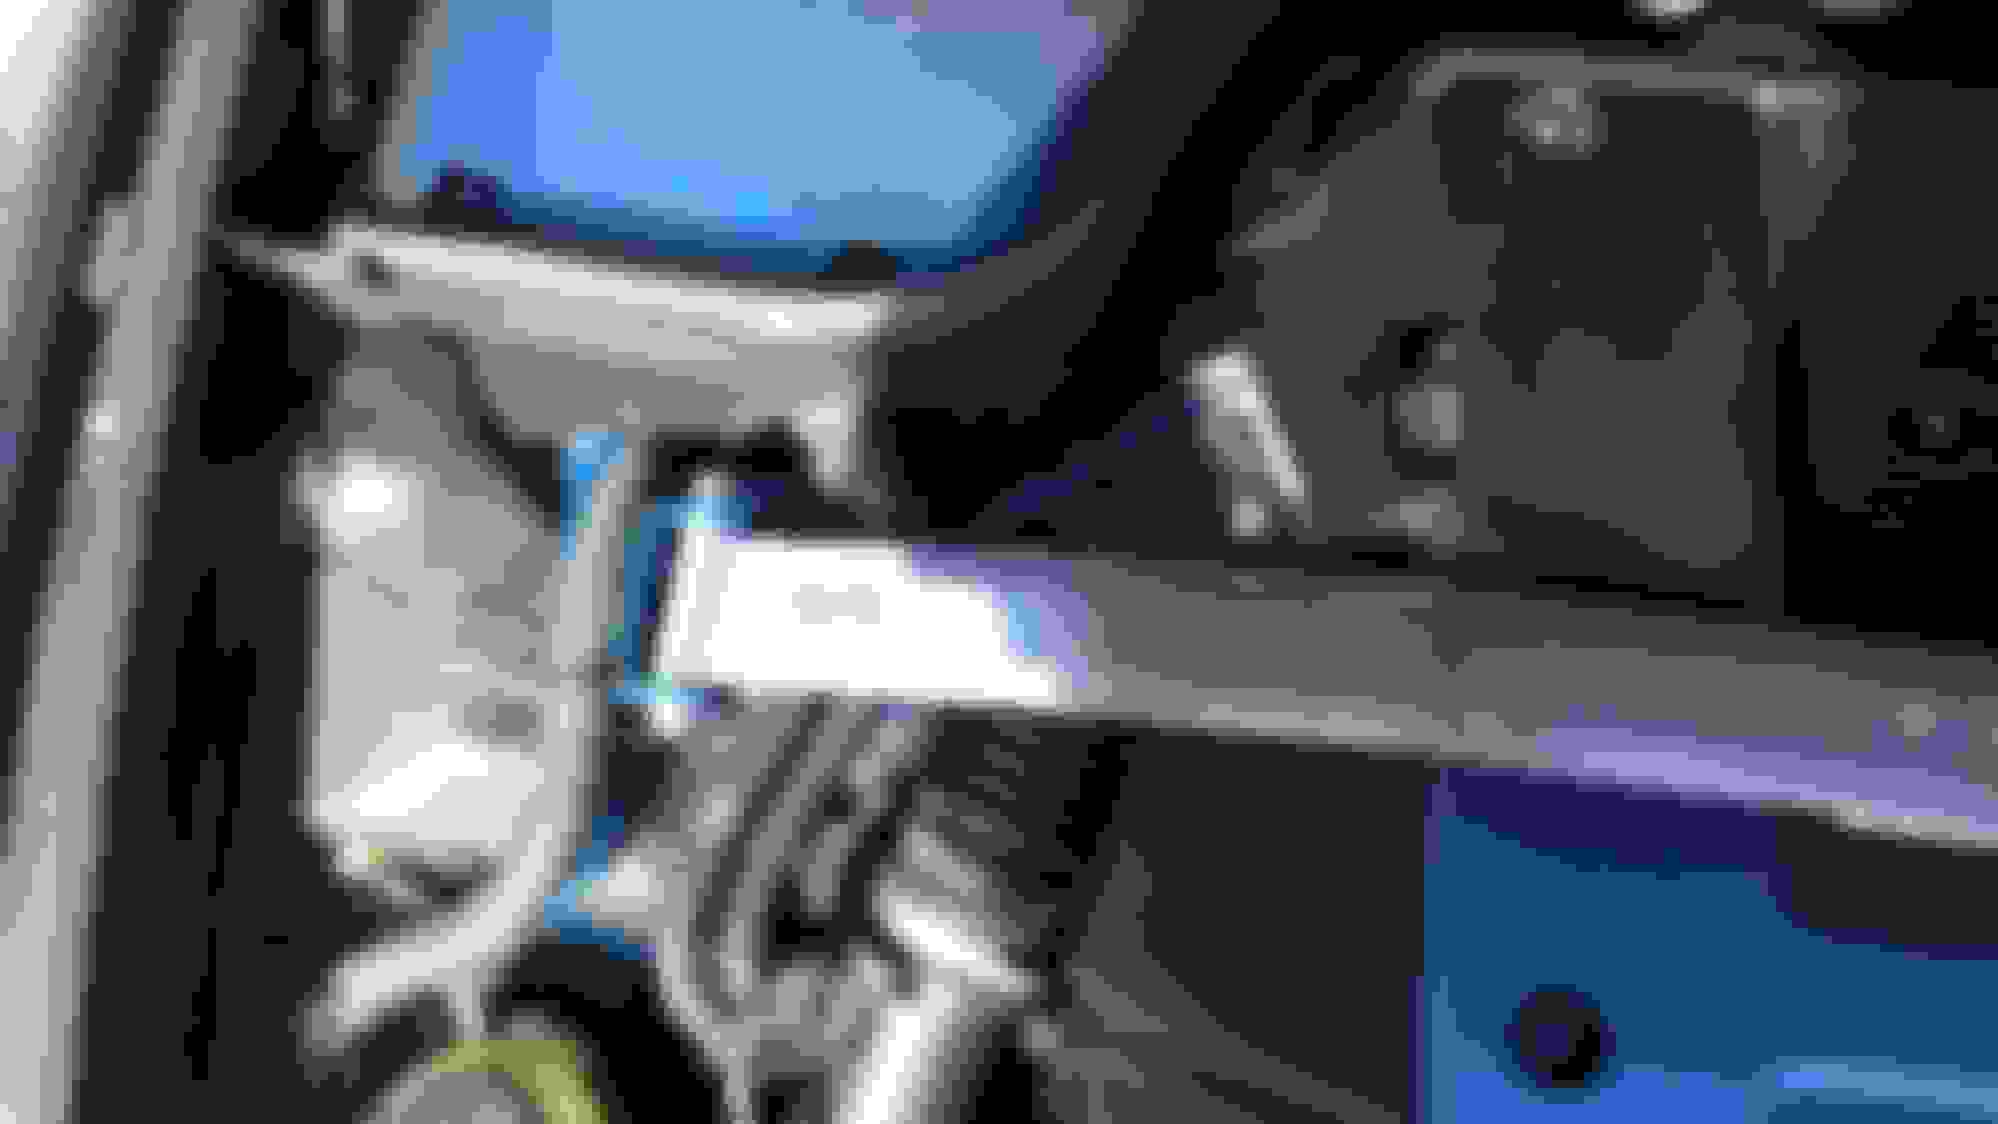
Have you ever considered getting rid of the CUSCO etching in the center of the bar? I did that with my GT Spec bar, because the ends had the logo too, enbossed into the welds. Looks like the Cusco has some kind of branding on the ends too.
Old 02-28-2016, 02:16 PM
  #36  
hexotic
DIY Cheapskate/Mod
Thread Starter
 
hexotic's Avatar
 
Join Date: Oct 2015
Location: Richmond Hill, ON
Posts: 1,772
Received 587 Likes on 392 Posts
it seems like they clearcoated or something over the metal, on top of the etching. I have some rubbing from the padding (as you can see from the scratches) and it seems to be a thin layer of clearcoat. I never thought about it, maybe some day when I can look more towards little details and not worry about the big mods.
Old 02-28-2016, 02:55 PM
  #37  
Rochester
Administrator
iTrader: (9)
 
Rochester's Avatar
 
Join Date: Nov 2010
Location: Rochester, NY
Posts: 18,871
Received 4,574 Likes on 3,425 Posts
Originally Posted by hexotic
it seems like they clearcoated or something over the metal, on top of the etching. I have some rubbing from the padding (as you can see from the scratches) and it seems to be a thin layer of clearcoat. I never thought about it, maybe some day when I can look more towards little details and not worry about the big mods.
It is clear coat. I had the same thing. Kind of a milky, easily scratched surface.

You know what takes that off polished aluminum? Four naught (0000) steel wool, elbow grease, and then metal polish and more elbow grease.

IDK why they bother clear-coating it, because the clear-coat looks horrible. Get it polished down to the raw metal, and as long as you wipe it down a few times a year, there will never be any corrosion. Mine has a mirror-like finish, 3 years later.
Old 02-28-2016, 03:10 PM
  #38  
hexotic
DIY Cheapskate/Mod
Thread Starter
 
hexotic's Avatar
 
Join Date: Oct 2015
Location: Richmond Hill, ON
Posts: 1,772
Received 587 Likes on 392 Posts
Cool, I'll keep that in mind. Maybe sometime this summer I'll make it a weekend project at the cottage.
Old 05-28-2016, 03:14 PM
  #39  
hexotic
DIY Cheapskate/Mod
Thread Starter
 
hexotic's Avatar
 
Join Date: Oct 2015
Location: Richmond Hill, ON
Posts: 1,772
Received 587 Likes on 392 Posts


I know my license plate light is flickering lol. New set ordered already.

Last edited by hexotic; 05-28-2016 at 03:20 PM.
The following users liked this post:
blnewt (05-28-2016)
Old 05-28-2016, 03:48 PM
  #40  
blnewt
Movin On!
iTrader: (13)
 
blnewt's Avatar
 
Join Date: Nov 2009
Posts: 24,877
Received 4,941 Likes on 4,174 Posts
Sounds nice, how are you liking the TopSpeed?
Old 05-28-2016, 03:50 PM
  #41  
hexotic
DIY Cheapskate/Mod
Thread Starter
 
hexotic's Avatar
 
Join Date: Oct 2015
Location: Richmond Hill, ON
Posts: 1,772
Received 587 Likes on 392 Posts
Originally Posted by blnewt
Sounds nice, how are you liking the TopSpeed?
Its definitely louder than I expected. My reference was all video, and they only give you so much of an idea of how it actually sounds. Its making me a more careful driver in the city, no more hard acceleration lol... cops everywhere. Ive yet to try it on the highway.
Old 08-11-2016, 10:56 PM
  #42  
hexotic
DIY Cheapskate/Mod
Thread Starter
 
hexotic's Avatar
 
Join Date: Oct 2015
Location: Richmond Hill, ON
Posts: 1,772
Received 587 Likes on 392 Posts
custom splitter finally done


Old 08-11-2016, 11:16 PM
  #43  
blnewt
Movin On!
iTrader: (13)
 
blnewt's Avatar
 
Join Date: Nov 2009
Posts: 24,877
Received 4,941 Likes on 4,174 Posts
Well done sir! Did a nice job following the bumper contours and kept it on the conservative side which goes really well up there IMO.
The following users liked this post:
hexotic (08-11-2016)
Old 08-11-2016, 11:20 PM
  #44  
hexotic
DIY Cheapskate/Mod
Thread Starter
 
hexotic's Avatar
 
Join Date: Oct 2015
Location: Richmond Hill, ON
Posts: 1,772
Received 587 Likes on 392 Posts
My friends that make these professionally did most of the work lol, I just "art directed" the shape haha. Had to take the bumper off and trim a bunch of plastic off, as well as create 8 mounting points. This thing is bolted on so solid....
Old 12-28-2016, 10:57 AM
  #45  
hexotic
DIY Cheapskate/Mod
Thread Starter
 
hexotic's Avatar
 
Join Date: Oct 2015
Location: Richmond Hill, ON
Posts: 1,772
Received 587 Likes on 392 Posts
Small addition. (pardon the potato image quality)


Quick Reply: Hexotics' progress thread


All times are GMT -4. The time now is 09:36 PM.