Build Threads

Hexotics' progress thread

Old 12-08-2015, 01:03 AM
  #16  
hexotic
DIY Cheapskate/Mod
Thread Starter
 
hexotic's Avatar
 
Join Date: Oct 2015
Location: Richmond Hill, ON
Posts: 1,771
Received 587 Likes on 392 Posts
Edited the original post with some rear light updates thanks to Diode Dynamics.
The following users liked this post:
Diode Dynamics (12-08-2015)
Old 12-08-2015, 10:14 AM
  #17  
ocie
Registered User
 
ocie's Avatar
 
Join Date: Nov 2015
Location: Minnesota
Posts: 66
Received 2 Likes on 2 Posts
I really dig the GIFs man, nice touch to show off the lights.

I've put Diode Dynamics in all interior lights, city lights, reverse lights and my license plate lights.

Any issues so far with the Tail as Turn mod? I wanted to pull the trigger and get a pair for my sedan, but wasn't sure if there would be an issue since Diode lists it for the coupe. The front and rear turn signals are no longer in sync now that you've used the Tail as Turn mod, correct?
Old 12-08-2015, 10:20 AM
  #18  
hexotic
DIY Cheapskate/Mod
Thread Starter
 
hexotic's Avatar
 
Join Date: Oct 2015
Location: Richmond Hill, ON
Posts: 1,771
Received 587 Likes on 392 Posts
Originally Posted by ocie
I really dig the GIFs man, nice touch to show off the lights.

I've put Diode Dynamics in all interior lights, city lights, reverse lights and my license plate lights.

Any issues so far with the Tail as Turn mod? I wanted to pull the trigger and get a pair for my sedan, but wasn't sure if there would be an issue since Diode lists it for the coupe. The front and rear turn signals are no longer in sync now that you've used the Tail as Turn mod, correct?
I also replaced all my interior lights.
No issues on the tail as turn.
It lists it for the coupe because they make it plug and play for the coupe. You have to get the DIY kit for the sedan. Which is actually a lot cheaper, and is not hard at all to install.
I put in a set of resistors into the back lights, and that solved any issues with hyperblinking or out of sync blinking.
Hope that answers it all
The following users liked this post:
ocie (12-08-2015)
Old 12-11-2015, 04:44 PM
  #19  
hexotic
DIY Cheapskate/Mod
Thread Starter
 
hexotic's Avatar
 
Join Date: Oct 2015
Location: Richmond Hill, ON
Posts: 1,771
Received 587 Likes on 392 Posts
Updated rear end with the chrome painted black.


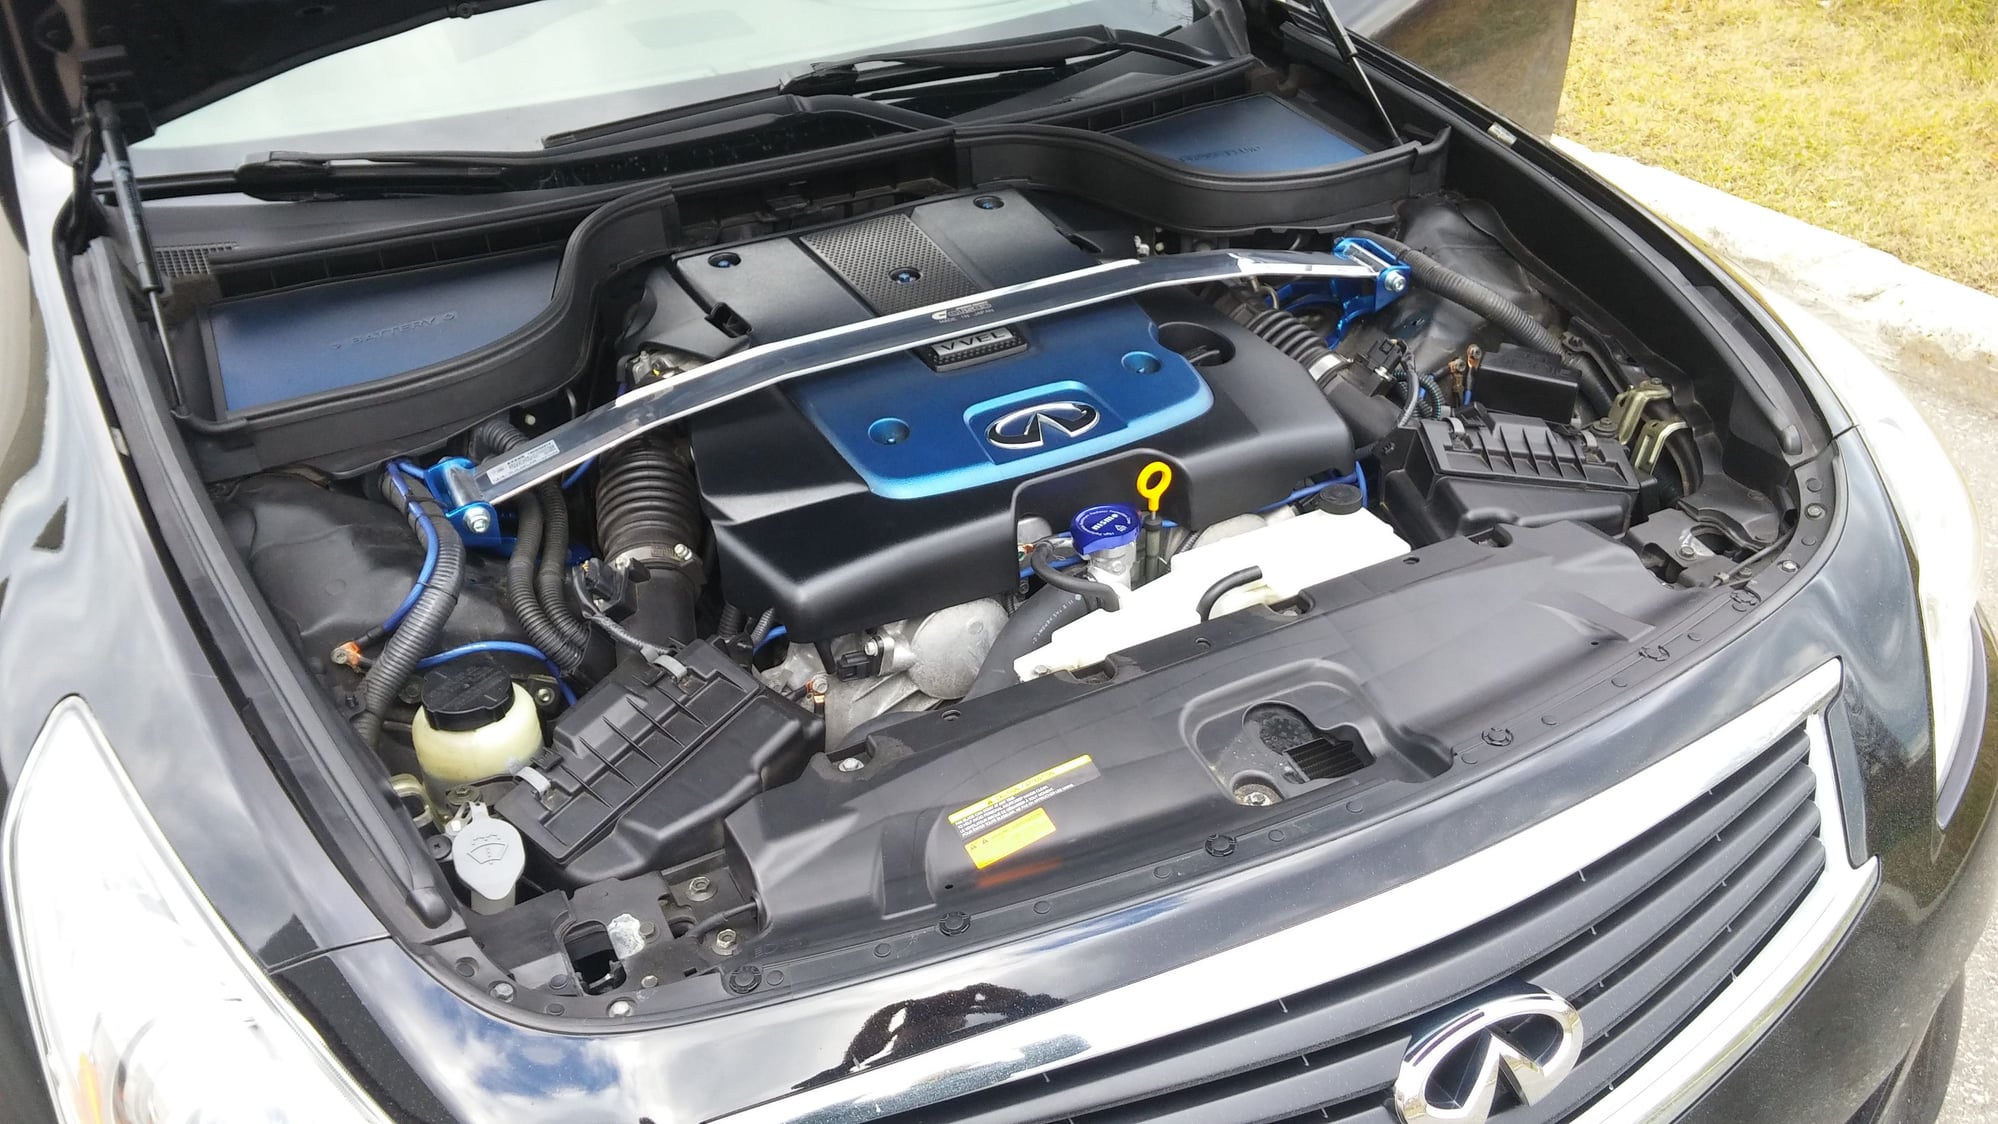
Also the updated engine bay. Just waiting for my oil filter cap to arrive. Next big thing will be Takeda CAI.
Old 12-11-2015, 04:48 PM
  #20  
Rochester
Administrator
iTrader: (8)
 
Rochester's Avatar
 
Join Date: Nov 2010
Location: Rochester, NY
Posts: 18,861
Received 4,571 Likes on 3,422 Posts
Did you know beforehand how well those powdercoated Cusco brackets would match your engine cover? Because that looks great. Even the blue cable grounding kit, and the painted back panels. Well done.

I know the VMS rad cap cover is blue, too. But something about it is mismatched and awkward. I think that cap cover would look better black. IIRC, they're pretty inexpensive.

The new tail-end perspective is a very clean look. Also well done. Whoever twisted your arm to do that is a freaking genius.
Old 12-11-2015, 05:10 PM
  #21  
hexotic
DIY Cheapskate/Mod
Thread Starter
 
hexotic's Avatar
 
Join Date: Oct 2015
Location: Richmond Hill, ON
Posts: 1,771
Received 587 Likes on 392 Posts
Originally Posted by Rochester
Did you know beforehand how well those powdercoated Cusco brackets would match your engine cover? Because that looks great. Even the blue cable grounding kit, and the painted back panels. Well done.
Yep, I colour matched the colour from a photo, got the hex code, then looked at google images using their colour matching search for car paint. Found that this blue is a GM blue that I was able to grab from an autoparts store. The panels and cover are a blue highlight gradient on a black background, but in the photos it comes out a lot more dominant.

Originally Posted by Rochester
I know the VMS rad cap cover is blue, too. But something about it is mismatched and awkward. I think that cap cover would look better black. IIRC, they're pretty inexpensive.
Yeah, I ordered it blue, then changed my mind thinking it was too vibrant, and too different of a blue than the rest of the stuff. Emailed them asking for a black one instead. Got a package with the blue cover, and a friggin Toyota TRD oil filter cap..... instead of a black and silver Nismo one.... So its safe to say they dont speak English very well lol.

Originally Posted by Rochester
The new tail-end perspective is a very clean look. Also well done. Whoever twisted your arm to do that is a freaking genius.
Yeah that guy deserves a cookie.

Last edited by hexotic; 12-11-2015 at 05:25 PM.
Old 12-11-2015, 05:24 PM
  #22  
Rochester
Administrator
iTrader: (8)
 
Rochester's Avatar
 
Join Date: Nov 2010
Location: Rochester, NY
Posts: 18,861
Received 4,571 Likes on 3,422 Posts
Originally Posted by hexotic
Yeah, I ordered it blue, then changed my mind thinking it was too vibrant, and too different of a blue than the rest of the stuff. Emailed them asking for a black one instead.
Well then, I will officially get out of your head now. LOL


No wait, one more thing. Since you clearly have painting skills better than the average bear, how about painting those brackets for the airboxes and the open-hood sensor?

Last edited by Rochester; 12-11-2015 at 05:29 PM.
The following users liked this post:
hexotic (12-11-2015)
Old 12-11-2015, 05:47 PM
  #23  
hexotic
DIY Cheapskate/Mod
Thread Starter
 
hexotic's Avatar
 
Join Date: Oct 2015
Location: Richmond Hill, ON
Posts: 1,771
Received 587 Likes on 392 Posts
Well, the airboxes will be gone once I finally buy the Takeda CAI, so no point right now.

Since you clearly have painting skills better than the average bear
Old 02-21-2016, 05:30 PM
  #24  
hexotic
DIY Cheapskate/Mod
Thread Starter
 
hexotic's Avatar
 
Join Date: Oct 2015
Location: Richmond Hill, ON
Posts: 1,771
Received 587 Likes on 392 Posts
Took your advice with the bolts John. Looks much better now. Still waiting for my black rad cap cover.... Note to self, clean engine bay.... So much winter gunk ugh.

Old 02-21-2016, 05:38 PM
  #25  
Rochester
Administrator
iTrader: (8)
 
Rochester's Avatar
 
Join Date: Nov 2010
Location: Rochester, NY
Posts: 18,861
Received 4,571 Likes on 3,422 Posts
Very nice! So much better, right?

Now paint that dipstick ring with black plastic.
Old 02-21-2016, 05:46 PM
  #26  
hexotic
DIY Cheapskate/Mod
Thread Starter
 
hexotic's Avatar
 
Join Date: Oct 2015
Location: Richmond Hill, ON
Posts: 1,771
Received 587 Likes on 392 Posts
So much better lol. I might just black it all out. Black and chrome.
Old 02-21-2016, 06:24 PM
  #27  
monytx
Registered Member
iTrader: (2)
 
monytx's Avatar
 
Join Date: Mar 2013
Location: Houston
Posts: 1,140
Received 116 Likes on 109 Posts
Really lovin your progress man. Very beautiful sedan. Really wish I had one.
Old 02-21-2016, 06:45 PM
  #28  
hexotic
DIY Cheapskate/Mod
Thread Starter
 
hexotic's Avatar
 
Join Date: Oct 2015
Location: Richmond Hill, ON
Posts: 1,771
Received 587 Likes on 392 Posts
Originally Posted by monytx
Really lovin your progress man. Very beautiful sedan. Really wish I had one.
Thanks man A lot of big ticket items left, Want to do everything at once, but Ill have to be careful with the finances and stretch it out over a few years.
Old 02-21-2016, 10:29 PM
  #29  
blnewt
Movin On!
iTrader: (13)
 
blnewt's Avatar
 
Join Date: Nov 2009
Posts: 24,877
Received 4,940 Likes on 4,174 Posts
Nice update, great touches in that bay, was wondering where you'd been
Old 02-21-2016, 10:32 PM
  #30  
hexotic
DIY Cheapskate/Mod
Thread Starter
 
hexotic's Avatar
 
Join Date: Oct 2015
Location: Richmond Hill, ON
Posts: 1,771
Received 587 Likes on 392 Posts
Winter slow season lol, crazy deadlines at work, and had to dump money into some other stuff besides the car QQ. I've been quietly stalking the forums, just not posting much. Did every fluid possible in the car, and had to drop $500 to fix he leak in the inner cv boot. They had to replace the axel...
The following users liked this post:
blnewt (02-21-2016)

Thread Tools
Search this Thread
Quick Reply: Hexotics' progress thread


All times are GMT -4. The time now is 02:37 PM.